How to Create a Bootable USB Drive for Windows 10? Try Easiest Methods

Keeping a bootable USB by your side is a must to avoid unnecessary headache during unforeseen issues in your Windows as it keeps the reinstallation or repair of your PC well. When it comes to creating a bootable drive, let us assure you that it is pretty simple. However, you can compare the methods based on the amount of time and energy you can put into them.
2 Easy Methods to Create a Windows 10 Bootable USB Drive
In this article, we have brought you two methods to let you know how you can create a bootable USB drive in Windows 10.
How to Create a Bootable USB Drive Using Command Prompt
If you wish to create a bootable USB drive in Windows 10 without using any software then you have to be patient enough to go through this method. The steps below will help you in creating a bootable USB drive manually.
Follow these steps to create a bootable drive in Windows 10:
- First thing first, check if your USB drive is plugged in.
- Now, search Command Prompt and open it as an administrator.
- You have to open the disk management utility using CMD. To open that, you have to type disk part and click enter.
- Next, type in list, disk and click enter to display all the disks that are connected.
- After that, you will have to select your USB drive. To select USB drive, type select disk # and click enter. Replace the # with your disk number.
- In the next step, you have to clean the USB drive. To clean it, type clean and click enter.
- Now, create a bootable partition. Type in create partition primary and click enter.
- Once you have created a partition, you have to select it. To select the partition you have just created, type in select partition. 1.
- Now that you have selected it, type active and hit enter.
- Then, format the USB drive by typing in format data=fat32 and click enter.
- You will now have to type in to assign your USB drive a letter.
- In the last step. Copy all the files from your Windows 10 and paste them inside the USB drive.
That is all you have to do to create a bootable USB drive in Windows 10 manually. It may appear to be tricky to you but if you are not looking for a software to help you out, you can count on this method. Once you perform this method, the bootable drive will be able to install Windows 10 on your device.
Read Also: How to Enable or Disable USB Ports in Windows 10/8/7
How to Create a Bootable USB Drive Using a Software
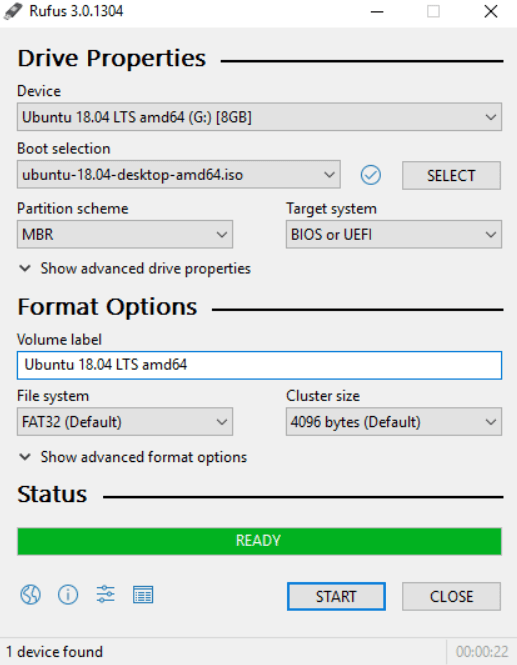
Creating a bootable drive using software is easier than the method mentioned above. You can use Rufus to create a bootable drive for your Windows 10.

Here are the steps to create a bootable drive with software:
- Go to the official website of Rufus and download it.
- Now, click and open rufus.exe
- Plug-in your USB once the user interface of software opens up.
- Then, look for the Create a bootable USB drive option and select an ISO Image from the drop-down.
- Then, you have to click on the button next to the drop-down and select the Windows 10 ISO that you want to install.
- Finally, click on the Start option and wait until the bootable USB drive is created.
Read More: Download & Update USB 3.0 Driver For Windows
So, these are pretty simple steps to create a bootable USB drive in your Windows 10. You can follow these steps if using the former method seems tricky to you. Now that you have a bootable USB drive, plug it in your device and ensure the setup of BIOS. Once you have made all these steps and the aforementioned checks, you will now be ready to install Windows 10 using a bootable USB drive.
Summary
If you are not a tech-expert and are still confused about how to create a bootable USB drive for Windows 10, then you should definitely pick the easiest method to create the drive. Once you have completed following the steps you will proceed with the upgrade or installation of Windows 10. Do you have a word (or more) to add to these methods? If you have anything to share or suggest, feel free to write in the comment box.


