Learn how to defrag computer hard drive, without any hassles. Here is everything you need to know about the same.
If you are experiencing a slowdown in the performance of your system and are considering purchasing a new one, it is high time that you examine and defragment your hard drives. Files that are fragmented, which frequently go unnoticed, might in the long term do harm to your system and lead to poor performance on your computer. Instead, defragmenting your Windows installation should be an integral part of your standard maintenance.
If you observe any of the following symptoms in your computer, it is highly recommended that you perform defragmentation as soon as possible:
In simple terms, defragmentation makes applications run faster while also extending the lifespan of hard drives, improving security, and lowering error rates. If you want to give your computer the boost it so desperately needs, you should read on to learn some quick methods for defragmenting your hard drives in Windows 10, 11 or older versions.
Listed below are different approaches to defrag your hard drive on Windows PC. So, without further ado, let’s get started!
The Disk Defragmenter tool, which is built into Windows, is a useful tool for defragmenting the hard drives of your PCs. If you want to defragment your hard drive quickly in Windows 11 or Windows 10, check out the instructions offered below.
Step 1: First, open Windows Settings. To launch the Windows Settings menu, press the Windows logo + I keys on your keyboard, and then click on the System from available options.
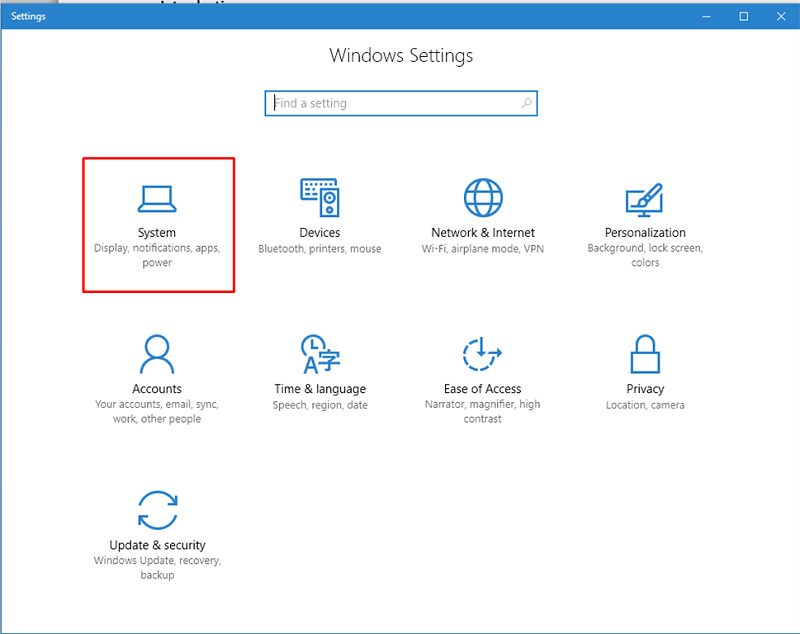
Step 2: In Windows 11, select the “Storage” menu option, then select “Advanced Storage Settings” in the section labeled “Storage management,” and finally select “Driver optimization.”
If you are running Windows 10, navigate to the Storage panel on the left side of the System panel, and then select Optimize Drives from the More Storage settings panel on the right side of the screen.
Step 3: Now, click the Optimize button after you have chosen the drive you wish to defragment from the drop-down menu in the window that appears when you click Optimize Drives.
You also have the option of utilizing an application called Disk Defragment to perform an automatic defragmentation of your hard disk. To accomplish this, continue the steps outlined above until you reach Step 3, then click the Change Settings button. After that, choose the schedule that best suits your needs. For instance, pick a date and time when your computer is turned on but not being used, and after that, click the OK button.
That sums it up nicely. Following the defragmentation of your system, you will notice an increase in the functioning and performance of your computer.
Also Read: Why Hard Drive Not Showing Up In Windows 10 And How To Fix It
Command Prompt is yet another way that you can use to defrag computer’s hard drive in order to improve the overall PC performance. Here is how to defrag hard drive on Windows 7, 8, 10, 11:
Step 1: On your Windows 10, 11 PC, open Command Prompt.
Step 2: After that, write defrag /? in the command prompt window and hit the Enter key from your keyboard. This action will list all supported options by the defrag. Then, in order to utilize defrag, type the following command and press Enter key.
defrag [drive letter] [parameter] [extra parameters]
For instance, if in case, you wish to defrag the drive C then simply write command defrag C:. And, if you want to defrag all of your drives in one go, then simply write defrag /C and hit the Enter key from your keyboard. To complete the process without any glitches, you only need to utilize the right commands depending on the provided parameters on Command Prompt window.
Also Read: Best Hard Drive Health Check Software For Windows
Last but not least, you can also use the batch file feature to defrag hard drive on Windows 11. Follow the steps below to do so:
Step 1: Altogether press Windows + R and type notepad. Then, click on OK.
Step 2: Launch File Explorer in order to view the drives your system has. After that, enter the following commands into text editor:
@echo off
defrag.exe c: -f
defrag.exe d: -f
defrag.exe e: -f
Step 3: Now, you need to save the desired file as .bat file.
Step 4: Then, open the same file under admin privileges in order to defrag computer hard drive.
Also Read: Best Way to Copy DVDs to Hard Drive on Windows and Mac
Defragmentation is a component of Windows cleaning that ensures your disks remain in a flawless and healthy state and that your computer operates efficiently and quickly. We have assisted you in manually defragmenting your disk using the Windows mechanism known as Disk Defragment, which is built into Windows.
On the other hand, you can also make use of any trusted and safe third-party disk cleanup and defragment tool. It can be the best choice for you if you’re looking for something simple to do. Such applications provide comprehensive disk care, including the cleaning and removal of browser garbage as well as the defragmentation of your hard drive to improve its efficiency. Disk cleanup tools automatically streamline your computer which is small in size yet powerful and effective.
So, that was all about how to defrag a computer’s hard drive. We hope you found the information shared in this article helpful. Please feel free to drop your queries or further suggestions in the comments section below. For more tech-related information, you can subscribe to our Newsletter, additionally, you can follow us on Social Media (Facebook, Instagram, Twitter, or Pinterest) so you never miss an important tech update.
If you also want to place some bets on games this IPL season, here are…
If you wish to download and update the RNDIS device driver for Windows 10/11 or…
In the event that you are interested in executing the Bose Headset drivers download and…
If you are also facing the Guided Access not working issue on your iOS (iPhone)…
If you are looking for the best privacy screen protector to use the smartphone freely…
If you are looking for the perfect alternative to Apple Pay, refer to the Apple…