How to Edit a PDF on Mac (Complete Guide)
Today, we are going to discuss how to edit a PDF on Mac for free though. Read the entire guide to know every bit in detail.
PDF (Portable Document Format) files are everywhere and are one of the most popular document formats, also, easier to view and read. Whether you are a writer, a freelancer, a professional, or just a student, you will have to deal with PDF documents on a regular basis. Isn’t it so?
But, many users believe that editing a PDF document on Mac is a bit of a tricky task to accomplish. But, it is not at all, you can easily view, edit and export your PDF documents on Mac. As through this write-up, we have listed down the most workable methods on how to edit a PDF on Mac for Free.
A List of Easy & Quick Methods to Edit PDFs on Mac
In this tutorial guide, you will learn how to edit PDF on Mac, easily & quickly. Below we have explained everything you need to know regarding the same. So, without further ado, let’s get started!
Method 1: Edit a PDF Document on Mac Using Preview Tool
MacOS has an in-built program called Preview for opening and editing PDFs. It is a versatile tool that can let you open different file formats, also is a robust utility possessing lots of much-needed features.
The Preview application allows you to add annotations or comments, merge multiple PDF documents, highlight particular parts of a PDF document, and many more. For better understanding, we have explained all these features below. Let’s have a look at them!
1. Adding or Typing Text on PDF through Preview Tool
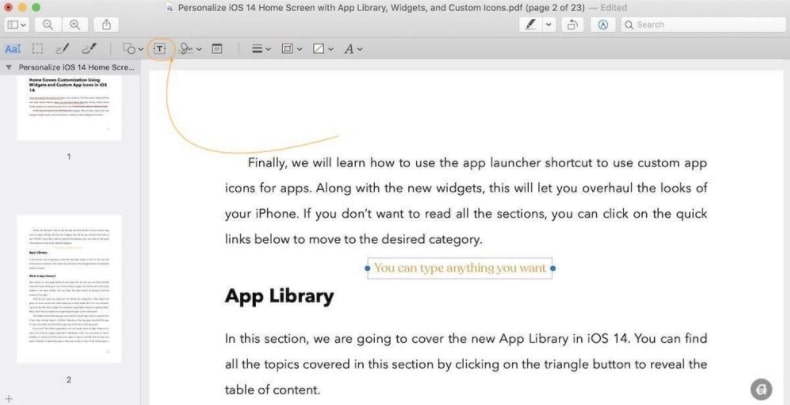
In order to add text to your PDF document, you need to head to the annotation toolbar in Preview. However, this toolbar is hidden or disabled by default in the tool. So, you have to enable it by making a click on the annotation tool presented at the top right side of the screen. After that, follow the instructions below:
- To type new text, make a click on the Text tool, then it will add a text box where you can add a new text. Check the picture below as a reference.
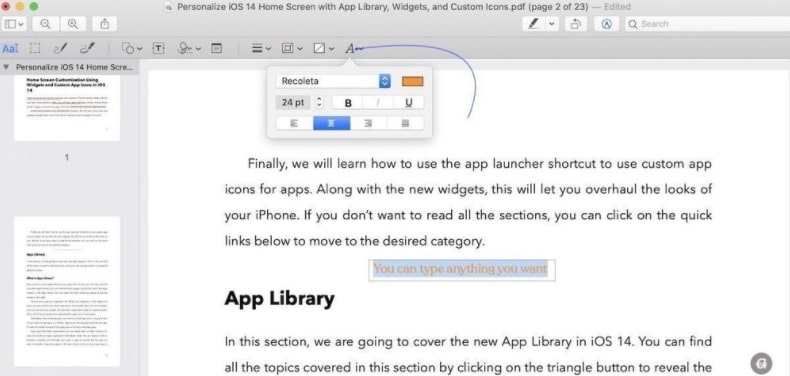
- After that, if you want to modify the text appearance and formatting, then select all the text, and make a click on the Text Formatting option as shown in the image below. Now, you can alter the font size, font style, font color, and do a lot of other things.
Also Read : How to Convert a PDF File into a Word Document? Try Best Ways!
2. Adding Notes to PDF via Preview Tool on Mac
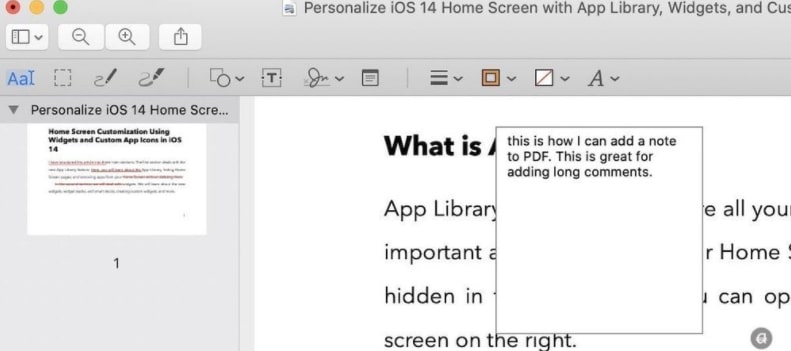
Want to add notes to your PDF document? If yes, then it can be possible. If that’s the case, just make a click on the Note tool to summon a note box that can be dragged anywhere you wish.
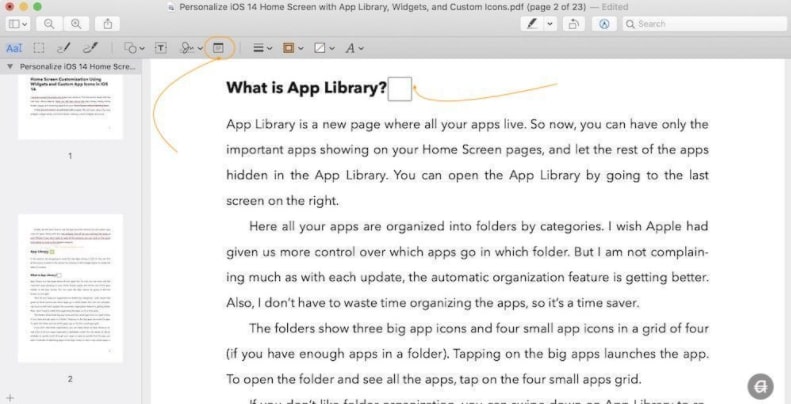
Now, start writing inside the note box, and once you have completed, then click anywhere in the file to merge it.
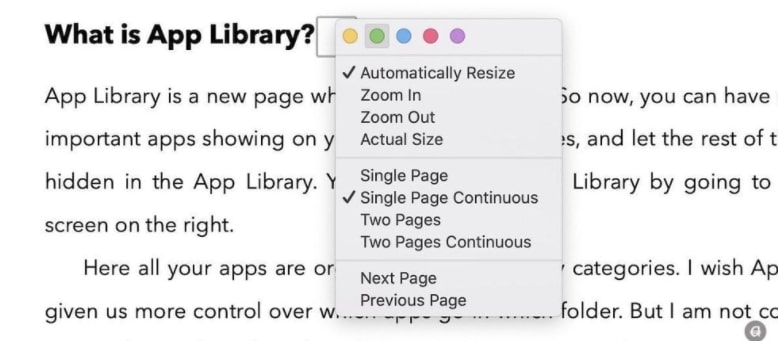
In addition to this, you can also customize the color of the note. For this, make a right-click on the note and select any color you prefer.
Also Read : 10 Best Free Scanning Software for Mac in 2021
3. Rearranging, Deleting, and Rotating PDF Pages via Preview Tool on Mac
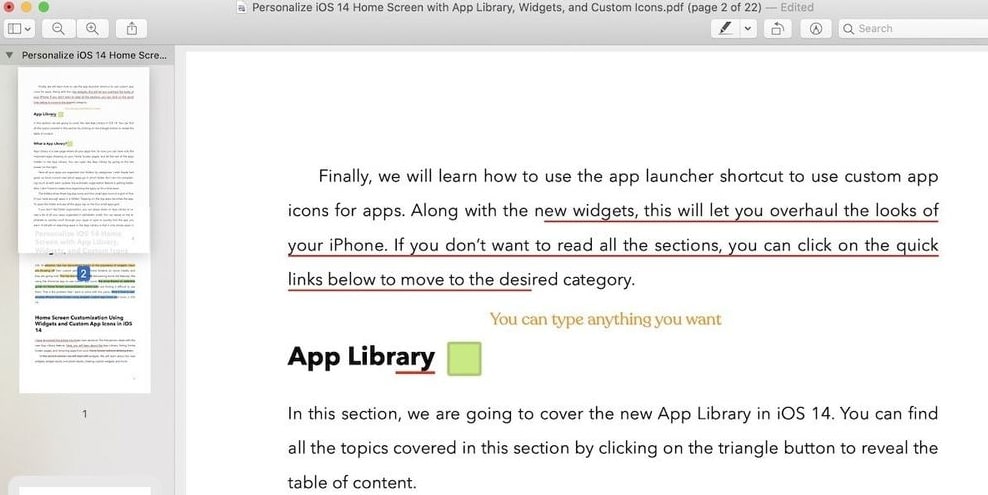
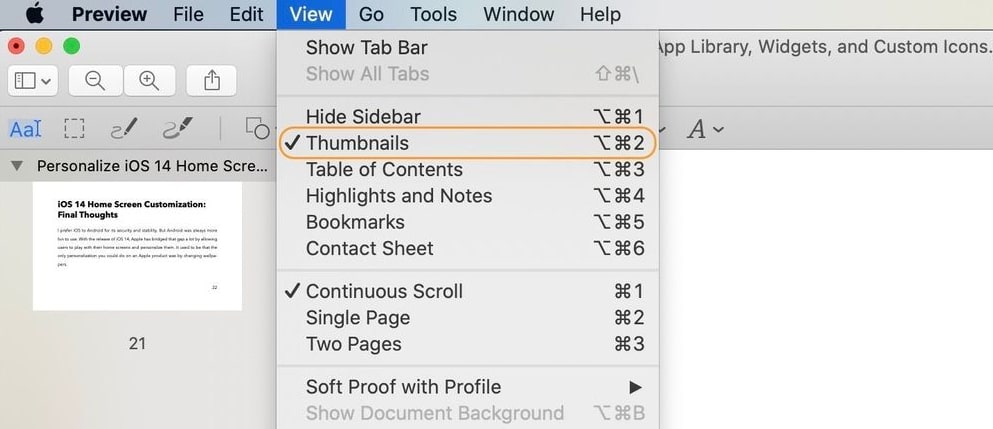
Furthermore, using Preview, you can easily adjust pages within your PDF documents. The user can rearrange, rotate and extract pages pretty easily. So, to try these features, open your PDF and ensure that the page is open in the thumbnail view. If you are unable to see the page thumbnail view, then head to the View and then click on Thumbnails to make the option enabled. Alternatively, you can also press the OPT + CMD + 2 keyboard buttons at the same time.
If you want to rotate a page inside the PDF document, then make a click on its thumbnail and then click on the rotate tool shown at the top. Now, use it as per your preference.
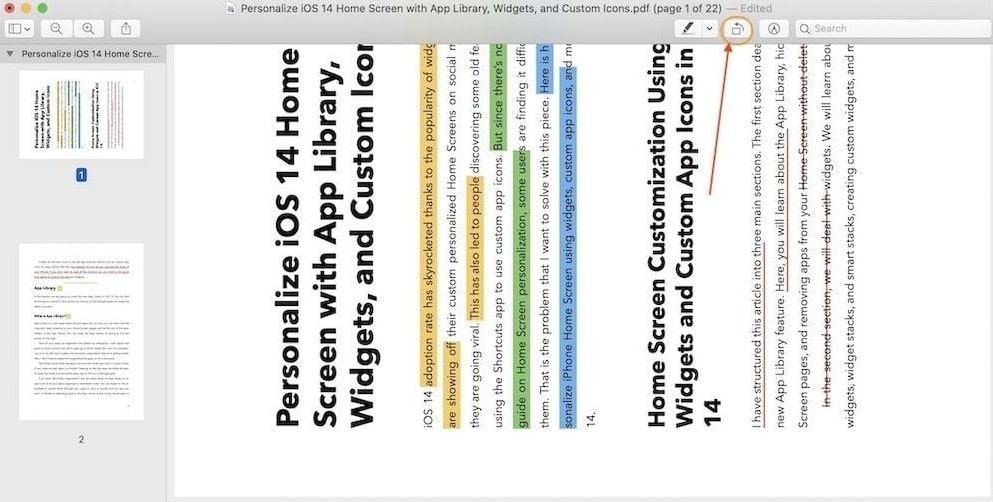
When it comes to rearranging the pages, then one or multiple pages, drag & drop the pages to the location where you want them to be placed.
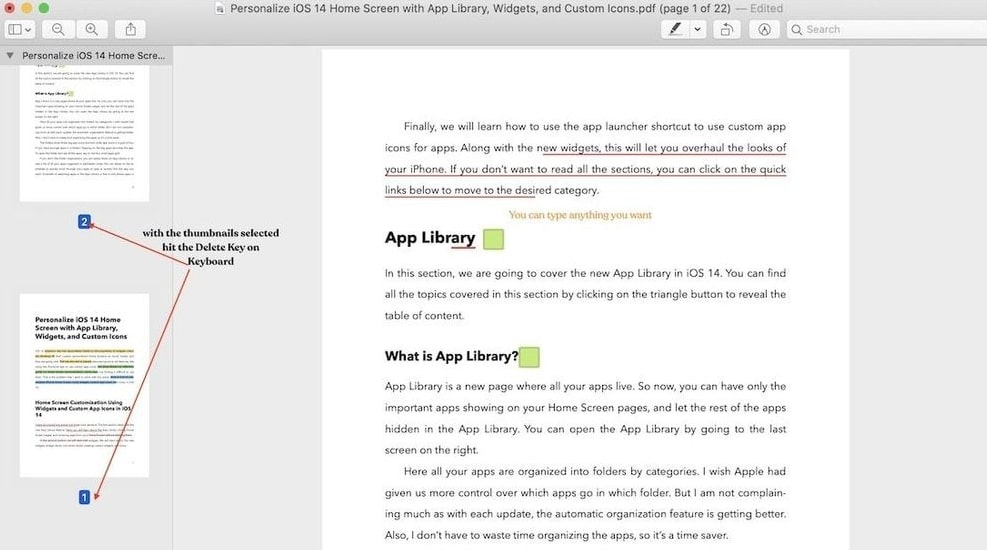
If you wish to remove one or several pages from the PDF, then choose the page you want to remove and DELETE the key to get the task done.
Also Read : 15 Must Have App and Software for Mac of All Time
4. Create or Insert a Signature to PDF on Mac
The Preview application also lets you instantly create and attach your signature to your PDF files. However, you can take it from the scanned pictures or depict a signature directly in the Preview tool itself.
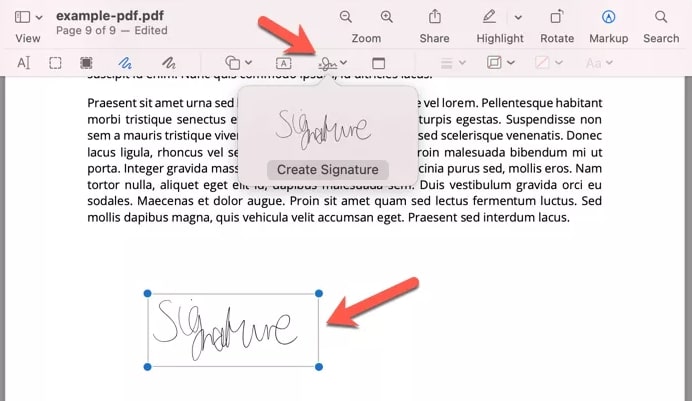
In order to insert the signatures, hit Markup, then Sign. And, if you have already put the sign in the PDF, then select and place it correctly.
If in case, you don’t have a digital signature, then click Create Signature and draw your signature through your trackpad, thereafter, insert it into your document.
5. Merging Multiple PDF Files Through Preview Tool on Mac
Using this built-in application, you can even merge multiple PDF documents into one large PDF file. To do so, follow the instructions below:
- Open the first PDF, then altogether hit CMD + Opt + 2 buttons from your keyboard to launch the thumbnail view.
- Choose Thumbnails from the View menu list.
- After that, make a click on the + icon that appeared at the bottom, and choose Insert Page from File… to add the next PDF.
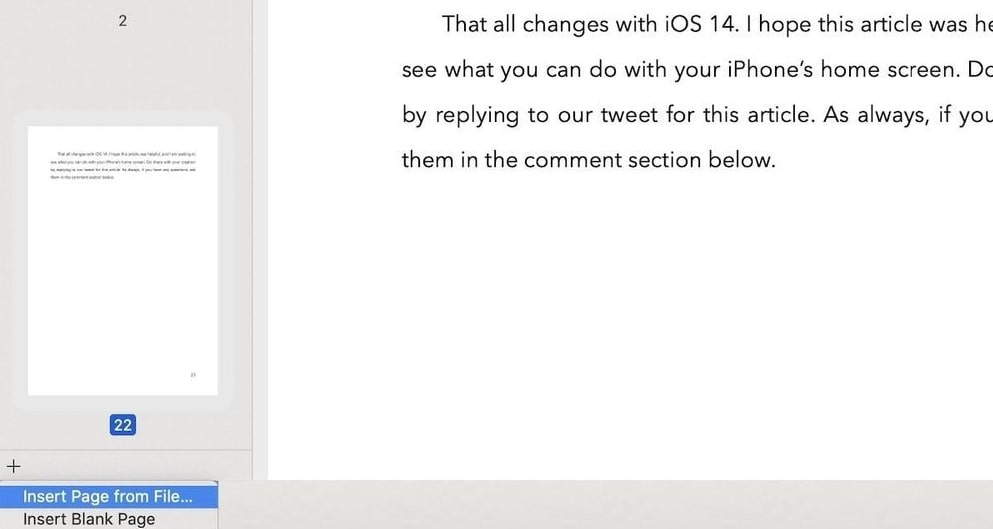
- This will take you to the File Browser, wherein you need to Browse and choose the document that you wish to add. Click on that PDF file, then, Open to import the PDF file.
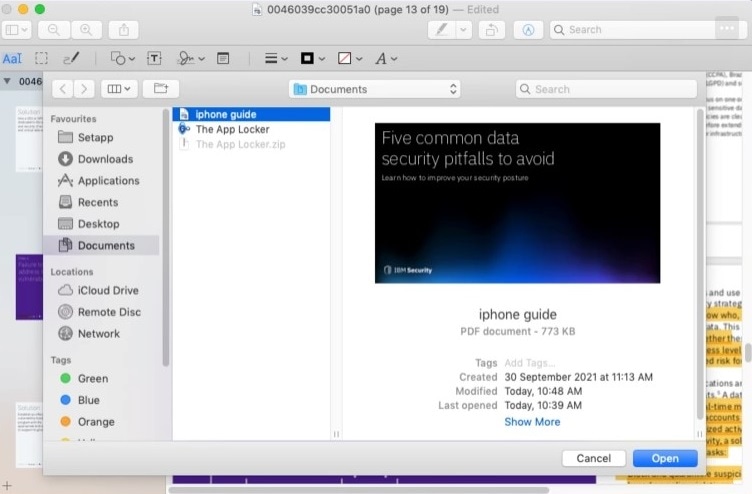
That’s all you need to do in order to combine numerous PDFs into a single document.
Also See: How To Remove Password From PDF Files [Recovery & Reset]
6. Splitting PDFs Using Preview Tool on Mac
However, there is no option in the Preview app to split the files, but still, you can do it with the help of a tested and tried tactic. For this, first of all, you need to select all the PDF pages that you wish to split and save separately. Then, drag & drop the selected pages onto the desktop.
It will automatically create a new PDF document including all the chosen pages.
7. Exporting and Resizing PDFs with Preview Tool
Through the Preview tool, you can even reduce the size of the PDF files, and export them too. So, if you have a larger PDF document that can’t be shared due to the size of the file, then this feature will help you out. Comply with the instructions below to reduce the PDF files size on Mac.
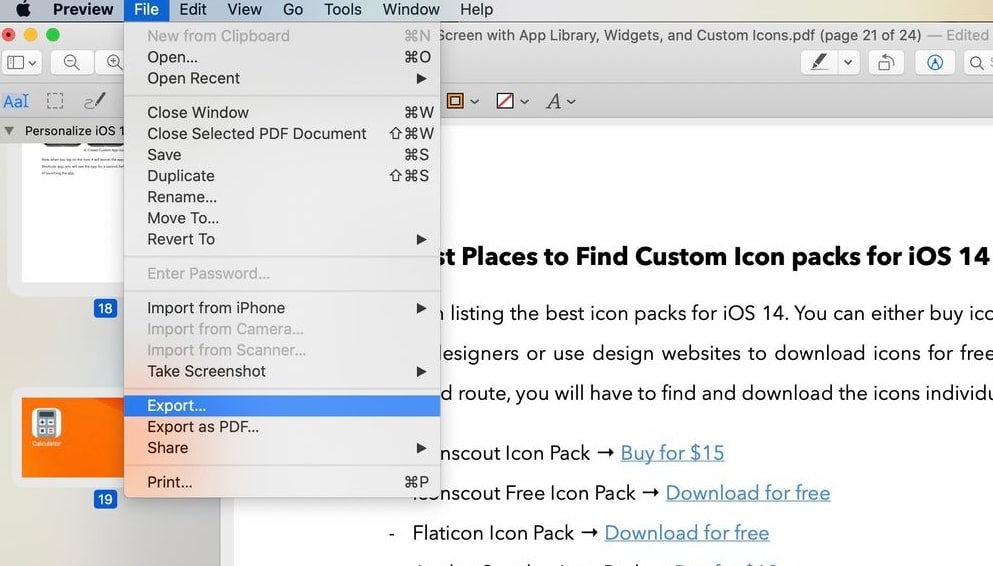
- Launch the PDF file in the Preview app, then head to the File option.
- Choose Export.
- Now, you will see an option named Quartz Filter click on the dropdown menu presented next to it.
- After that, choose the option saying Reduce File Size.
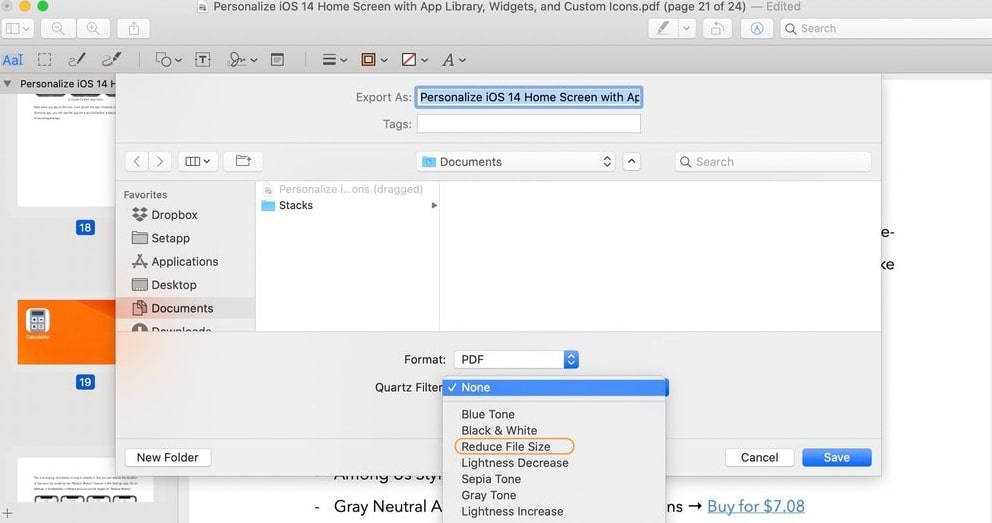
- Once done, then export the PDF file
Also See: 9 Best Free File Rename Software For Mac In 2021
Method 2: Edit a PDF Document on Mac through QuickLook
QuickLook, you can say it is a miniature of the Preview app. It is also an in-built utility in Mac that lets you view, read, and edit your PDFs on Mac at no cost. Like Preview, QuickLook also offers the same editing features except for emendation. Below is a quick tutorial on how to edit a PDF for Free on Mac using QuickLook:
- In the Finder menu bar, choose the PDF document you want to edit and then hit the Spacebar button from your keyboard on Mac.
- Now, to use the editing features in QuickLook, open a file in QuickLook and click the Markup option placed at the top-right edge.
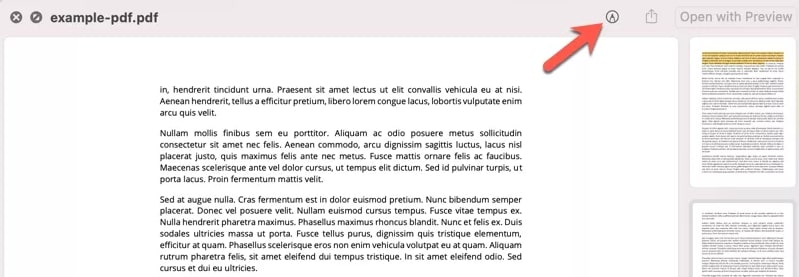
- From there, you can insert shape, text, signature, drawings into your document. Also, you can crop, rotate or resize your PDF document.

- Once you have made all the changes, then click on the Done button to save all the changes directly to your document.
Also See: How to Move Files on Mac – Complete Guide
Method 3: Use Third-Party Free & Paid PDF Editors
No doubt that QuickLook and Preview are the best approaches to editing your PDF documents on Mac. But, if you want to run advanced editing operations like edit the text of PDF documents, or Optical Character Recognition (OCR), then you will need to install any third-party PDF editing app for Mac (free or paid). We have tried numerous such kinds of applications and found two of them really beneficial. Below, we have explained each, just read them and choose the best one for you.
1. Adobe Acrobat
One of the dedicated apps to view or edit PDFs without any hassles. The tool can be used to convert distinct file types to PDF, create or add digital signatures, combine multiple PDFs into a single file, extract pages from PDFs into multiple smaller chunks, fill forms, and many more. You can acquire Adobe Acrobat as a single-off payment, but if you want to have the access to the most latest editing features as well as cloud storage of around 200GB, then you need to subscribe to Adobe Acrobat DC as a monthly payment instead.
2. PDFExpert
Move on to the next, this PDF editor lives up to its name, PDFExpert. It is a robust and unique PDF editor available for Mac. With this tool, you can do all the things like adding notes, organizing PDF pages, annotating PDFs, inserting electronic signatures, and many more. Unlike others, this PDF editor for Mac also lets you edit the original text of the document, adding comments to the highlights, export the highlights, and whatnot. Along with this, this PDF editor also displays the summary of all the highlights.
Furthermore, the PDFExpert comes with a variety of built-in tools for modifying page numbers, reducing the size of the file, crop PDF pages, and so on.
Also See: 11 Best Ways to Speed Up Your Mac in 2021
Which is the Best Way to Edit PDF on Mac?
So, these were some of the best methods to view, read, and edit PDFs on Mac. Now, if you are wondering, “Which method should I use?”
Well, if you are the one who doesn’t work with PDFs frequently, then an in-built application of Mac-like Preview and QuickLook, are the best mediums to edit a PDF for free on Mac.
By contrast, if you are a heavy Mac user and need extra features to fulfill your editing requirements, then you can either choose Adobe Acrobat or PDFExpert.
That’s all as for now, we hope the guide helps you in the right direction. If you have any questions or further suggestions then do tell us in the comments below. Additionally, tell us in the comments, which is the best way of organizing a PDF document on Mac.
Lastly, before you go, do subscribe to our Newsletter for reading more troubleshooting tips & tricks related to the tech niche. Apart from this, you can also get connected with us through social media: Facebook, Twitter, Instagram, and Pinterest.


