How to Fix Encryption Credentials Have Expired (Printer Issue)
You can follow this quickest and easiest guide to fix the encryption credential issue to use the printer on Mac.
Printing is among the most commonly performed tasks on a computer. You may need to print various documents and photos for different purposes. And it is frustrating if you are unable to do so, as your printer encryption credentials have expired.
However, now that you have arrived at this article, you can put your worries aside. Here, you are going to learn how to fix this irritating printer issue quickly and efficiently. Before discussing these solutions, let us discuss what triggers this problem in the first place to ensure better troubleshooting.
Why Printer Encryption Credentials Have Expired
You may be experiencing this annoying printer problem for the following reasons.
- Random network or printer bugs
- Your AirPrint driver is set as Secure AirPrint
Above, we looked at what may have caused the issue you are experiencing. Let us now learn how to fix it.
Fixes for Encryption Credentials Have Expired Printer Problem
You can apply the following solutions to get rid of the error hampering your printing experience.
Fix 1: Try restarting your printer and network
A simple network and printer restart can fix the random bugs that may have led to the issue you are struggling with. Hence, you can follow these steps to restart your printer and network.
- To begin with, turn off your modem by pressing its power button.
- Secondly, follow the path Setup>Network Setup>Restore Network Settings.
- Now, power off your printer.
- You can now power on the modem and wait until it establishes the internet connection.
- Power on your printer and get it connected to the network.
- You can add another printer driver after connecting the printer.
- Now, navigate to the Apple Menu>System Preferences>Print & Scan path.
- You can now select and delete your printer.
- Click on the Plus sign and select the Add Printer or Scanner option.
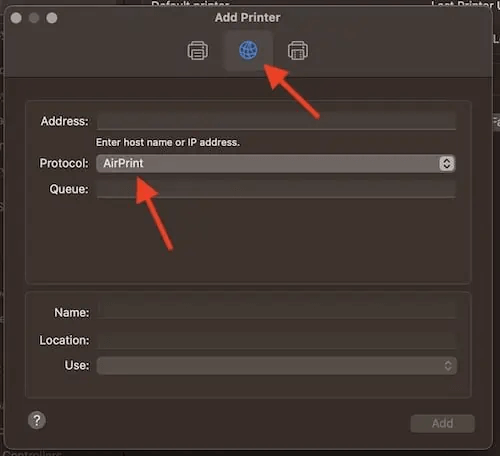
- Now, select the Use or Print Using menu and choose AirPrint.
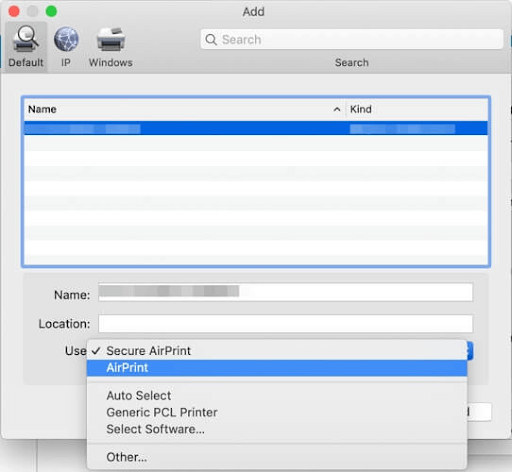
- Choose the Add option to continue.
- Lastly, restart your printer and computer.
Also Read: How to Fix Windows Cannot Connect to Printer
Fix 2: Reinstall your printer with the AirPrint protocol
You may find the encryption credentials have expired if you have installed an AirPrint driver and set it as Secure AirPrint. In such a situation, you can reinstall the printer by following the below directions to solve the problem.
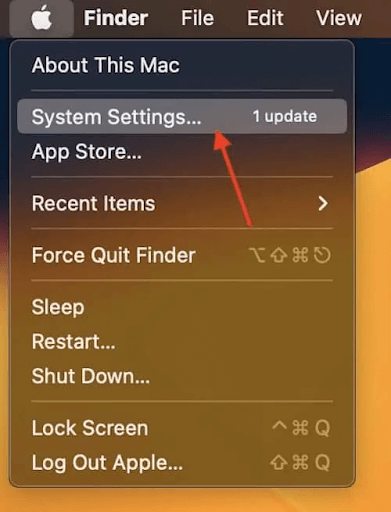
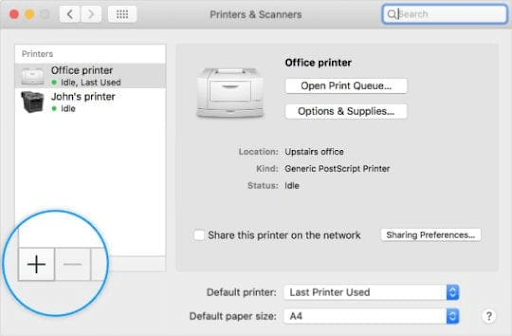
- Firstly, choose System Settings or System Preferences from the Apple menu.
- Secondly, locate the Printers and Scanners option.
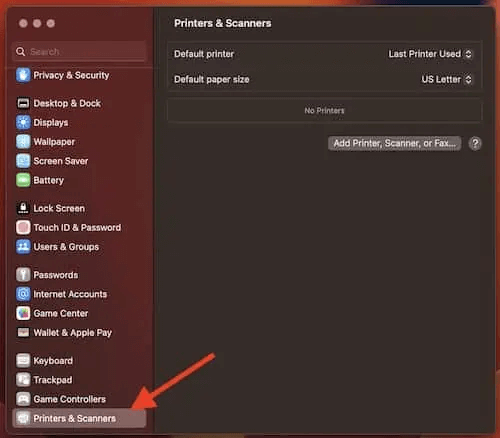
- You can now choose Your Printer.
- Click on the Minus or Remove button.
- Now, move to the Library/Printers option and drag your old printer folder to the Trash.
- Empty your Mac’s Trash.
- You can now power off the Mac and unplug your printer from the power source.
- Power on your Mac and plug in the printer.
- Now, return to the Printers and Scanners option.
- You can now find and install your printer. However, remember to change the protocol from Secure AirPrint to AirPrint.
Also Read: How to Restore Printer Connection on Windows 10, 8, 7
Fix 3: Try printer network settings reset
Resetting the printer network settings is another option you can try if your printer is not functioning. Here is how to change the settings.
- To begin with, turn off and unplug your router.
- Secondly, get your computer restarted.
- Now, find your printer’s Control Panel and select Setup.
- Select Restore Network Settings from the Network Setup.
- Turn off the printer and wait for at least thirty seconds before plugging in the router.
- After restoring the network, you can power off the printer.
- Lastly, you can access your printer’s Wireless Setup Wizard.
Also Read: How to Fix Printer Slow Printing
Fix 4: Reinstall your printer using the LPD protocol
If you have an older printer, you can try reinstalling your printer via LPD protocol to fix the printer encryption credentials have expired issue. Here are the steps to do it.
- Firstly, navigate to the System Settings/System Preferences from the Apple menu.
- Secondly, choose Printers and Scanners from the on-screen options.
- Now, you can add a printer by clicking on the Plus Sign.
- You can now choose the LPD option from the IP tab, or Line Printer Daemon from the list of protocols.
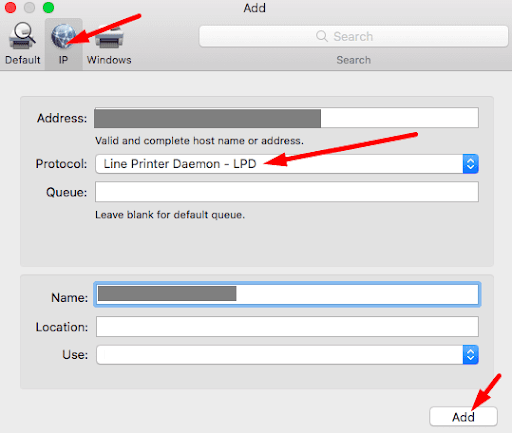
- Lastly, name your printer, input its IP address, and click Add.
Also Read: How to Fix Windows Cannot Connect to Printer
Fix 5: Create a new certificate
If none of the above solutions work to solve your problem, you can follow the below steps to create another self-signed certificate.
- To begin with, open your Mac and input your printer’s IP address in the browser.
Note: You can follow the path System Settings/Preferences>Printers and Scanners> (Your Printer) to locate the IP address of your printer.
- Secondly, choose Network from the available options.
- Click on Advanced Settings.
- You can now click on the Plus Sign.
- Select Certificates and then choose the Configure option.
- Tap on the option to Create a New Self-Signed Certificate.
- Lastly, click on the Finish option to complete the certificate creation process.
Also Read: Printer Driver Is Unavailable On Windows 10, 11 [Fixed]
Printer Encryption Credentials Have Expired Fixed
Hopefully, you can now effortlessly fix the printer credentials issue on your Mac. You can begin fixing it with the first solution and continue the troubleshooting until the issue gets resolved. However, if you have any doubts or suggestions about this piece of writing, please leave us a comment. We will be glad to address all your concerns.


