Epson L130 Printer Driver Download and Update (Freely)
The post highlights the best methods to find, download and install the Epson L130 printer driver on Windows 11, 10, 8, 7. For more information continue reading!
Epson is one of the most renowned manufacturers for producing supreme quality multifunctional printers and numerous other computer peripherals. Epson L130 is an extraordinary printer and has the potential to print anything in high quality.
Instead of being a high-quality and multifunctional printer, sometimes it doesn’t deliver the desired results. This majorly occurs when the driver file has become outdated or goes missing. Luckily, simply updating the Epson L130 printer driver will fix all issues related to the printer.
For upgrading printer drivers, you have probably heard about the numerous methods, a few of which require expertise in the technical niche. So, in order to help you, we have brought three methods to easily & quickly perform the Epson L130 driver download on Windows PC.
Easy Methods to Download, Install & Update Epson L130 Printer Driver
Have a look at the methods below for performing the Epson L130 printer driver download on Windows PC. Without further ado, let’s get started!
Method 1: Manually Download Epson L130 Driver from Official Website
You can get the latest drivers for your Epson printer from its official website. The manufacturer provides full support for their products. To use this method in order to perform the Epson L130 driver download on Windows, you only need to follow the procedure explained below:
Step 1: Go to the official website of Epson.
Step 2: Hover over the Support tab and choose Printers from the drop-down menu.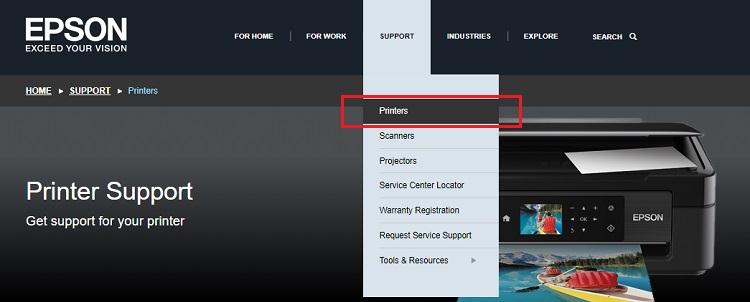
Step 3: Type Epson L130 in the search box and choose the correct search result from the list.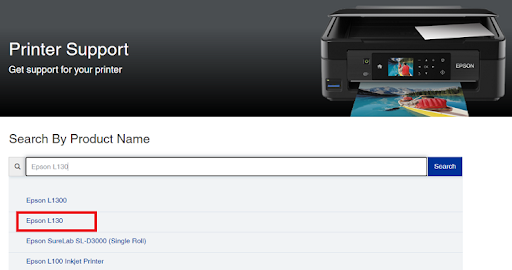
Step 4: Now, you will be redirected to the Epson L130 driver download page. Here you need to first select the particular version of the Windows OS that you are using and scroll down the page until you find the Drivers option.
Step 5: Thereafter, click on the Download option presented next to the Epson L130 printer driver.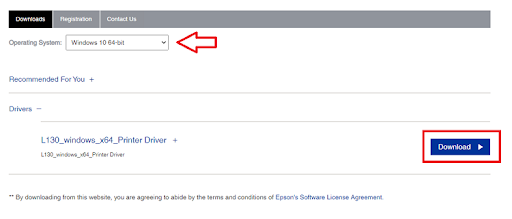
Step 6: Wait for the download process to finish. Once done, double-click on the executable file and follow the installation wizard to proceed.
Step 7: Next, follow the instructions on your screen to successfully install the Epson L130 printer driver on your PC. Lastly, reboot your computer system to save new changes.
Read Also: Epson L3150 Driver Download, Install and Update on Windows
Method 2: Use Bit Driver Updater to Automatically Install Epson L130 Driver (Recommended)
If you don’t have time or the required technical skills to update drivers manually, then you can automatically update outdated PC drivers with Bit Driver Updater.
Bit Driver Updater is a globally recognized driver updating tool that instantly identifies your device and finds the latest driver updates for it. The software is available in free as well as pro versions. Its pro version takes only one click of the mouse to update all outdated drivers simultaneously. This makes the overall process much easier and less time-consuming. While the free version allows you to update one driver at a time.
Now follow the steps below to automatically update Epson L130 printer driver using Bit Driver Updater:
Step 1: Firstly, download the Bit Driver Updater from the button below.
Step 2: Run the downloaded file and simply follow the onscreen instructions to finish the installation process.
Step 3: Once installed, launch the Bit Driver Updater on your system and click on Scan from the left menu pane.
Step 4: Wait for the scanning to be completed. After that, check the scan results and then click on the Update Now button available beside the driver you want to update. You can instead click on the Update All button. This action will update all obsolete PC drivers in one go.
However, in order to perform bulk driver downloads at once you will have to upgrade to the pro version of Bit Driver Updater. The pro version also gives 24/7 technical support and a full money-back guarantee.
What’s more, Bit Driver Updater’s pro version has the ability to automatically create a backup of currently existing drivers before updating them so old versions of drivers can be easily restored if required. See how easy and quick it is to update outdated device drivers with Bit Driver Updater. Restart your system to save the recently made changes.
Method 3: Update Epson L130 Printer Driver in Device Manager
Last but not least, you can also use Windows’ in-built utility tool called Device Manager to find and install the latest driver update for the Epson L130 printer. To do so, follow the steps below:
Step 1: On your keyboard, altogether press Windows + X keys and choose Device Manager from all available options.
Step 2: The above action will take you to the Device Manager. Here you need to find and double-click on Printers or Print Queues to expand its category.
Step 3: Then, right-click on Epson L130 and select Update Driver Software to proceed.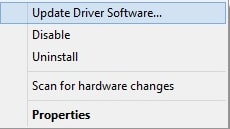
Step 4: From the next prompt, choose Search Automatically for Updated Driver Software.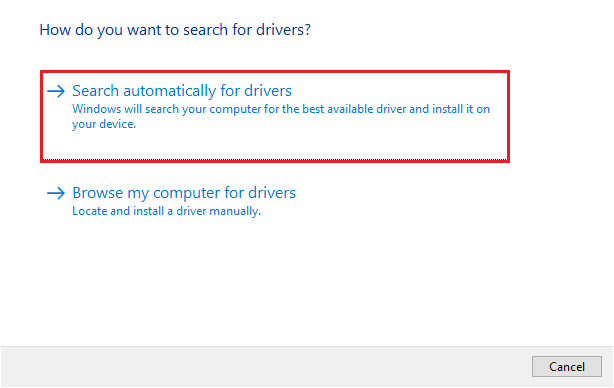
Now, sit back and wait for the Device Manager to search and install the available driver updates for the Epson L130 printer. Once everything is done, then reboot your computer to apply the new drivers.
Read Also: Epson L4150 Driver Download and Update on Windows PC
How to Download, Install & Update Epson L130 Printer Driver on PC: Explained
That’s all! So, this is how you can perform the Epson L130 driver download on Windows operating systems. Try these ways to find and install the most compatible driver for your Epson printer.
We suggest you use Bit Driver Updater to keep all system drivers up to date. Please drop your queries or further suggestions in the comments section below.
If you liked the information shared in this article, then do subscribe to our Newsletter.

