How to Find Mouse Pointer in Windows 10, 11 (Laptop & PC)

If you are losing sight of the mouse pointer on your PC or laptop, then try the following methods to find the mouse pointer in Windows 11, 10.
Undoubtedly, displays are getting better and bigger every year, so there’s no doubt that we sometimes lose track of the mouse pointer on the computer screen. In case you are utilizing multiple displays, locating the tiny mouse pointer could become an even more difficult task.
Finding the cursor (also known as the standard white mouse pointer) on the computer screen can be daunting at times, but tweaking the following settings helps you easily track it down on your screen. This post explains how to find a mouse pointer in Windows 10, 11 with a few clicks.
A Step-by-Step Guide To Find Mouse Pointer in Windows 11, 10 (PC & Laptop)
The tutorial contains different methods to find the cursor on the screen. However, you do not need to apply them all, simply work your way down and choose the one that works best for you. Now, without further ado, let’s get started!
Method 1: Use Native Options to Find Mouse Pointer in Windows
Windows has a default option that will allow you to find the cursor on the screen instantly. You can use Windows built-in Native options to find mouse pointer in Windows 10, 11. Here is how to do that:
Step 1: Press the Windows logo key from your keyboard, search Settings in the search box, and open it.
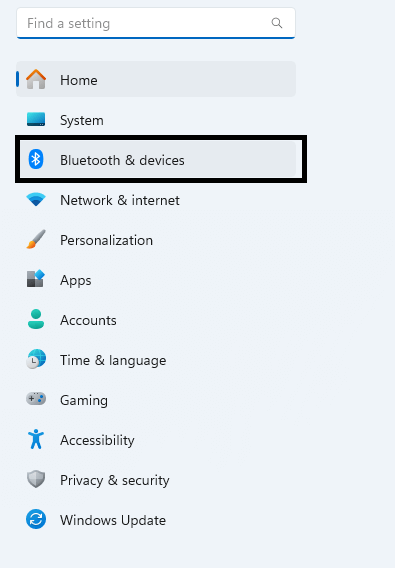
Step 2: In Windows Settings, locate the Bluetooth & Devices option on the left pane and click on it.
Step 3: Scroll down the page and choose Mouse from all available options on the right.
Step 4: Next, click Additional Mouse Settings under the Related Settings option.
Step 5: This will launch the Mouse Properties window, here you need to choose the Pointer Options tab.
Step 6: Now, find the Show location of the pointer when I press the CTRL key option and enable the toggle available next to it.
Step 7: Click Apply and OK to save recent changes. You can now close the Windows Settings app.
Now, press the CTRL key from your keyboard to show the mouse pointer on your screen. You should now see a circle around your cursor on the computer screen, making it quite simple to locate the mouse pointer in Windows.
Method 2: Find the Mouse Pointer Using PowerToys
Well, you can seamlessly find the mouse pointer in Windows with the Native option, but utilizing Microsoft PowerToys offers a few notable advantages. PowerToys was initially designed by Microsoft but then open-sourced afterward. It comes with a set of utility tools for customizing your Windows, which includes features such as renaming multiple files at the same time, extracting text, File Explorer add-ons, and more. Here is how to find a lost cursor on a laptop or PC with PowerToys.
Step 1: First, download the PowerToys application either from the Microsoft Store or GitHub. We suggest downloading the app from GitHub.
Step 2: On GitHub page, scroll down until you find the Assets section. If your system has an ARM processor, click the Power Toys Setup ARM64 option. In case you have an X64 processor, click the Power Toys Setup X64 option.
Step 3: A pop-up window will appear, click the Save option to proceed.
Step 4: Now, run the downloaded file, and mark the checkbox available before the I agree to license terms and conditions option.
Step 5: After that, click the Install option and then click the Yes option to begin the installation process.
Step 6: After installing, launch PowerToys on your system, and click the Mouse Utilities option.
Step 7: Under Find My Mouse, turn on the toggle presented next to the Enable Find My Mouse option.
Step 8: Next, you can either select the Press Left Control twice option or the Shake mouse option shown adjacent to the Activation method. Enabling this option will help you find your cursor when you utilize that (CTRL) shortcut. Additionally, it throws a spotlight around your cursor, making it quite easy to find the mouse pointer in Windows.
Step 9: If you wish to change the mouse pointer’s appearance, click the Appearance & behavior option. This option will allow you to alter the spotlight color, background color, spotlight initial zoom, radius, animation duration, and overlay opacity.
That’s all, now when you try to use the shortcut to locate the mouse cursor, it shows your mouse pointer as per your customized appearance.
How to Find Lost Cursor on a Laptop & PC: Explained
However, the Native option is a good way for most of the time when it comes to finding mouse pointer in Windows 10, 11 (PC & Laptop). But, it only adds a white big circle around the cursor, highlighting it. Whereas, the PowerToys lets you completely customize the mouse pointer, allowing you to add a plethora of other useful features or tools to your armor.
So, that was all about how to find a mouse pointer in Windows 10, 11. We hope you liked the information shared in this article. If you have any questions or additional information, then please feel free to tell us in the comments section below.
Lastly, you can subscribe to our Newsletter for more tech-related articles, how-to guides, and more.


