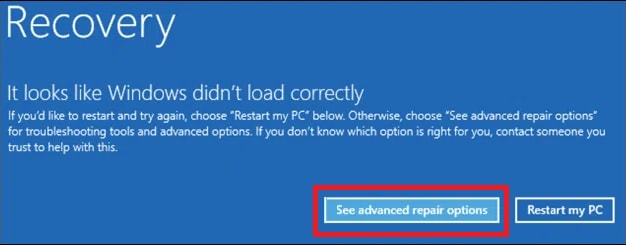
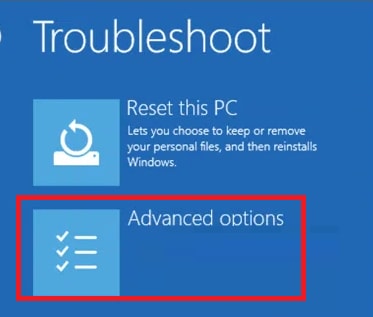
Take the help of this step-by-step guide to fix automatic repair loop that couldn’t repair your PC.
The Automatic Repair utility is one of the best programs for Windows PC that allows you to restore the system to its original or previous source whenever you face any problems. The tool diagnoses what factors are causing the errors in the system and helps in solving them.
But what if instead of solving problems, Automatic Repair starts creating them. Sometimes, due to one or more boot errors, the tool may fail to work properly. If you want to Fix Automatic Repair loop in Windows 10 that couldn’t repair your PC then this article will list some best and effective ways to do that.
The oncoming sessions of this write-up will include the best and safest ways to fix Automatic Repair loop in Windows 10. Apply these fixes one by one until you get rid of the issue.
If you have connected some devices recently and then started facing automatic repair couldn’t repair your PC issues. Then you need to disconnect or remove such devices. Some newly installed devices may be interrupting the working of the repair tool and causing the issue.
Also Read: How to Fix Service Control Manager Error on Windows 10
If disconnecting does not work, you should take the help of the Command Prompt to run the System File Checker and Disk check commands. These commands will help you determine the exact problems behind the issue and fix Automatic Repair loop in Windows 10. Here’s how:


After the process is complete, all the boot issues will be solved and now you can start the PC perfectly without any startup repair couldn’t repair your PC issues. The scan will restore and replace the missing files on your PC to run it smoothly.
Also Read: Fixed: Black Screen Problems on Windows 10
If the above process does not work, you should repair and restore Windows Registry. When the Registry is restored to the previous state, the PC will run just as you want very easily. Take the help of the steps listed below to restore the Windows Registry through the boot menu:
After the process is complete, you can restart the PC quite easily without any boot issues. If the problem of windows 10 automatic repair couldn’t repair your PC persists, follow the next method.
Also Read: 18 Best Free PC Cleaner Software For Windows 10, 8, 7 In 2021
If the above solution does not work, you can also scan the system for Deployment Image Servicing and Management (DISM). This scan will repair the corrupted files on the system. Follow the steps below to do that:
After the scan is complete, restart the system. You will get the perfect answer for how to fix automatic repair couldn’t repair your PC Windows 10.
Also Read: How to Fix Error Code 0x800f08a in Windows 10 – TechPout
The next thing you can try to fix Automatic Repair loop in Windows 10 that couldn’t repair your PC is to limit the boot loops. Take the help of the following steps to do that:
After the process is complete, close the window and boot the windows perfectly. Now you will not face the windows 10 automatic repair couldn’t repair your PC.
Also Read: How to Fix Windows 10 Taskbar Not Working
If none of the above-listed methods work to fix Automatic Repair loop in Windows 10 that couldn’t repair your PC. Then you need to reset the Windows. Resetting the device will erase every setting or app that is forcing the utility to loop. Follow the below-listed steps to rest the Windows:
Once the PC is reset, set up a new device as per your requirements. Now you won’t face startup repair couldn’t repair your PC issues.
Also Read: How to Get Help in Windows 10 [Complete Guide]
So these were some easy methods to Automatic Repair loop in Windows 10 that couldn’t repair your PC. With the help of one or more of these methods, you can boot the system easily.
The repair screen will not repeat on loop and you can enjoy using the PC as meant. For precision, we suggest that you go through these methods simultaneously and apply the fixes in the same manner.
If you have any other doubts related to how to fix automatic repair couldn’t repair your PC on Windows 10, then write to us in the comments. We will get back to you as soon as possible. If you need interesting tech updates, blogs, and tutorials delivered to your inbox, subscribe to the newsletter from the Techpout blog.
If you wish to download and update the RNDIS device driver for Windows 10/11 or…
In the event that you are interested in executing the Bose Headset drivers download and…
If you are also facing the Guided Access not working issue on your iOS (iPhone)…
If you are looking for the best privacy screen protector to use the smartphone freely…
If you are looking for the perfect alternative to Apple Pay, refer to the Apple…
How to scan documents on an iPhone? If you have the same question, then you…