How to Fix Cast to Device Not Working on Windows 10,11
Have you found the Cast to Device functionality is not working on your computer? If yes, you can go through this post to know the quickest and easiest ways to solve this problem.
Casting allows you access to the computer’s desktop on the big screen of your TV for a fun-filled get-together, movie night, or professional presentation. However, it can be annoying if the cast to a device feature is not working on your PC.
Hence, this article describes the best possible fixes to this irritating issue. However, before attempting to troubleshoot, it is a good idea to understand the underlying causes of the problem to solve it quickly and efficiently. Thus, let us take a look at the same before looking at the solutions.
Why Is Cast to Device Not Working
Here are various reasons Miracast may not work on your Windows 10/11 device.
- Outdated network adapter driver
- Streaming permissions are not set correctly
- Network sharing is disabled on your computer
- Outdated graphics driver
- Hardware problems
- Interference from Windows Defender Firewall
- Random system bugs
Above, we listed some factors that may be responsible for the mirror cast not working on the Windows 10/11 issue. Let us now learn the most suitable ways to fix it.
Fixes for Cast to Device Not Working (Quick and Easy)
You can apply the following tried and tested solutions if the cast to device feature is not functioning on your PC.
Fix 1: Ensure your computer supports screencast
Before trying any complex solutions, you should check whether your PC has the screencast feature. Here are the steps to do it if the cast to device feature is not working on your computer.
- To begin with, access the Settings panel using the Windows+I keyboard shortcut.
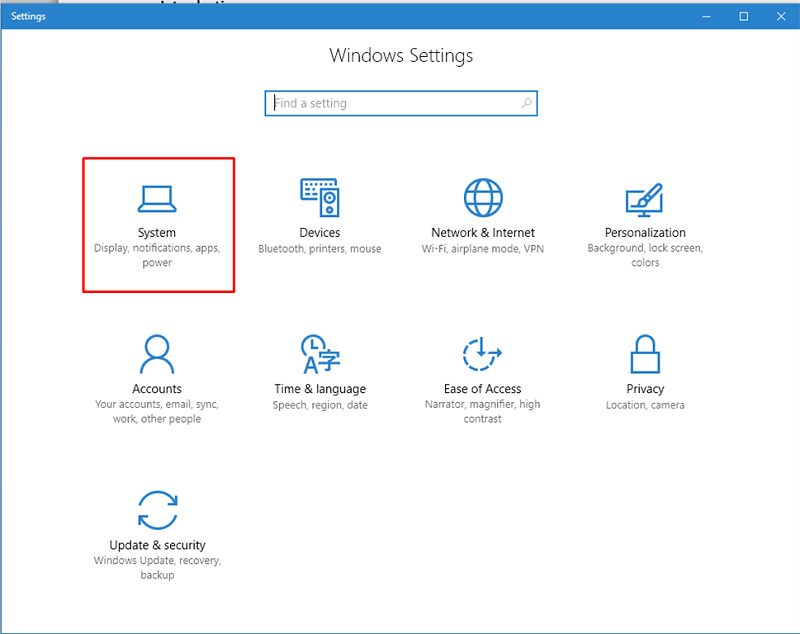
- Secondly, select System from the menu on your screen.
- Now, choose Display from the options present in the System settings window.
- You can now navigate to the Scale & layout option.
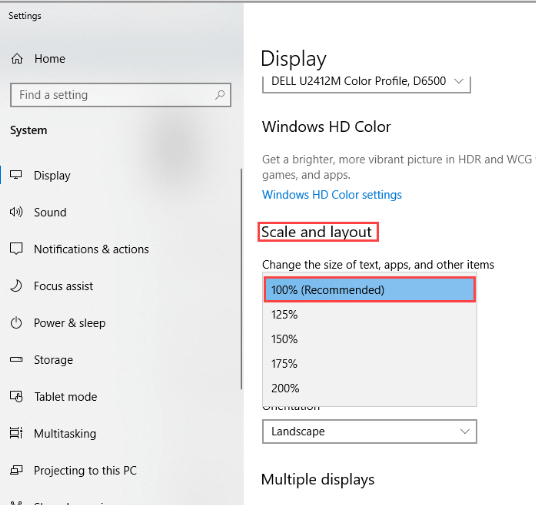
- Choose Multiple displays from the Scale & layout options.
- Now, check whether or not the option to Connect to a wireless display is available. If the option is available your computer supports screencast, otherwise it does not support it.
However, there is no need to panic if screencasting is unavailable on your computer. You can use a physical cable to connect your computer’s screen to the big screen.
Also Read: Miracast on Windows 10,11 PC: Download, Install, Update & Setup
Fix 2: Ensure network sharing is enabled
Network sharing must be enabled on your computer for the screencast option to work. Hence, here is how to make sure the network sharing is enabled if you are experiencing problems with the cast to device feature.
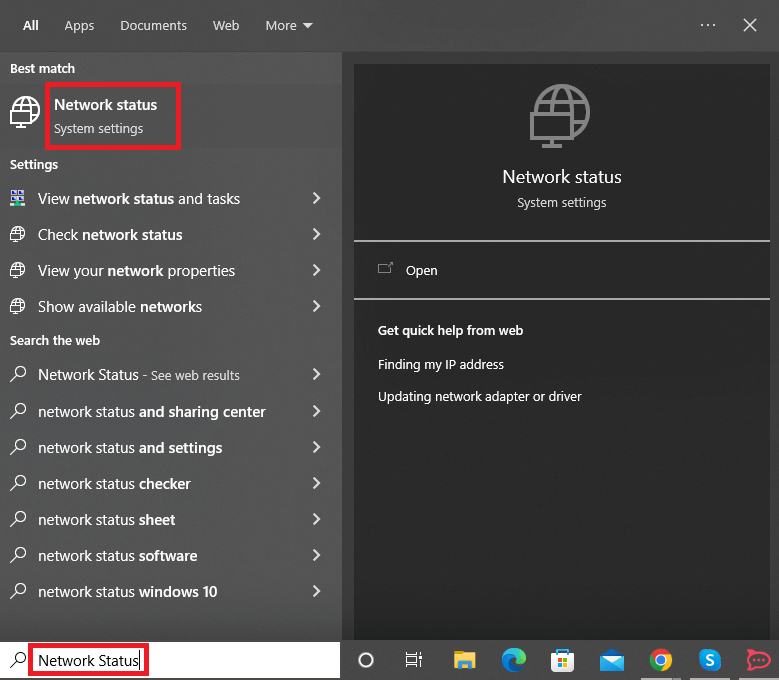
- To begin with, input Network in the Windows search box.
- Secondly, choose Network status from the options you have on your screen.
- Now, scroll down to the Network and Sharing Center and click on it.
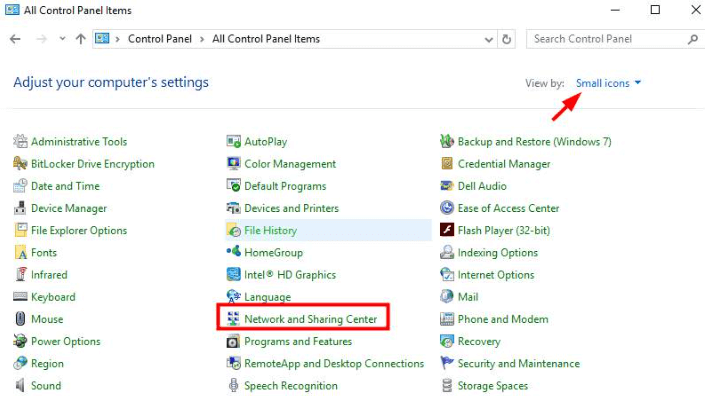
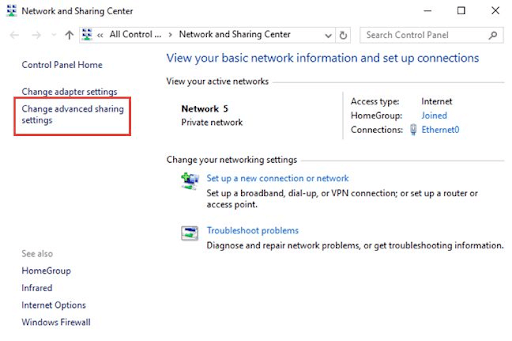
- Choose the option to Change advanced sharing settings from the left panel of the Network and Sharing Center window.
- Ensure the options to Turn on network discovery and Turn on file and printer sharing are checked.
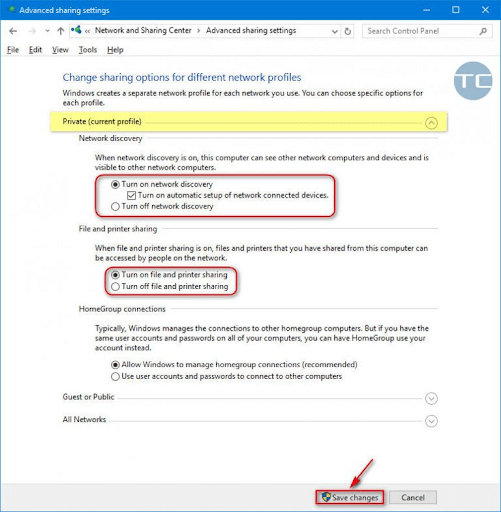
- Click on the Save Changes button.
- Lastly, try using the cast to device features to check whether or not it is working. If the feature still does not work, you can try the other solutions shared in this article.
Fix 3: Try resetting the stream permissions
Streaming permissions determine whether or not other devices can access your media. These permissions are reset automatically after an update. However, improper permissions reset can be a reason the cast to device does not work on your PC. Hence, you can follow the below steps to reset the permissions via the Windows Media Player to solve the problem.
- To begin with, access Windows search using the Windows+S keyboard shortcut.
- Secondly, input Windows Media Player in the on-screen box and select the first search result.
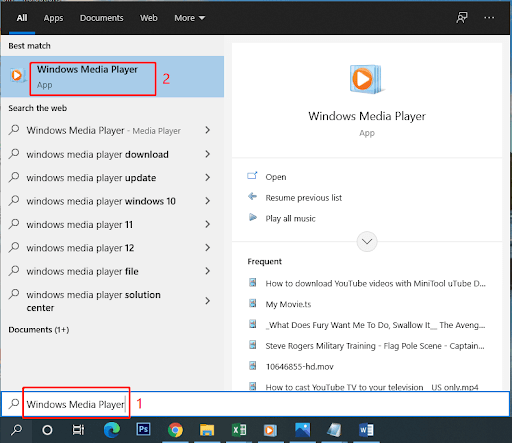
- Now, select Stream from the top menu.
- Choose the option to Allow Internet access to home media from the Stream menu.
- Give the necessary permissions to Allow Internet access to home media.
- Now, select the option to Turn on media streaming.
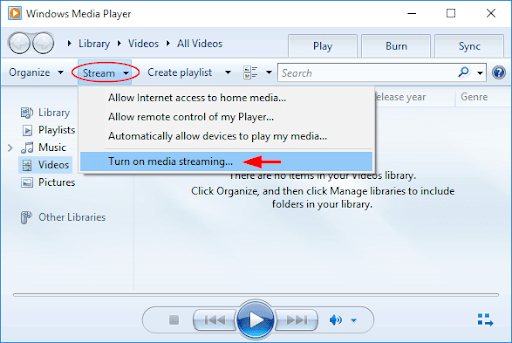
- After enabling the media streaming, open it.
- Change the default PC name and the advanced sharing settings.
- Lastly, reboot your PC after completing the above steps.
Also Read: How to Set up VPN on Chromecast
Fix 4: Try troubleshooting the hardware and devices
Many users solved the problem by running the hardware and devices troubleshooter. Though this fix may not work for everyone, there is no harm in trying it. Hence, you can follow the below directions to run the troubleshooter.
- To begin with, search for the Control Panel and open it.
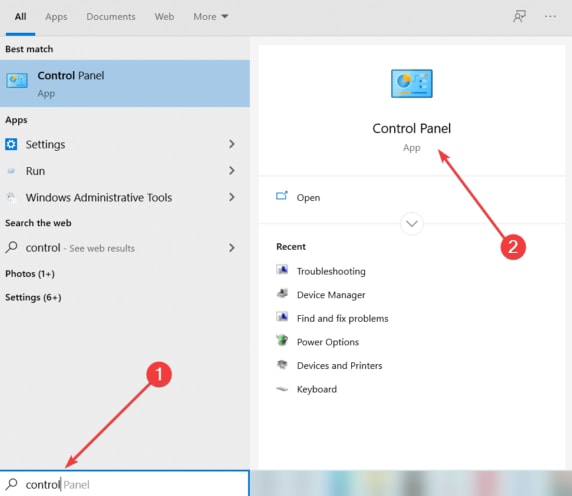
- After opening the Control Panel, change the Control Panel’s view to Large icons.
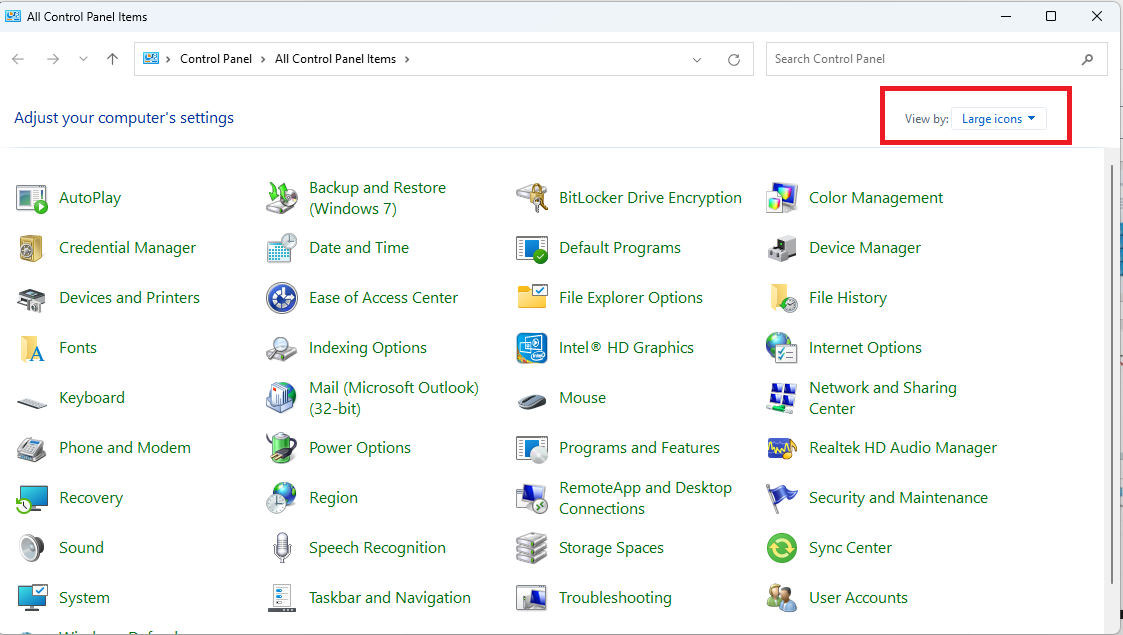
- Now, select Troubleshooting from the menu on your screen.
- Now, choose the View all option from the left panel of the Troubleshooting window.
- Select Hardware and devices from the available options and click Next to proceed further.
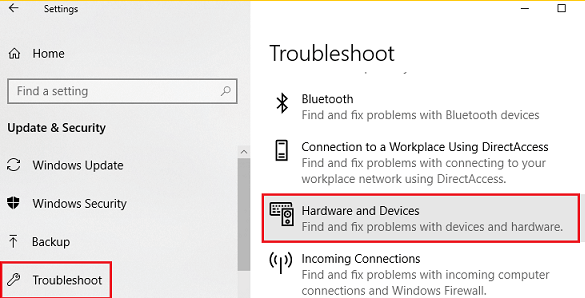
- Lastly, wait until the troubleshooting process is complete and reboot your PC afterward.
Fix 5: Update outdated drivers (Recommended)
Broken or outdated drivers are among the top causes of many problems you experience on your computer. For example, an outdated or old network driver obstructs network sharing, and out-of-date graphics drivers cause display issues, leading to the cast to device not working issue. Hence, updating outdated drivers is a good idea.
You can update drives in various manual and automatic ways. However, the best approach is to perform driver updates automatically via a dedicated driver updater, such as Win Riser.
The Win Riser software updates all troublesome drivers with one click. Moreover, it offers many impeccable features to take your computer’s performance to the next level.
For example, it boasts driver backup and restore, junk removal, malware detection, ignore option for the drivers you do not plan to update, and PC scan scheduling. You can download and install this wonderful software directly from the following link.
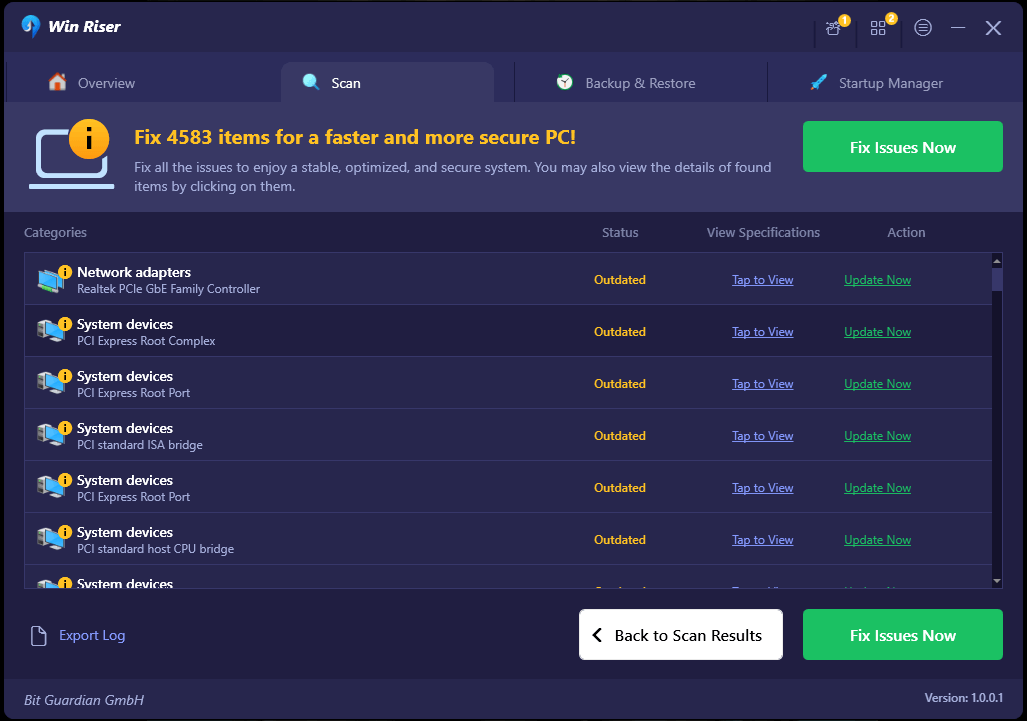
After installing Win Riser (the installation completes in one to two seconds), you can follow the below simple directions to update drivers.
- To begin with, allow the automatic computer scan to conclude (it completes in two to three seconds).
- Now, go through the results to know which drivers are causing problems on your computer.
- Select Fix Issues Now to automatically get all drivers updated to their most recent version.
Also Read: How to Set Up Google Chromecast on Your TV
Fix 6: Perform Windows update
Microsoft has already recognized many users are experiencing issues with the cast to device feature. Hence, it has released updates to debug the problem. If you are still struggling with this problem, chances are you have not updated Windows. Hence, here are the steps you can take to update Windows.
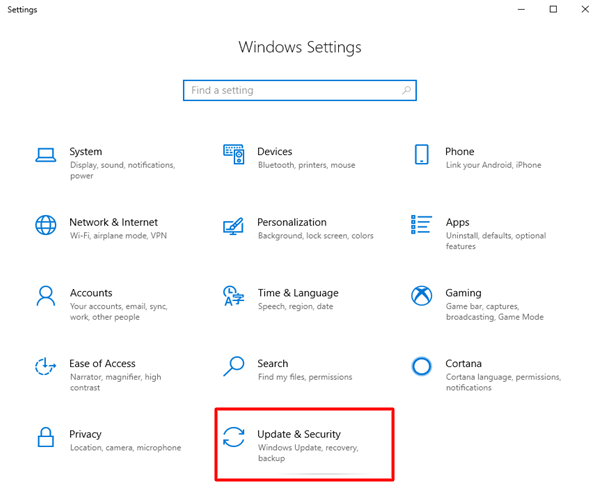
- To begin with, bring up the Settings window using the Windows+I keyboard shortcut.
- Secondly, select Update & Security from the options available on the screen.
- Make sure you have Windows Update selected in the left panel of the Update & Security Settings window.
- Now you can select the option to Check for updates to your computer.
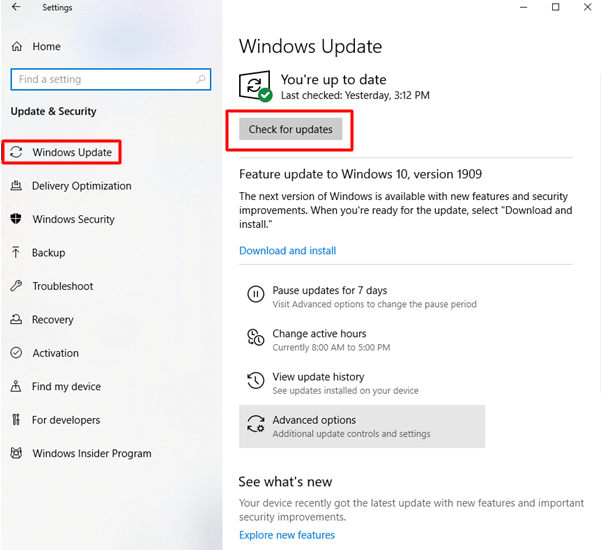
- Download and install the latest Windows update.
- Lastly, restart your PC to complete the update process.
Fix 7: Change Windows Defender Firewall cast to device settings
Cast to device may not be working on your computer due to interference from Windows Defender Firewall. Hence, you can follow these steps to change the Defender settings to solve the problem.
- To begin with, call up the Run utility using the Windows+R keyboard shortcut.
- Now, input Control in the on-screen box and click OK to open the Control Panel.
- After accessing the Control Panel, locate and click on Windows Defender Firewall.
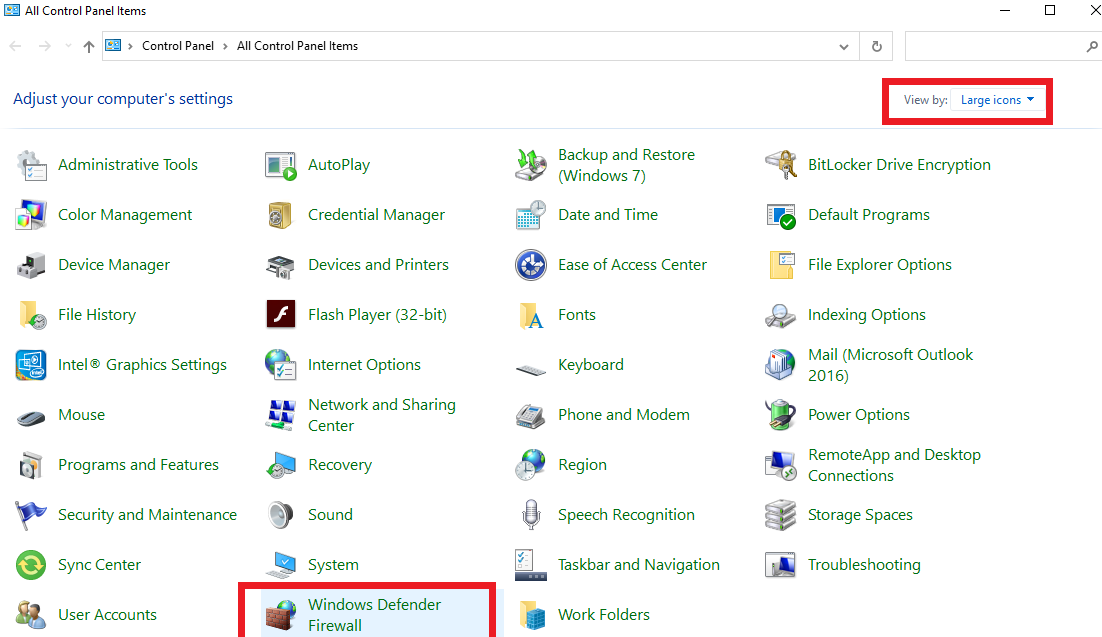
- Now, choose to Allow an app or feature through Windows Defender Firewall from the left panel of the on-screen window.
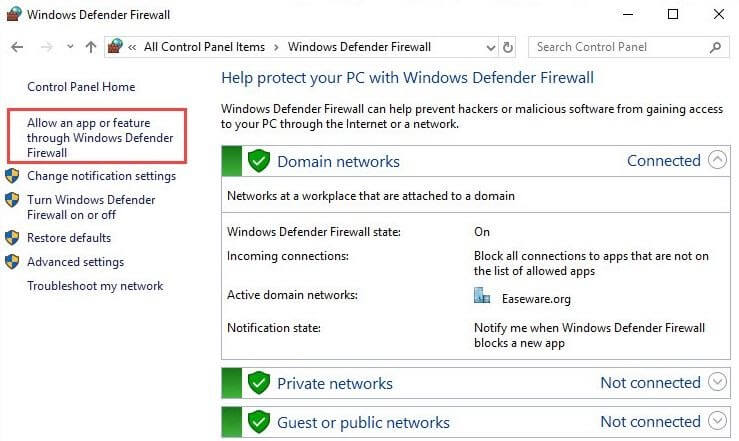
- Find the Cast to Device functionality in the allowed apps and features.
- If both private and public boxes are not checked for the cast to device functionality select the Change settings option to check both boxes.
Also Read: Best Web Browsers for Your Roku device
Cast to Device Not Working Problem Solved
The above guide listed various solutions you can try if the cast to device feature on the computer does not work. You can try the above fixes sequentially to arrive at the solution that solves the problem or directly apply the recommended fix (updating drivers) to get rid of the issue instantly.
However, if you have better recommendations to fix the issue or have any questions, feel free to drop them in the comments section.


