[Fixed] Could Not Connect To Steam Network Error
![[Fixed] Could Not Connect To Steam Network Error [Fixed] Could Not Connect To Steam Network Error](https://wpcontent.techpout.com/techpout/wp-content/uploads/2021/02/24175557/Fix-Could-Not-Connect-to-Steam-Network-Error.jpg)
Many Steam users complained that they are getting “could not connect to steam network” error messages when they are trying to login to their Steam account. Have you ever undergone this issue? Then, no need to panic! Through this write-up, we’ve brought up some tested solutions to bypass this issue.
Quick Workarounds To Fix Could Not Connect To Steam Network Error
Before we start, the following are the initial hacks that you should try.
Monitor the Steam server status: Steam’s official website monitors the overall server traffic. By monitoring the website frequently, you can see if Steam has any server issues or network dim-out.
Reboot your system: Though it is a very simple solution, but, restarting the system can resolve any driver issues, frequent system crashes, frozen programs, BSOD issues, and more. Apart from this, rebooting the system is quite a useful tip to reset the Network Settings.
Run Steam as an Administrator: However, running Steam as an admin might sound like a weird hack, but in many events, an app needs an administrator privilege to run suitably. Plus, many Steam users claimed that this simple hack solved their network problems.
Check Physical Network Connection: The quickest route to fix the Steam network errors is to monitor the physical network connection. Just be sure it is securely plugged into your computer and the router/modem. Some users stated that they could not connect to the steam network but I have internet connection, those can try the following fixes to solve this error.
Temporarily Disable your Windows Firewall: By disabling your Windows firewall you can fix the Steam network errors. The firewall could block the ports that Steam requires to run. Hence, temporarily disabling the firewall is a smart move that blocks the threats from entering your system.
Troubleshooting Tips To Fix Could Not Connect To Steam Network Error
After trying the above quick and easy solutions, still, your Steam is having trouble connecting to the Steam servers. Then, read the below listed highly advanced troubleshooting methods.
Method 1: Restart Your Steam Connection
When you encounter a Steam network error then originally try to start your Steam connection again. Follow the instructions given below:
Step 1: Connect to the Internet and then open Steam.
Step 2: Now, from the top-most left corner of the Steam session, click on Steam.
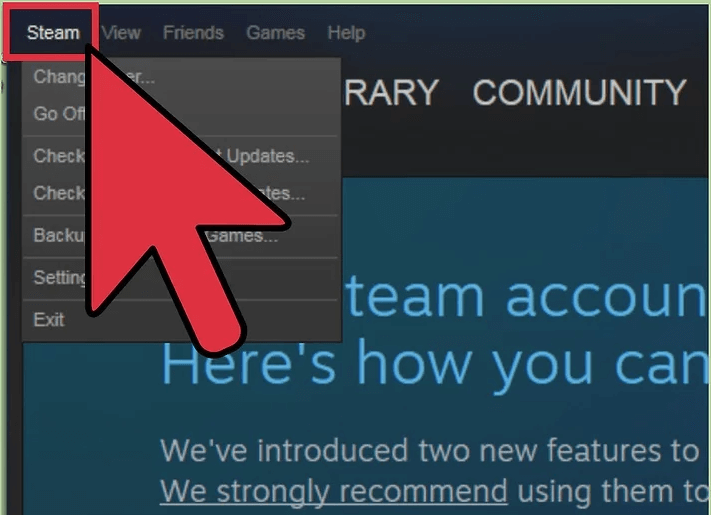
Step 3: Then, select Exit from the pop-up menu list to close the ongoing Steam session.
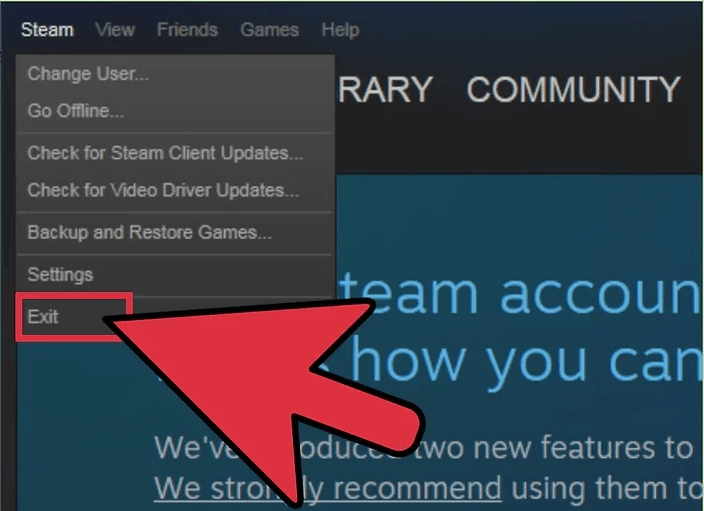
Step 4: After this, from your desktop double click on the Steam icon to start it again.
Try this and check whether the error saying could not connect to the steam network fix or not.
Read Also: How To Access Steam Screenshots On Windows 10
Method 2: Reset Your Network Settings
Maybe, there is something inaccurate with your system’s network settings. Therefore, you are experiencing network errors. Resetting the system’s network settings can fix the Steam network issues. Here is all you should know to reset your Network Settings.
Step 1: Go to the search box of your system, and type command or cmd inside it. Then, right-click on the suitable match.
Step 2: Later on, select Run as Administrator. This step will launch Command Prompt as an Administrator.
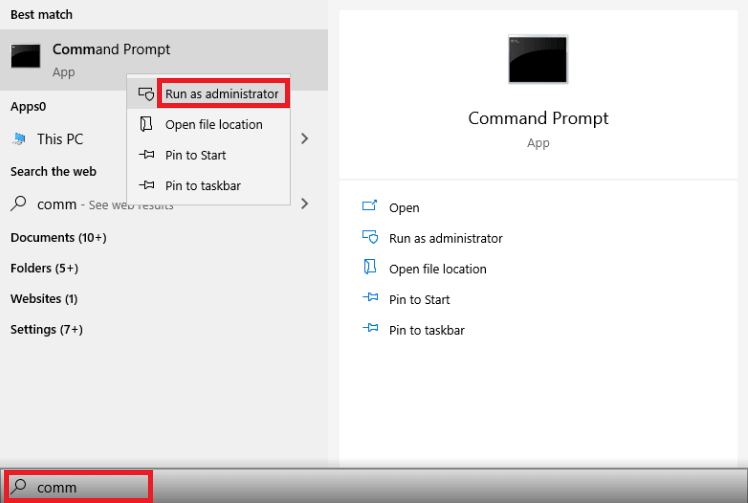
Step 3: Next, copy and paste the following command in the command prompt window:
ipconfig /release
ipconfig /renew
ipconfig /flushdns
netsh winsock reset
net stop dhcp
net start dhcp
netsh winhttp reset proxy
Do not forget to press enter key from your keyboard after each command. Later on, once all the commands get successfully executed then check if the steam could not connect to steam network persists or not.
Method 3: Update Your Network Driver
One of the major reason because of which you get Steam network error that is outdated or faulty network drivers. Drivers ensure almost half of the effective performance of the system. Therefore, it is very crucial to keep your network drivers up-to-date in order to enjoy the top-notch performance of the system.
We use Bit Driver Updater for updating drivers automatically and frequently. Hence, we also suggest you use Bit Driver Updater, an extremely fast and effective tool for updating faulty or outdated drivers in no time. Follow the instructions given below to run Bit Driver Updater:
Step 1: Download Bit Driver Updater and launch it on your system.
Step 2: Once launched, then it will start searching for outdated drivers.
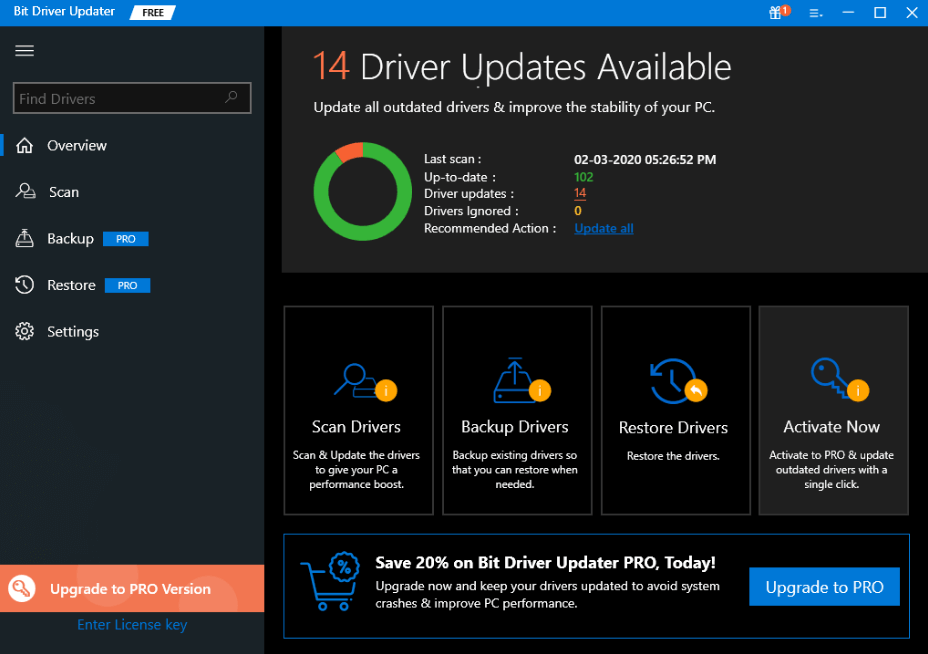
Step 3: After this, it will generate the list of the drivers that require an update.
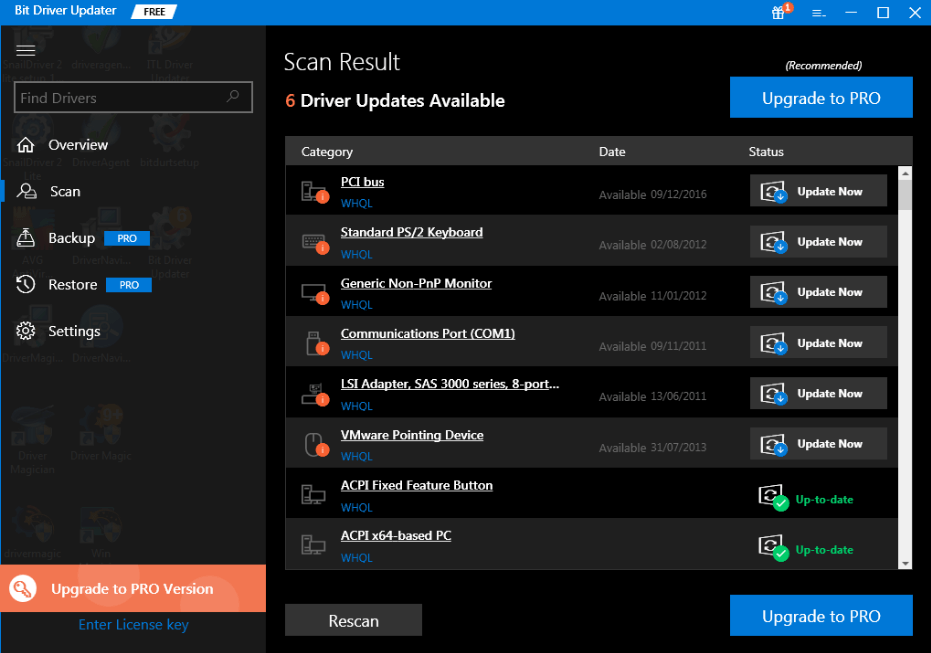
Step 4: Later on, to update the particular faulty driver you need to click on the Update Now button presented next to the driver. Or, click on Update All to update all the faulty ones in one click.
Updating drivers with Bit Driver Updater is the best way to fix the other driver-related issues as well. Apart from this, it saves a lot of time, offers automatic updates functionality, schedule scans, one-click update, 24/7 technical support, and so on. Hence, download Bit Driver Updater from the button given below!
Method 4: Install Your Steam Client Again
It might be possible that there are some corrupted files in Steam that result in Steam could not connect to the Steam network error. Hence, to resolve this error you need to completely uninstall the Steam program then again install it. Try this and check if it resolves the Steam network. You have to follow certain steps to uninstall and then reinstall the program. We’ve shared the steps below:
Step 1: Before we start, don’t forget to backup all the files if you use the steam client to download the applications and games. Track the place where you have installed the Steam.
Step 2: Then, look for a folder named Steamapps, and move it out of the Steam directory at the secure place.

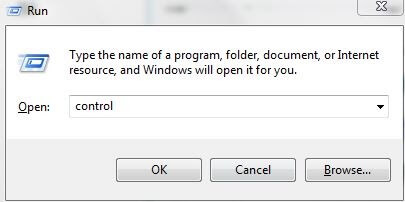
Step 3: After this, launch the Run dialog box by pressing the Windows and R key together from the Keyboard.
Step 4: Now, write control in it, then press the enter key from the Keyboard.
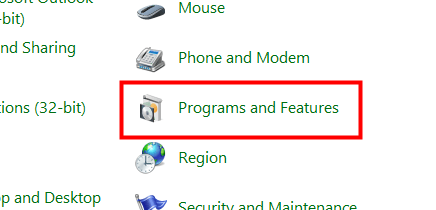
Step 5: Locate Programs and Features, then click on it.
Step 6: Next, in the list of the programs, find Steam and click right on it to choose Uninstall.
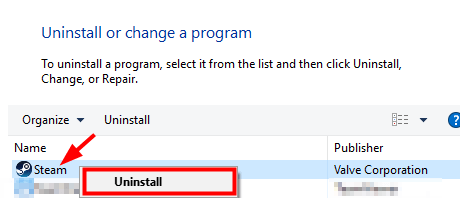
Step 7: Click on Uninstall.
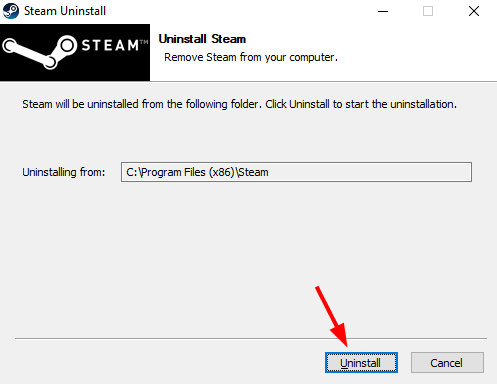
Later on, download the most recent client installer from Steam and then reinstall the Client. Now, you can shift the Steamapps folder again to the Steam directory which you have moved earlier. After this, trigger the client again and see if the error disappears.
Read More: How To Fix Steam Disk Write Error On Windows 10
Method 5: Change The Steam’s IP
Originally, Steam uses the UDP internet protocol to broadcast the data. If you are running into could not connect to steam network error then changing UDP to TCP can fix the issue. Follow the steps given below to change the Internet Protocol that Steam currently accesses.
Step 1: Click right to the Steam shortcut on your desktop and then choose Properties from the context menu list.

Step 2: Then, switch to the shortcut tab.
Step 3: Next, add -tcp at the end of the Target manual box.
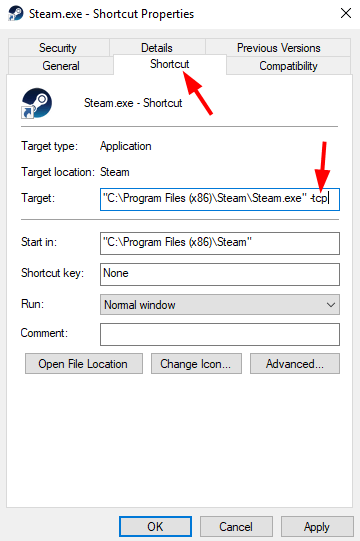
Step 4: To move further, click on the Ok option.
Now, to check if this method worked for you double click on the steam shortcut to open Steam.
Read More: How To Fix Steam Download Slow
Method 6: Switch Off Windows Defender
Yet another way to fix the same issue is by switching off the windows defender. As you all know that the Windows PC comes with an in-built security attribute i.e, windows defender. But, sometimes the interference of the background applications may result in a network error. Hence, to deal with the network issues, you need to temporarily turn off the Windows Defender. If you don’t know how to do it. Then, no worries, follow the instructions shared below!
Step 1: Gear Windows Settings by pressing the Windows and I keys simultaneously from the Keyboard.
Step 2: Then, navigate to the Update & Security and click on it.
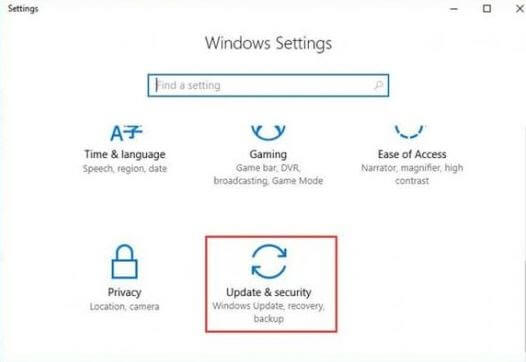
Step 3: Now, choose Windows Security from the menu list and then click on the Open Windows Security.
Step 4: After this, locate Virus & Threat Protection and click on it.
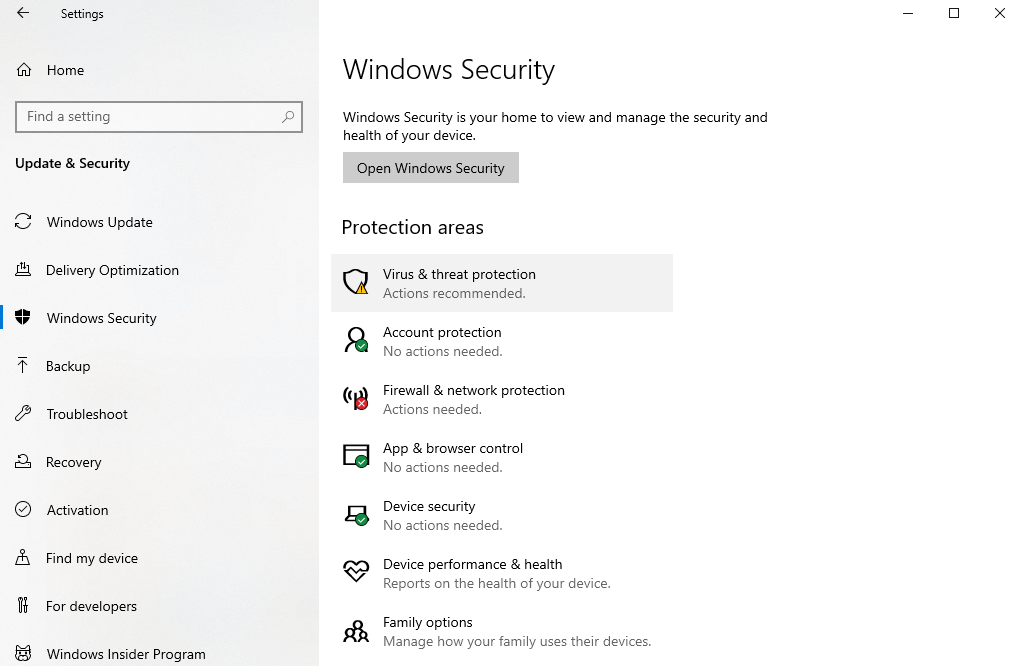
Step 5: Under Virus & Threat Protection choose Manage Settings to move further.
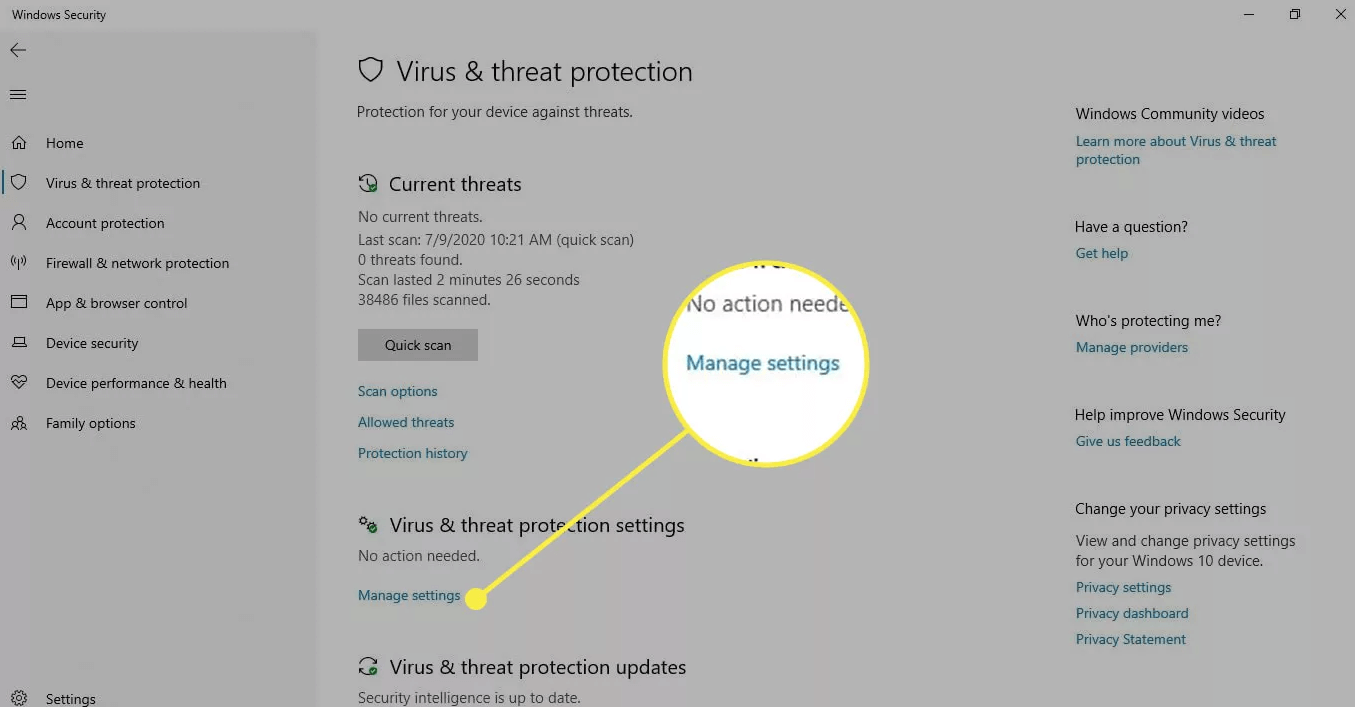
Step 6: Now, choose the Real-Time Protection Toggle to switch it off.
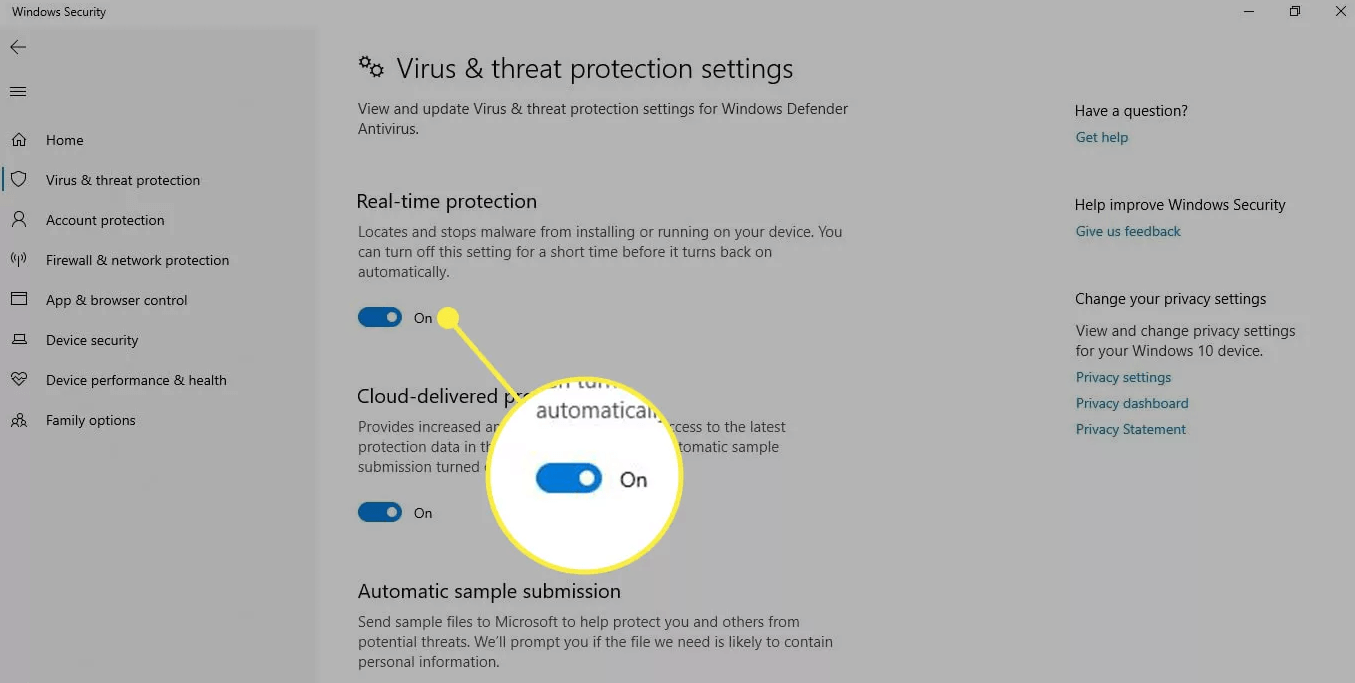
Note: If the pop-up window displays asking if you want to allow several programs to make changes to your computer, then choose Yes.
Step 7: At last, choose Automatic sample submission and Cloud delivered protection toggles to turn it off.
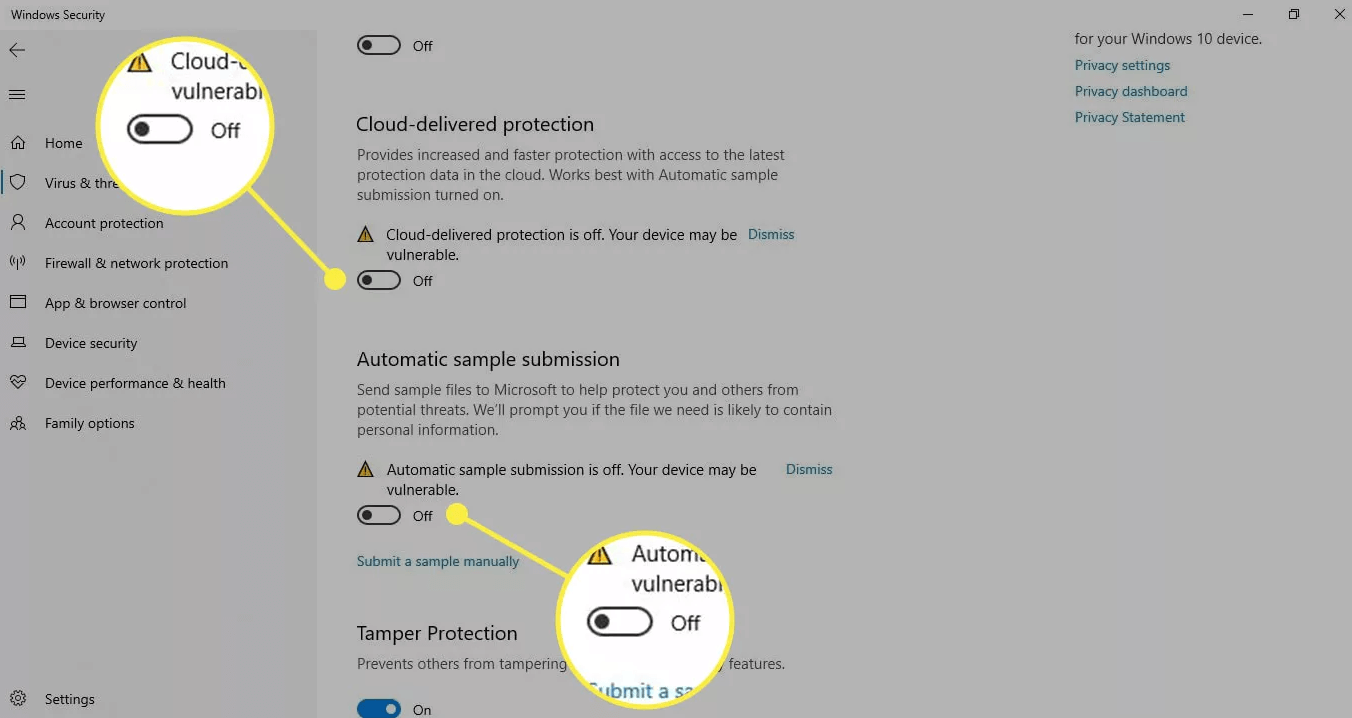
This is how you can disable the Windows Defender in Windows 10 in order to fix the Could Not Connect To Steam Network error.
Read More: How To Solve Modern Warfare Crashing On PC
Could Not Connect To Steam Network Error [FIXED]
Thus, how you can resolve the Could Not Connect To Steam Network Error without too much effort. Steam network error hinders your effective gameplay. Hence, it is crucial to fix it as soon as possible. With the above-standardized solutions, you can easily do so.
Was this write-up helpful? Tell us in the comment zone below. And, if you are convinced with the information provided by us then do subscribe to our Newsletter for receiving more such informative articles. That is it for now, we’ll come back again till then stay tuned!


