[Fixed] Epson Scanner Not Working In Windows 10 {Quick Methods}
![[Fixed] Epson Scanner Not Working In Windows 10 [Fixed] Epson Scanner Not Working In Windows 10](https://wpcontent.techpout.com/techpout/wp-content/uploads/2021/01/13125144/Fix-Epson-Scanner-Not-Working-in-Windows-10.jpg)
Are you using an Epson scanner? And, got to realize that your Epson Scanner not working accurately. Then, this write-up highlights the methods to fix it. So, stay focused till the end!
Epson is the leading brand for printers and scanners. And, the quality of the Epson products is always up-to-mark. But, currently, many users have encountered that their Epson scanner not working properly. Are you also confronting the same problem with your Epson scanner? If yes, then no worries, this will not remain the same anymore. Through this write-up, we will explain to you how to fix the Epson scanner not working issue. But, before starting the actual discussion, here is the briefing on why the Epson scan not working on Windows 10.
Best Way to Fix Epson Scanner Not Working in Windows 10
Update Epson scanner drivers to keep up the good work of it. To do so with much ease, users can try Bit Driver Updater. It is a fully automatic driver updater utility that has the capability to fix all corrupted drivers in one click. The most exciting part of this software is it can boost the overall PC’s performance by up to 50%. So, hit the download button shared below to get it installed on your PC.
Why Does Epson Scan Not Working In Windows 10?
Corrupt, outdated drivers, faulty connections, bad configuration, and software upgrades are the major causes of the Epson scan not working perfectly as it used to. But, no worries, here are some handiest fixes to rectify this annoying issue and get back the working efficiency of the Epson scanner. So, let’s get started with the discussion round off!
Quick Methods To Fix Epson Scanner Not Working In Windows 10
Here, is how you can fix the Epson scanner not working issue in Windows 10. We’ve listed down the effective yet easiest solutions to fix the same issue. Just, have a look at them!
Method 1: Make Sure That Epson Scanner Is Not Set To Compatibility Mode
Maybe, Epson Scan set to the compatibility mode when you update your Windows 10, and this results in this issue. So, what you need to do is – just make sure that the Epson scan is not set to the compatibility mode. Follow these steps to do so!
Step 1:- Firstly, click right on the Epson scan icon presented on the desktop, then click on the Properties option.
Step 2:- Then, head to the Compatibility option, now see if the checkbox next to Run this program in compatibility mode is tick mark, then unmark it. Lastly, click on the OK button.
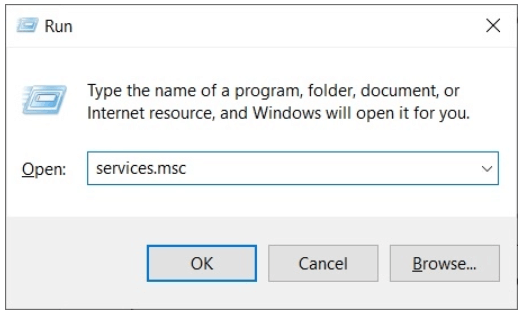
Step 3:- Now, to launch the Run Dialog box quite quickly hit the Win and R key simultaneously from the Keyboard.
Step 4:- After this, type services.msc in the box and then hit the enter key from the keyboard or click on the OK option.
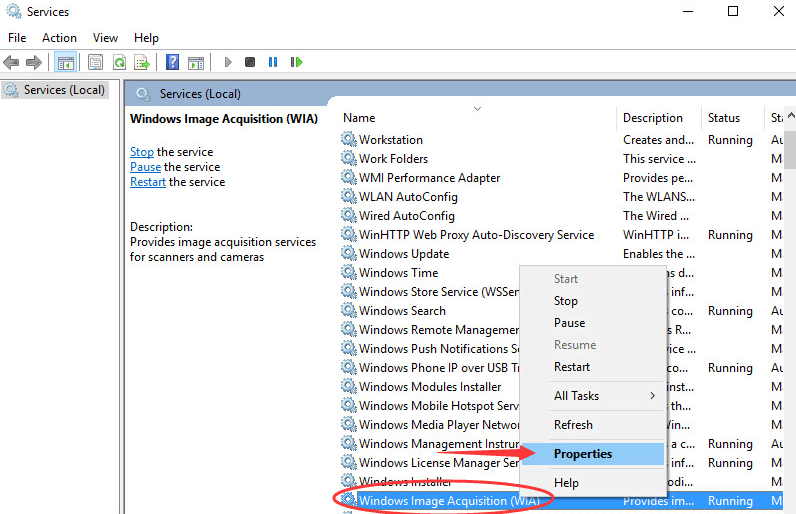
Step 5:- The above step will trigger the Services window. Thereafter, locate Windows Image Acquisition and click right on it, then select Properties.
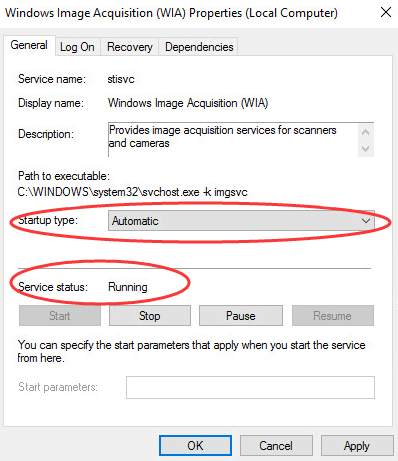
Step 6:- Next, be sure that the Startup type is set to automatic approach and the status of the Service is set to running. After this, click on Apply and then Ok to finish the process.
After doing all this, check if your scanner runs accordingly or not. If the scanner is still lagging then try the below mentioned advanced methods.
Read Also: How to Download Epson Printer Drivers For Windows 10/8/7
Method 2: Make Sure That The Epson Scanner Isn’t Connected To A Wrong Port
Generally, there are two kinds of USB ports available i.e, one for handling easy data for mouse or Keyboard and another one for handling heavy data. So, if you have connected your Epson scanner through a light USB port then it may not work accurately. Hence, make sure that the Epson Scan isn’t connected to the wrong port. Follow the below-listed steps to change the port for your scanner.
Step 1:- Switch off your Epson scanner.
Step 2:- Then, disconnect the USB cable.
Step 3:- After this, restart your computer and endeavor a different USB port.
Step 4:- Now, power on your Epson scanner.
Probably, this will fix the Epson Scanner not working issue on Windows 10, if you are connected to the wrong port. And, just in case, if you are connected to the correct port then move ahead towards more advanced solutions in order to fix the issue.
Read More: How To Fix HP Scanner Not Working Problem In Windows 10
Method 3: Update Epson Scanner Driver (Highly Recommended)
Maybe, outdated scanner drivers are responsible for the bad or inaccurate performance of your Epson scanner. Therefore, you need to update Epson scan drivers frequently. However, there are numerous ways to run the driver’s update tasks but using the driver updater tool is one of the handiest ways to perform this task.
We use Bit Driver Updater which is accessed by professionals and we also recommend you to use the same to update your Epson Scanner drivers. Moreover, you will be amazed after seeing the working of the Bit Driver Updater. Want to know? Then, here it is!
Step 1:- Download and launch the Bit Driver Updater by running its setup file.
Step 2:- After launching, you have to wait for a while until it executes the Automatic Scanning procedure.
Step 3:- Thereafter, it will display the list of drivers that need to be updated. So, you need to review the entire list thoroughly.
Step 4:- Lastly, click on the Update Now button presented next to the drivers that need to be updated. And, if you want to update all the drivers simultaneously then click on the Update All button instead.

That’s it! Bit Driver Updater lets you update drivers with much ease and felicity. Moreover, the premium version of Bit Driver Updater gives you extra facility including an in-built optimizer, time saver, fixes windows-related issues, frequent crashes, and many more. So, hit the below-given download tab to download and install the Bit Driver Updater.
Method 4: Install Epson Scan Utility Again
And, after trying all the solutions, still the Epson Scan Not Responding then you need to install the Epson scan utility again. Here is how to do it!
- Head to Windows Settings.
- Then, click on the Apps and after this, locate Epson Scan under the Apps & Features utility.
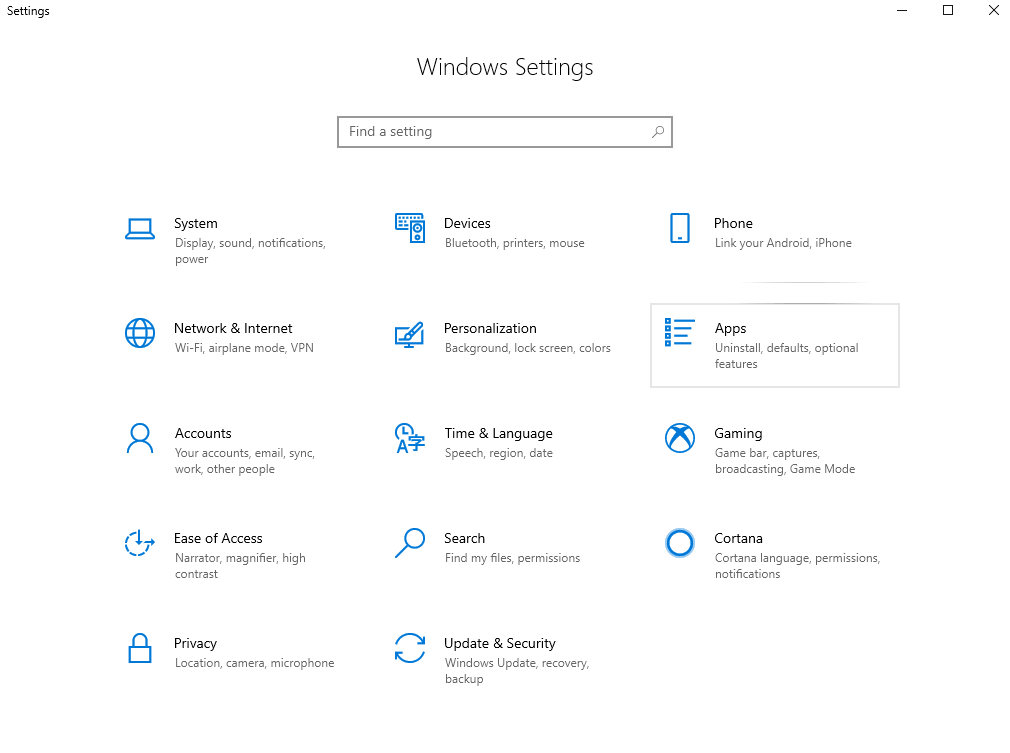
- Lastly, uninstall it.

Once the Epson Scan uninstalled completely, then go to the Epson official support page to download the compatible Epson scan utility again.
Read More: How To Update USB Driver In Windows 10/8/7
Epson Scanner Not Working In Windows 10 [Fixed]
Maybe, prior to this, solving the Epson scanner not working issue wasn’t your cup of tea. But, from now, it can be yours as now you are familiar with the easy steps to solve this issue quite quickly. However, you do not need to run all the methods, when you observe that after implementing this method the Epson scan issues get over. Then, stop there only and pick up that method.
In sum, that is it, what we want to explain to you regarding the very same issue. Still, while implementing the methods, if you face any sort of problem then do let us know in the comment section below. We will try to help you in the best possible ways. And, do subscribe to our Newsletter for more such informative yet helpful write-ups!


