How To Fix Mouse Jumping Around Windows 10 [Top Fixes]
![How To Fix Mouse Jumping Around Windows 10 [Top Fixes] How To Fix Mouse Jumping Around Windows 10 [Top Fixes]](https://wpcontent.techpout.com/techpout/wp-content/uploads/2022/06/16170408/How-To-Fix-Mouse-Jumping-Around-Windows-10-Top-Fixes.jpg)
Have you ever had that irritating feeling after typing anything and realizing a word was mistakenly placed between two other words or in the middle of a sentence where it wasn’t necessary? This is due to a widespread issue where the mouse cursor jumps around windows 10 without even touching the touchpad or mouse.
When we refer to the mouse cursor jumping around Windows 10 computer, we mean when it appears at random on various screen regions without moving. The mouse cursor is stationary for a while before moving to another location on the screen. For example, your Windows 10 mouse jumps to the corner or jumps too far when moving, way higher than the speed you set.
The mouse is termed as a precision device that shouldn’t act like it. So although mouse pointer jumping around screen issue is not normal, at the same time, this is nothing you should worry about. In this article, we have covered everything in which you want to know why my cursor jumps around Windows 10, along with the solutions to fix the windows 10 cursor jumps issue on your own.
How to Fix Mouse Jumping Around Windows 10 Issue
Your mouse may be jumping around Windows 10 computer for a number of reasons. Numerous factors, including a mouse problem, a driver problem, a mouse configuration problem, or even malware, could be the cause. So, let’s get into the most common causes and fixes for the windows 10 cursor jumps issue.
1. Check For Hardware Issues
In order to resolve the mouse jumping around Windows 10 issue, you must first rule out any hardware issues. This may have already been tried, but you should confirm or verify it as soon as possible.
Therefore, if possible, connect your mouse to a different computer. Additionally, if you connected your mouse using a problematic USB port, try using another USB port to determine whether the issue still exists. If everything functions as it should or as it did before, then there isn’t anything wrong with the mouse; if not, then changing the mouse will fix the issue with the cursor in Windows 10 hopping around.
Electrical interference can possibly be the root of this issue. So once more, you might try unplugging and reconnecting every USB device from the PC. It usually resolves the problem with the mouse pointer bouncing around the screen. If it doesn’t, don’t panic, though! The mouse jumps around in Windows 10 can be fixed in the following ways.
Also Read: How to Update USB Driver in Windows
2. Run the Device Troubleshooter
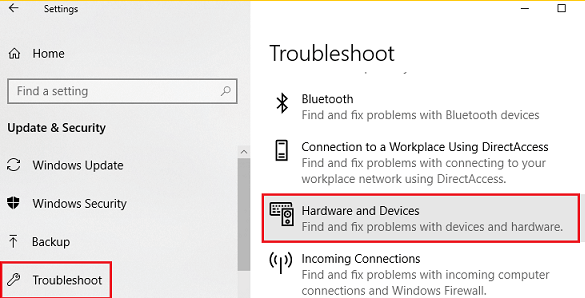
As already discussed, hardware errors are amongst the most common culprits for the mouse jumping around Windows 10 issue. You can run the troubleshooter of the Hardware or device for checking if there is any hardware error on the system. Here’s how you can do it:
One of the most frequent causes of the mouse jumping around a Windows 10 issue is hardware issues. You can launch the Hardware and Devices troubleshooter to see if there are any hardware problems. Here is how to go about it:
- To launch Windows Settings, Press the Window + I keys.
- Select Updates & Security and click on Troubleshoot.
- In the right pane, double-click on the option named Hardware & Devices.
- Click on the option Run the troubleshooter.
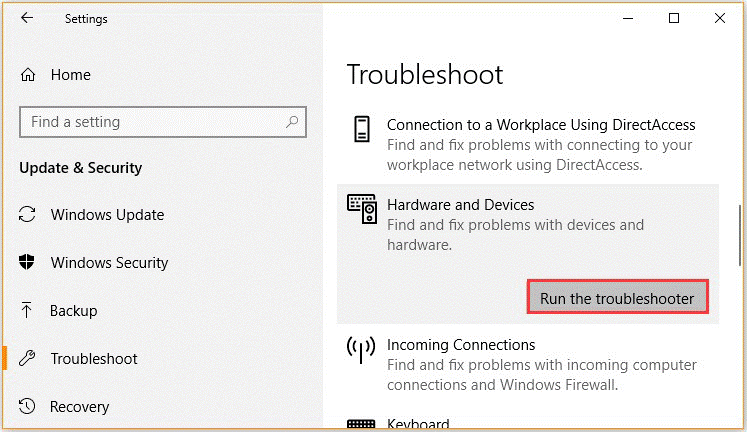
This troubleshooter will identify any hardware issues. Restart your Windows 10 computer to see if the mouse pointer jumping about Windows 10 issue is still present as soon as the process is complete. If it happens, we advise you to connect the mouse to another device and completely check the hardware.
3. Adjust Touchpad Delay Time
If you are using a laptop, the touchpad needs a thorough check, and if you are facing a mouse cursor jumping around windows 10 issue, the touchpad may cause this issue. You may try changing the touchpad delay time to fix the mouse jumping around windows 10 problem. To do this, the steps are –
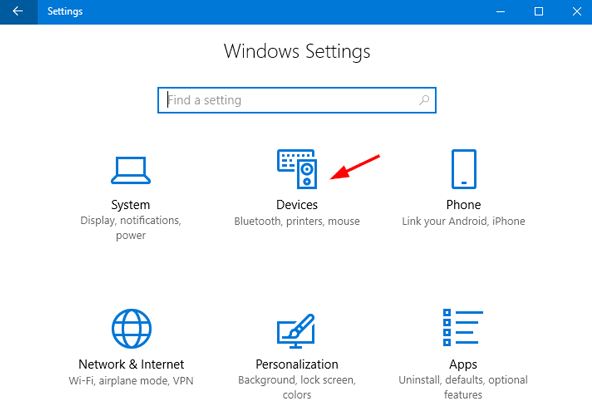
- Use the computer’s Win+I hotkeys to navigate.
- When System Settings appear, select Devices by clicking there.
- Select the Mouse & Touchpad tab.
- Select the Touchpad option in the following window.
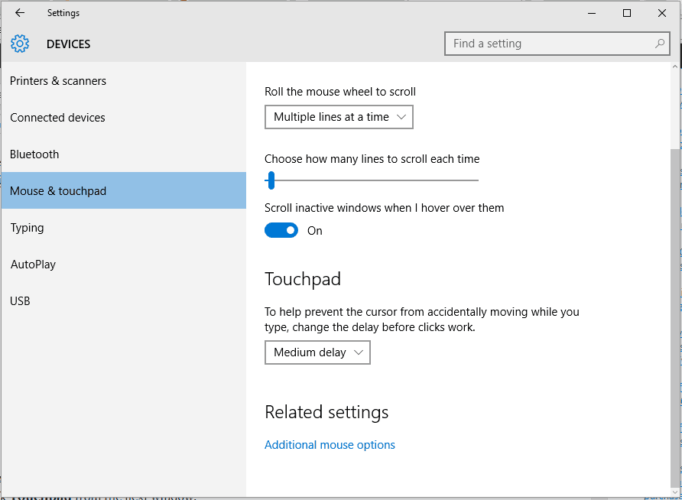
Step 5. Utilize the dropdown option to modify the delay time.
Step 6. If the random Windows 10 pointer jump problem vanishes after adjusting the delay to various values and testing your mouse, you’ve found the solution to your issue.
One efficient way to fix problems with the wireless mouse pointer jumping around Windows 10 is to change the touchpad delay time.
Also Read: How to Update and Reinstall Touchpad Drivers
4. Disable the Touchpad
To check if the problem lies in your mouse, disable your laptop’s touchpad & check whether the issue remains or not. With this solution, the wireless mouse cursor jumps around Windows 10 and can be fixed by disabling touchpad. Here is how you can do this.
- Expand the Mice and Other Pointing Devices option in the Device Manager window.
- Select Properties by right-clicking on the touchpad.
- Step 3. Click Apply after changing the Startup status to Disabled.
Now, restart your Windows 10 computer to see if Windows 10 mouse jumps to the corner problem still exists. Then, reboot your computer and check if the mouse cursor jumping around the windows 10 issue is resolved.
5. Disable the Pointer Precision
Many people have verified that disabling pointer precision will stop the mouse from jumping around in Windows 10. So let us give you a simple guide.
- By hitting Win + R, bring up the Run dialogue box. Type main.cpl into it, and then press Enter.
- Uncheck the option next to “Enhance pointer precision” in the Pointer Options section of the Properties window.
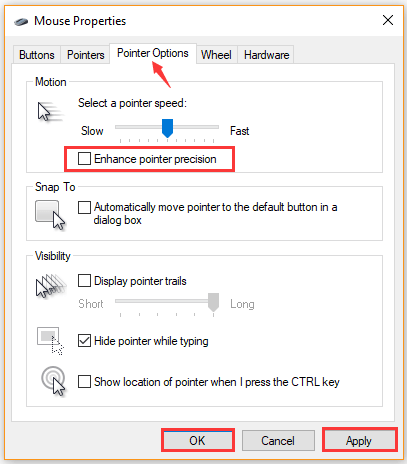
- To save changes, click Apply and OK.
This solution could possibly fix the mouse cursor jumps around windows 10 issue in most cases. However, if the above resolutions don’t help fix the mouse jumping around windows 10 problem, you can try other ways.
Also Read: Synaptics Pointing Device Driver Download and Update Windows
6. Update the Associated Device Driver
The pointer may jump around Windows 10 due to a faulty or outdated device driver. You can upgrade the relevant device driver to the most recent version to resolve the mouse leaping around Windows 10 issue.
- Select Devices Manager from the list of options when you right-click on the Start menu.
- Choose the Mouse device you want to update from the Mice and other pointing devices category, then click Update Driver.
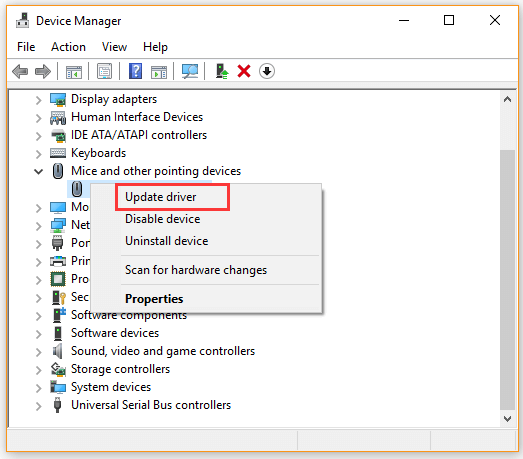
Step 3. To update the driver, select the option to “Search automatically for the updated driver software” and then adhere to the on-screen instructions.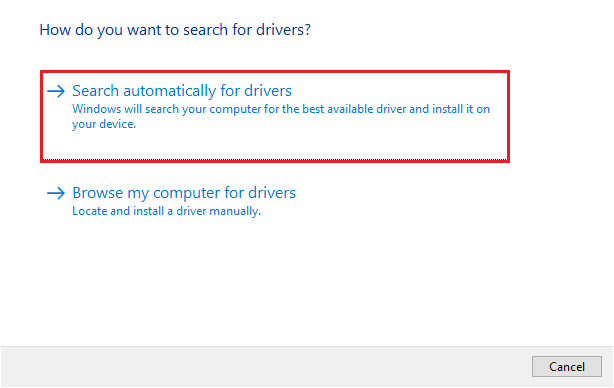
On the other hand, you may also install the most recent mouse driver on your computer by downloading it from the manufacturer’s website. You can now verify that Windows 10’s mouse jumping issue has been fixed.
7. Remove And Reinstall The Mouse Driver
Step 1. Open Device Manager, then choose the mouse driver with the right click. This can be found in the category of mice and other pointing devices.
Step 2. A warning/confirmation popup will appear when you choose the context menu option to Uninstall Device.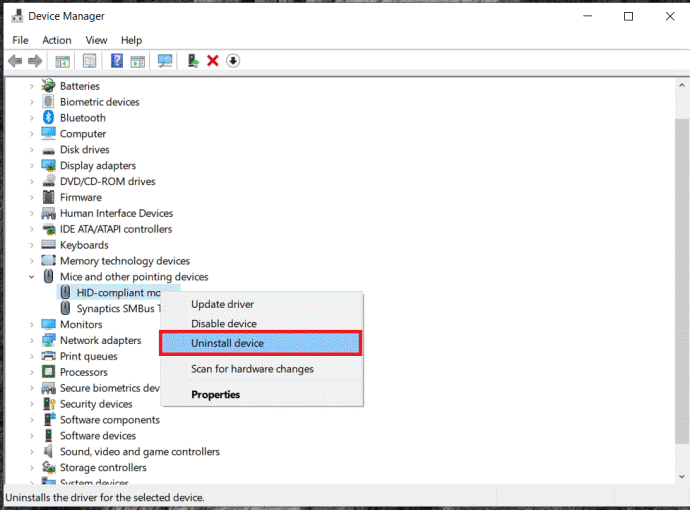
Step 3. You won’t be able to see this driver any longer if you click on the Uninstall option once more.
Step 4. You must right-click the Mice and other pointing devices window and select Scan for additional changes to obtain a fresh copy of this driver software.
The drivers will be removed and returned to you after this procedure. You still run the chance of getting a mouse malfunction, though. Because of the technological dangers, we do not advise doing this.
8. Scan Your Computer for Malware
Your computer may encounter a mouse jumping around Windows 10 issue if it has a malware infection. In this case, we advise you to search your computer for viruses. You can check for malware using Windows Defender or a different antivirus tool.
The mouse may jump because of malware or viruses. Thus, you should remove the unwanted application as necessary.
9. Update The Windows OS On Your System
Step 1. The Windows System Settings page should appear. This option is represented by a gear icon in the Start menu.
Step 2. You must select the Update & Security option on the main Settings screen. You will see the Windows Update page as a result.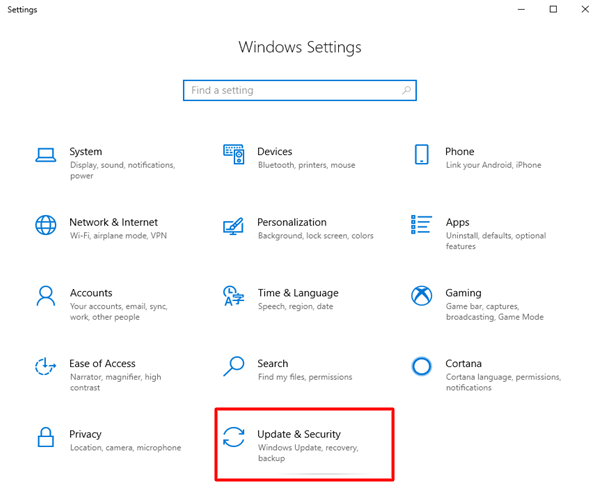
Step 3. Find and select the option to Check for Updates now.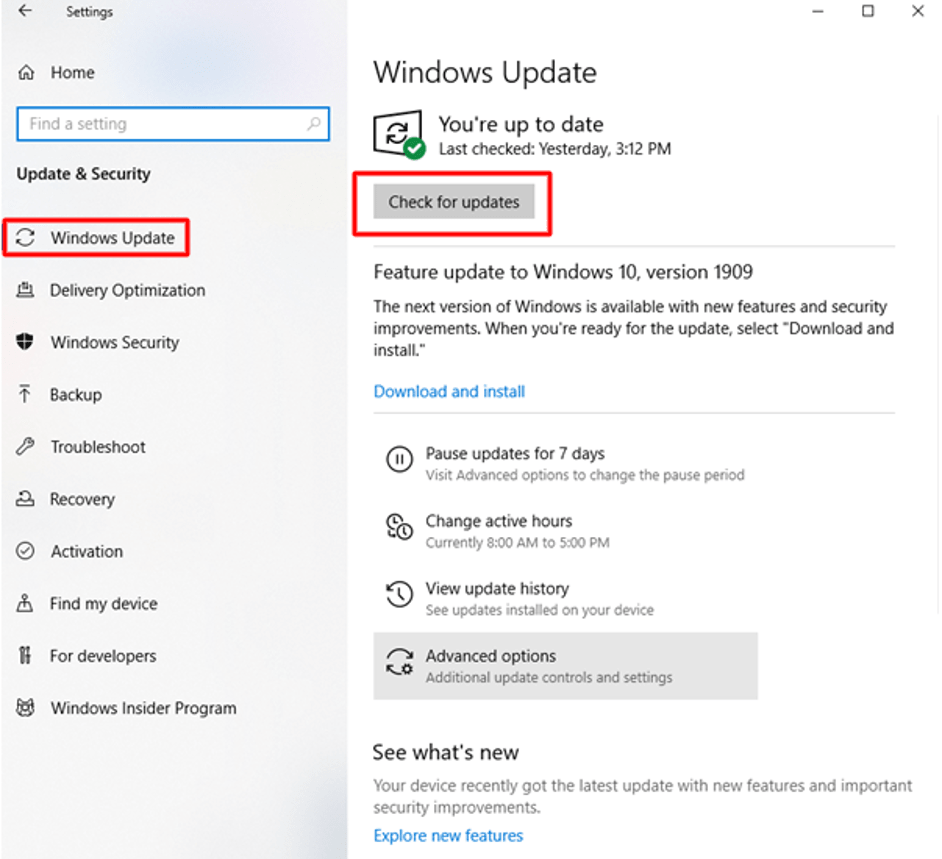
Step 4. When you have a reliable internet connection, choose the Download and Install option if any updates are available.
Step 5. Use the Update and Restart option in the Start menu power settings to restart your computer after the download is finished. Next, see if your display’s cursor is still moving around.
When updates for your OS are available, a notification will appear near the task tray telling you that they are ready for download and installation.
Also Read: Fix: Mouse Cursor Disappears On Windows 10
Conclusion
One of the various causes we’ve covered may be the cause of your mouse acting a little rebelliously and jumping around Windows 10. Your cursor should have settled down and stopped jerking once you’ve moved all the way down the list, though. Hopefully, the procedures mentioned above will help you fix the “mouse leaping around Windows 10” problem.
