How to Fix Reboot and Select Proper Boot Device
This article acquaints you with the quickest and easiest ways to fix the boot device error you are trying to resolve.
Boot device errors like “reboot and select proper boot device” are frustrating as they render your system dysfunctional, hampering your productivity. However, it is an annoying yet easily solved problem.
This issue can be solved effortlessly with some simple solutions. In this article, we are going to elaborate on these fixes. However, since understanding the problem’s causes helps smooth the troubleshooting process, let us begin by learning what may have caused this error.
Causes of Reboot and Select Proper Boot Device Error
The below factors may be responsible for the Windows 7/Windows 10/Windows 11 boot device error you are experiencing.
- Your BIOS settings are not configured correctly
- The partition is inactive
- Your system’s storage device cable is loose
- The boot volume or your operating system is malware-infected
- You have a damaged or corrupted Master Boot Record (MBR)
Above, we listed various factors that may have contributed to the issue. Let us now take you through the best possible solutions to the problem.
Fixes for Reboot and Select Proper Boot Device Error
Here are the solutions you can apply to solve the boot device issue on your computer.
Fix 1: Change the boot order
Incorrectly configured boot order settings are among the most common reasons for errors like the one you are trying to fix. If the boot order is not correct, BIOS may not find the device component or file containing your operating system. Hence, you can follow these steps to change the order particularly if you have replaced your old system disk with a new disk.
- The first step is to restart the computer and access the BIOS settings. You can enter the BIOS by pressing F2, F12, Del on your keyboard. The exact key to open BIOS varies from one manufacturer to another. Hence, you can search for the key to access these settings on your computer.
- In this step, navigate to the boot or boot order tab.
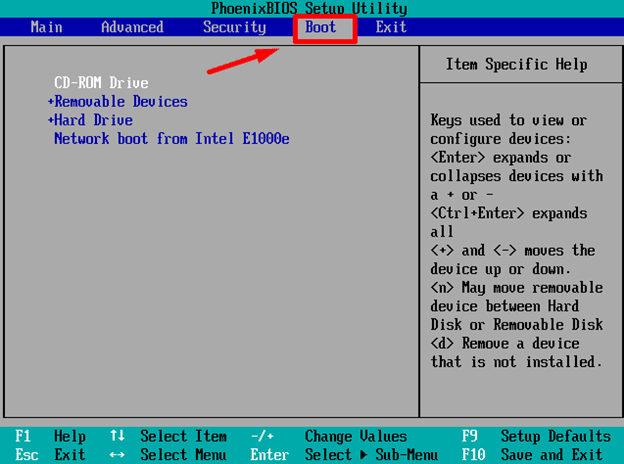
- You can now change the boot order to ensure your primary storage device is in the first position on the list.
- Save the changes you have made in the previous step and close the BIOS window.
- Lastly, boot your computer as you would normally do.
Fix 2: Ensure BIOS detects your boot device or installation media
You should make sure that your installation media or boot disk is identified by BIOS. Here are the steps to perform this action.
- Firstly, you are required to boot/reboot your PC.
- During the boot process, press F2, Del, Esc, or another key to access BIOS continuously to get the BIOS setup utility on your screen.
- After entering the BIOS, you can go to the Main tab to get a list of devices the BIOS detects.
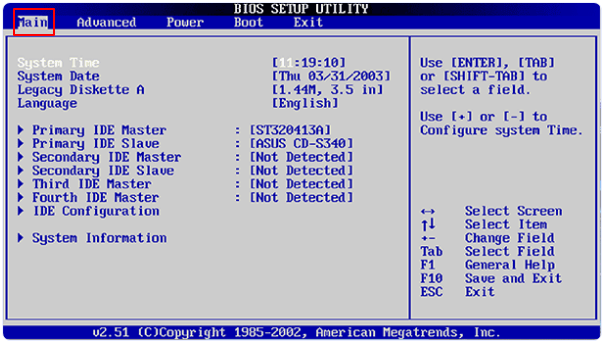
- If you do not find your device in the list, power off your PC, and connect the hard disk using a different cable. You can also connect the hard disk to another SATA slot on the motherboard.
Also Read: Fixed: Unmountable Boot Volume on Windows 10, 11
Fix 3: Activate the primary partition
The “reboot and select proper boot device” error may be a result of an inactive primary partition. Hence, activating the primary partition can fix the issue. You can follow these directions to activate the partition.
- Firstly, boot using a bootable external device and choose to Repair your computer.
- From the repairing options, choose Troubleshoot.
- Next, you can navigate to the Advanced options and select Command Prompt.
- You can now input Diskpart in the Command Prompt window.
- Next, input the list disk, select disk 0 (remember to replace 0 with the disk number according to your list), list partition, select partition 3 (please replace 3 with the OS partition’s number), and active commands one after the other.
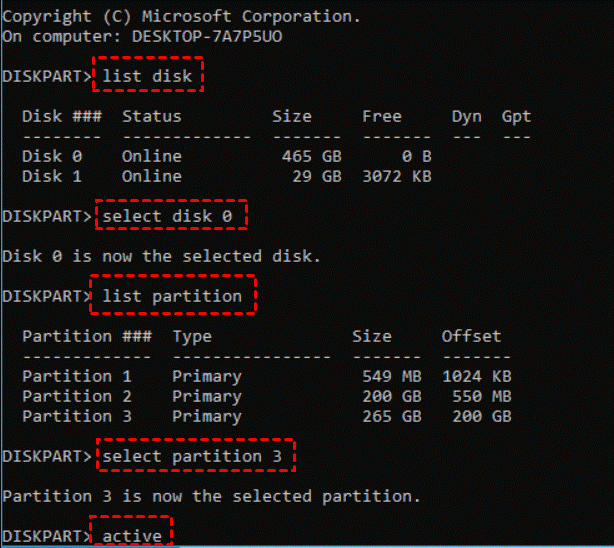
- Lastly, reboot your computer after closing the Command Prompt window.
Fix 4: Check the cable connection
A loose cable connection is often the culprit behind issues like Windows 11, Windows 10, and Windows 7 “reboot and select proper boot device” error. Hence, you can unplug the hard drive and plug it in again to ensure a secure connection.
Also Read: How to Fix Bootrec/fixboot Access is Denied in Windows 11, 10
Fix 5: Try repairing the boot files
Damaged or corrupted boot files may be another reason you experienced an error while booting your system. Hence, here are the steps you can take to repair the boot files.
- The first step is to ensure your computer is off.
- Secondly, insert a DVD or USB and switch on your computer.
- Next, allow your computer to boot through the recovery disk and wait for the install screen to appear.
- In this step, choose to Repair your computer from the lower-left corner of the on-screen window.

- Next, launch the Command Prompt and execute the following commands based on whether you are a UEFI user or a legacy BIOS user.
Legacy BIOS users –
Bootrec/fixmbr bcdbootC
Bootrec/fixboot
Bootrec/rebuildBCD
UEFI users –
: /windows - Lastly, exit the Command Prompt and restart the PC.
Fix 6: Try rebuilding the Master Boot Record (MBR)
MBR is a crucial boot process component. It stores the partition information and the code needed to start the computer. Since corrupted or damaged MBR may have caused the boot device error, you can take the following steps to rebuild it.
- Firstly, boot the computer using a bootable media.
- Secondly, choose Next when the installation screen appears and Repair your computer.
- Next, choose Troubleshoot from the System Recovery Options.
- You can now select Advanced options from the Troubleshoot menu.
- Next, select Command Prompt from the on-screen advanced options menu.
- The Command Prompt window will appear on your screen. You can now input the following commands based on whether you are a legacy BIOS user or a UEFI user. Please remember to press Enter after each command.
Legacy BIOS users –
bootrec /fixmbr
bootrec /fixboot
bootrec /scanos
bootrec /rebuildbcd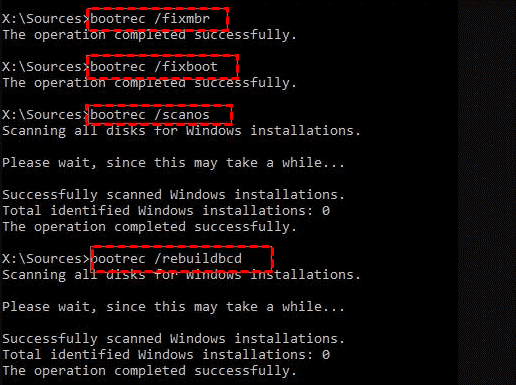
UEFI users –
bcdboot C:\windows - Lastly, type Exit to close the Command Prompt window and restart the computer.
Also Read: FIXED: Windows 10 Slow Boot
Fix 7: Reinstall the OS
If none of the above solutions work, the last resort is reinstalling Windows to fix the operating system corruption, malware, or virus infection. You can perform this action by following the below steps.
- Firstly, enter the Windows Recovery Environment.
- Secondly, choose Troubleshoot from the recovery options.

- Next, choose Reset this PC from the Troubleshoot options.
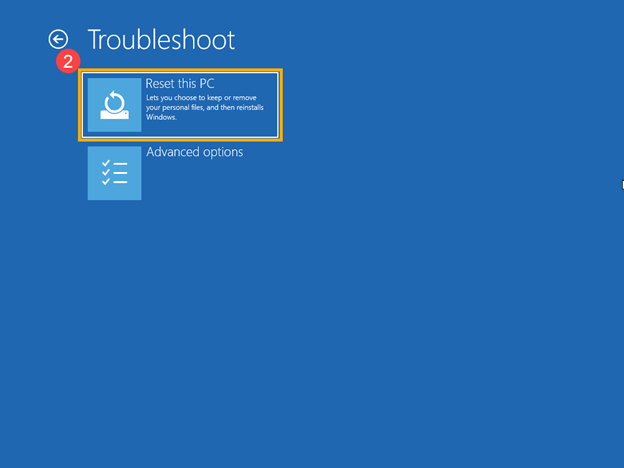
- You can now choose to keep your files or delete everything.
- Lastly, follow on-screen instructions to complete the process.
Reboot and Select Proper Boot Device: Fixed
We hope one of these solutions will solve your boot device problem. However, do not hesitate to leave us a reply if you have any questions or concerns about this write-up. Also, you can share this article with those who will find it helpful. We will be back with fixes for another annoying tech problem soon. Until then, you can read our other articles to learn more about solving various technical issues.


