How to Fix Teardown Keeps Crashing Issue Windows PC
A detailed tutorial on how to fix Teardown keeps crashing on Windows 11, 10, or older versions. After going through the article, you will be able to fix the problem on your own.
Developed and published by Tuxedo Labs, Teardown is the best sandbox, action, and puzzle game. Teardown possesses a truly interactive and fully destructible environment where players’ freedom and emergent gameplay are the driving mechanics. But the regular crashing issue prevents you from enjoying the destructible voxel realm. Many gamers have recently reported that Teardown keeps crashing or lagging on their Windows PC. The problem has been encountered in different forms and shapes.
As per some users, Teardown crashes or freezes in the middle of the gameplay, whereas, some users stated that the game starts freezing during the startup. This is annoying, but it can be easily solved. There are few solutions available for fixing Teardown crashing issues, without any hassles. In this article, we are going to show you some effective solutions that will certainly help you get the game back on the right track.
Before We Start At the very first step, you should always check if your computer system specs meet the minimum PC requirements of the game. If not, then you will either need to upgrade your rig or play the game on another system. Below are the minimum and recommended system requirements of Teardown.
Minimum Requirements:
Operating System: Windows 7
Memory: 4 GB RAM
Processor: Quad Core CPU
Storage: 4 GB available space
Graphics: NVIDIA GeForce GTX 1060 or higher
Recommended Requirements:
Operating System: Windows 11 or 10
Memory: 4 GB RAM
Processor: Intel Core i7 or higher
Storage: 4 GB available space
Graphics: NVIDIA GeForce GTX 1080 or better
Important: As per the official guide of Teardown, the game cannot run on Intel empowered graphics card.
Easy Solutions to Fix Teardown Keeps Crashing on Windows 11, 10, 8, 7
Here are a few most workable solutions for you to fix Teardown keeps crashing on Windows PC. However, there is no need to implement all of them. Just work your way through each and find the one that works best for you. Now, without further ado, let’s get started:
Solution 1: Restart your Computer
It may sound too obvious, but whenever you face game crashing, freezing, or lagging issues, always prefer to restart your PC as a basic hack. Because, sometimes, when an issue or bug is temporary, performing a clean restart can fix the problem. If not, try other advanced solutions explained below.
Also Read: COD: Vanguard Keeps Crashing on PC
Solution 2: Stop Overclocking
Gamers tend to overclock their CPU or GPU in order to improve the overall game performance. However, overclocking will likely make your system unstable and cause your game to lag or crash. If that is the case, disable your overclock utilities (if you are utilizing any like MSI Afterburner) and re-set the clock speed to the default is recommended.
After doing this, re-launch the game and check whether the Teardown keeps crashing fixed or not. Don’t panic, if the game crashing problem still remains the same, there are more solutions for you.
Solution 3: End Background Running Processes or Apps
You can also troubleshoot the problem by closing the unnecessary applications or processes that are running in the background and taking up resources that your game (Teardown) should use. To resolve the issue, follow the steps outlined below:
Step 1: Right-click on your taskbar and choose Task Manager. 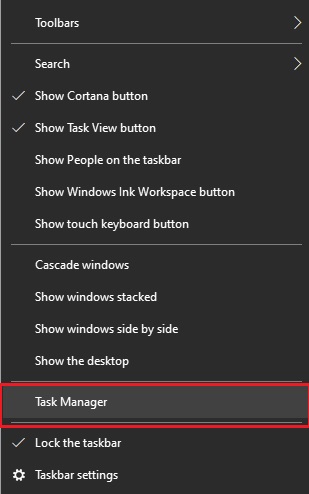
Step 2: In the Task Manager window, you will need to locate the processes that you no longer need.
Step 3: Click right on them one by one and choose End Task.
After closing the unwanted apps, try to re-open Teardown and check if it starts working fine now or not.
Also Read: How to Fix Final Fantasy XV Crashing on Windows PC
Solution 4: Allow Teardown via Control Folder Access
Another way to fix Teardown keeps crashing on Windows 11, 10 PC is to ensure the game gets complete access to required data and files. You can do so by adding it as an allowed application through Controlled Folder Access. Here is how:
Step 1: Click on the Start button and click on Settings. 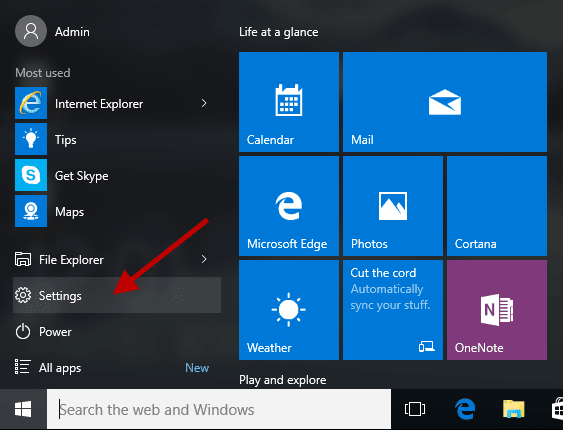
Step 2: Then, click on Update & Security. 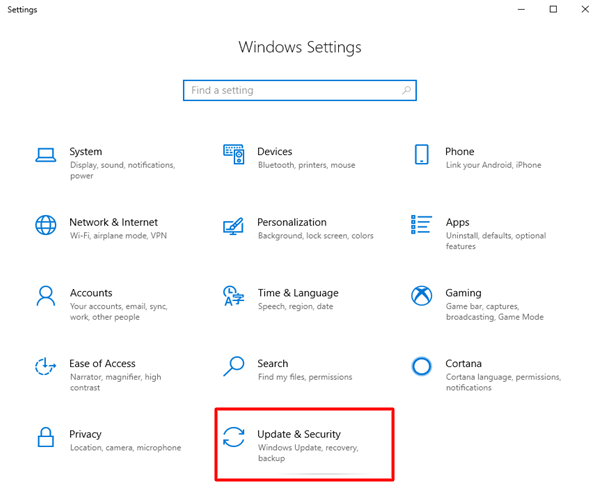
Step 3: Next, on the left pane, select Windows Security and then click on Virus & threat protection on the right. 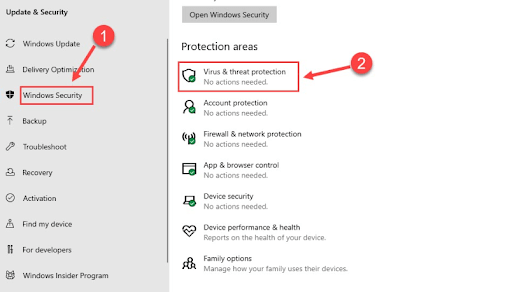
Step 4: After that, click on Manage Settings. 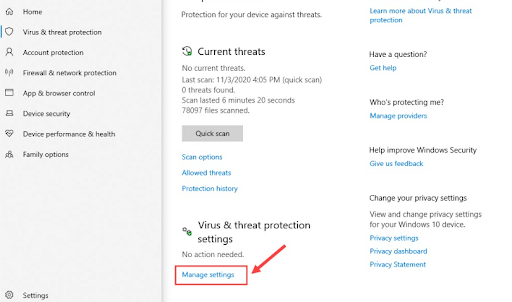
Step 5: Scroll down until you see Manage Controlled Folder Access and click on the same.
Step 6: If Controlled folder access is enabled, then click on Allow an app through the Controlled folder access option. 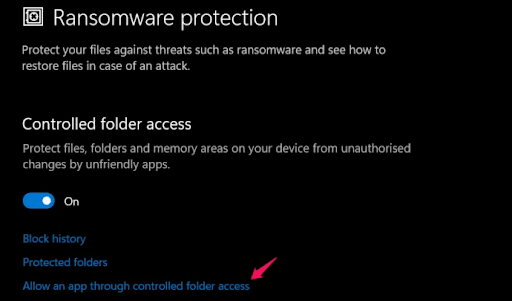
Step 7: Click on Add an allowed app and then choose Browse all apps. Thereafter, select Teardown as a reliable or trusted application.
Once finished, relaunch the game to see if it works. In case Teardown keeps crashing, try another solution to deal with the issue.
Solution 5: Disable Antivirus Temporarily
Undoubtedly, antivirus software are for preventing potential security threats on a computer system, but sometimes, it becomes overprotective and interferes with the games or related files in the wrong way. To check if that is the reason for the problem, consider disabling your antivirus temporarily, then try to open Teardown again.
If the game functions smoothly now, add Teardown to the exclusion list of your antivirus software so you access both without any conflicts. Proceed with other solutions if this doesn’t trick you.
Solution 6: Update your Graphics Drivers
Issues like game crashing, freezing, or lagging majorly occur when your graphics card drivers either have gone missing or become obsolete. GPU drivers matter a lot to video game performance. Updating the graphics drivers can actually fix bugs, enhance stability and boost your overall gaming experience.
There are mainly two ways you can use to get the correct driver for your graphics card i.e., manually or automatically.
Way 1: Manually Update Graphics Card Driver from Manufacturer’s Site
To use this method, you need to first make sure what GPU you are using like AMD, NVIDIA, or else. Then, you can visit the official support page of the manufacturer’s website and search for the right driver file according to your Windows version. Later on, download the driver installer manually. Once completed, run the downloaded driver file by clicking double on it and follow the instructions on your screen to finish the installation.
Do keep in mind that updating drivers manually requires special computer skills, plus a lot of time and effort. So, if you are a newbie and unable to understand technical things, then we suggest you update drivers automatically using any trusted third-party software like Bit Driver Updater. To know more about this approach, read further!
Way 2: Automatically Update Graphics Driver via Bit Driver Updater (Recommended)
Bit Driver Updater is one of the best and simplest ways to get the right driver updates in no time. By automating every required operation, the tool makes everything so much easier and quicker. It automatically finds the specific flavor of your Windows version and then finds the most suitable drivers for it.
Not only that, but the utility also clears the system junk across the corners and makes the machine faster. The driver updater comes in two different versions: free version and the pro version. Both versions work exceptionally well, but the pro version lets you update all PC drivers in just a single click. While the free version is partly manual so you’ll have to update drivers one by one. Following are some additional benefits of using Bit Driver Updater’s pro version:
- Allows you to schedule driver scans.
- 24*7 technical assistance.
- Full money-back guarantee but for a certain period.
- Auto backup or restore wizard.
Now, take a look at the steps below to learn how Bit Driver Updater works:
Step 1: From the button below, download Bit Driver Updater.
Step 2: Run the downloaded file and execute the on-screen instructions to finish the installation process.
Step 3: Upon successful completion, launch the Bit Driver Updater and click on the Scan button from the left menu pane. 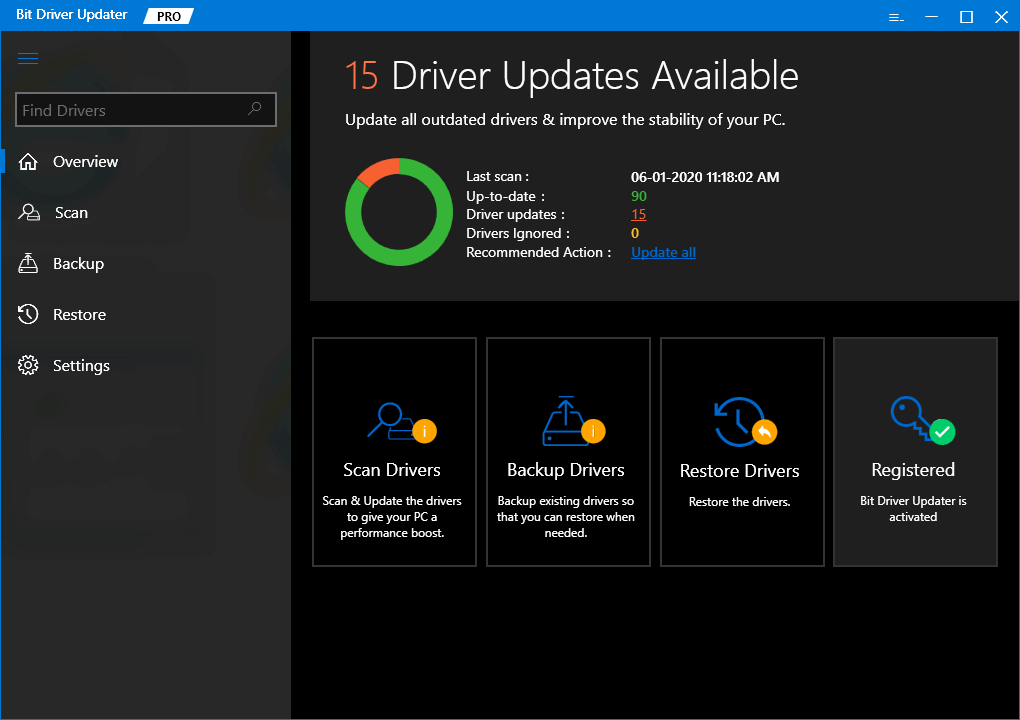
Step 4: Wait and let the driver updater scan your machine for outdated or broken drivers.
Step 5: Check the scan results and click on the Update Now button presented next to the problematic graphics driver. Instead, you may also click on the Update All button to simultaneously update other drivers as well. 
Reboot your PC to apply new drivers. Once done, check to see if the Teardown keeps crashing resolved. If not, move on to the next solution.
Solution 7: Verify the Integrity of Game Files
Damaged, broken, or missing game files are the most common cause of frequent game crashing problems on PC. If that is the case, then you should try to verify the integrity of your installed game files. This might help you fix Teardown keeps crashing in Windows. Follow the steps outlined below:
Step 1: Launch Steam and click LIBRARY to proceed.
Step 2: Find and right-click on Teardown.
Step 3: Then, choose Properties…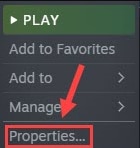
Step 4: Switch to the LOCAL FILES tab and make a click on VERIFY INTEGRITY OF GAME FILES…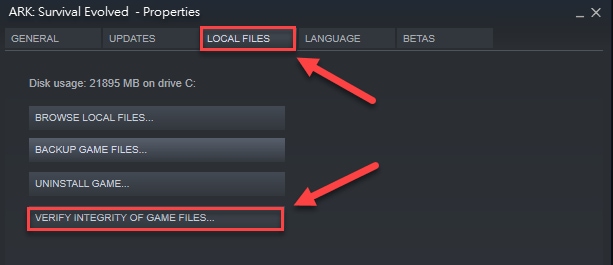
Sit back and wait for the Steam client to find and fix the damaged or corrupted game files. Once done, try to launch the game again and check if the Teardown stops crashing. If it didn’t work, then move to the last resort.
Also Read: How to Fix Dread Hunger Keeps Crashing on Windows
Solution 8: Reinstall the Game
None of the above fixes worked? Then, your final resort should be uninstalling and reinstalling the game. Possibly, there are some stubborn issues with your prior installation. Here is how to do that;
Step 1: Open Steam and go to the LIBRARY tab.
Step 2: Look for Teardown on the available game list and click right on the very same.
Step 3: Next, click on Manage.
Step 4: To affirm your action, click on Uninstall.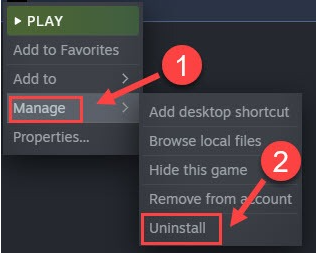
Once you are done with the aforementioned steps, reboot your system, then, download and install the game again. Installing the latest version will definitely help you fix Teardown keeps crashing on Windows.
Teardown Keeps Crashing on Windows: FIXED
We hope one of the solutions discussed above helps you resolve the Teardown crashing or lagging issues on Windows 11, 10, 8, and 7 PC. If you have any doubts or better suggestions, then please drop us a comment below.
For more troubleshooting tips, do subscribe to our Newsletter. Along with this, follow us on Facebook, Twitter, Instagram, and Pinterest
.


