Is your Windows 10 taskbar not working properly? If so, then read this troubleshooting guide to know how to fix this annoying issue quite effortlessly.
The taskbar in the Windows operating system which was just one of the petty features at the beginning has now got new functionality in Windows 10. The all-new elements turned it into a high-rich feature that is undoubtedly pleasant and beneficial. Though with the latest features, many users have encountered some obnoxious errors, but don’t worry, this guide is created only to fix these annoying errors.
What are the Major Issues that happen with Taskbar in Windows 10?
Taskbar not working error in Windows 10 is one of the most common issues one can experience. Discussing the same issue, when it occurs, you will notice that your taskbar stops reacting to your commands. Many times, the taskbar may get frozen and you are unable to move your cursor over there. Not only that but there are numerous issues with the Windows 10 taskbar that can arise and these are as follow:
- Right-click on Taskbar not working.
- Taskbar not responding on startup.
- Taskbar search not working.
- Taskbar buttons not responding.
- Cortana not working on Taskbar.
- Taskbar jump list not showing up.
- Taskbar got frozen in Windows 10.
So, these were possible issues that can occur with your Taskbar. If you are experiencing any of the above issues with your Taskbar, then you can fix them with the solutions shared in this blog post.
Troubleshooting Tips to Fix Taskbar Not Working in Windows 10
There are few possible strategies that you can adopt to resolve the Windows 10 Taskbar not working issue. These easy yet effective tactics fix the glitches that snatching down the taskbar functioning and make your taskbar work again. So, without any further ado, let’s get started!
Tip 1: Ensure Up-to-date Drivers
Many times, outdated, broken, or faulty drivers are the reason for many computer glitches. Thus, if your Taskbar not working on Windows 10, then there may be missing drivers behind this issue. Therefore, you need to always make sure that all the drivers are up-to-date always to their most recent version.
Updating the drivers wasn’t a simple task as it sounds. But after the arrival of the Bit Driver Updater, it became an easy-to-go task that any individual can perform in just a few clicks of the mouse. Plus, it is an automatic driver updater utility that requires no manual support for searching the correct and compatible drivers. Here are the steps you need to follow in order to update all the faulty or missing drivers via Bit Driver Updater:
Step 1: Get Bit Driver Updater introduced on your PC by making a quick click on the button provided below.
Step 2: Next, follow the wizard to install the utility completely.
Step 3: After this, summon the tool, and click on the Scan option shown on the left pane and wait until it gets executed.
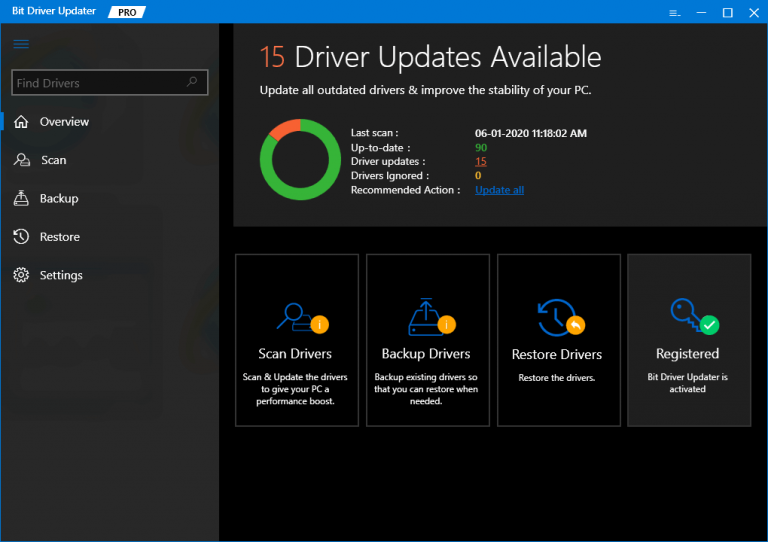
Step 4: Once the scanning is completed, then check the list of the outdated drivers and click on the Update All button for updating all the faulty ones in just a single click.

There you have the latest drivers installed on your PC. Isn’t it so magical to effortlessly perform the driver update in no time through Bit Driver Updater? Yes! Now, you can check to see if the Windows 10 taskbar not working issue has been fixed.
Also Read: How To Delete Duplicate Photos Of Different File Formats
Tip 2: Restarting Windows Explorer
Sadly, if updating the drivers doesn’t work for you, then you can try to restart Windows Explorer in order to fix Windows 10 Taskbar not working issue. Below are the steps you need to follow to restart Windows Explorer:
Step 1: Trigger Task Manager quickly by hitting the CTRL + SHIFT + ESC keys simultaneously from the keyboard.
Step 2: In the Task Manager window, locate Windows Explorer under the Processes tab and then make right-click on it.
Step 3: Next choose End Task to proceed further.
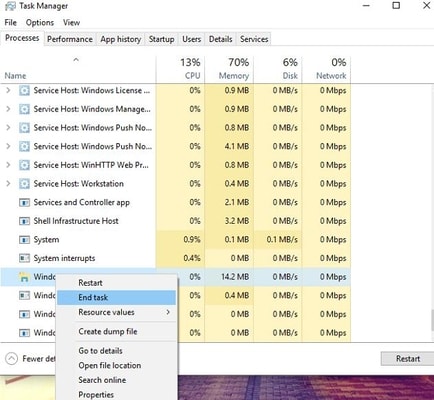
The operation will re-launch after a few minutes automatically, now check if the Taskbar not working issue has been solved or not. This method may solve the issue but on a temporary note, so for a permanent solution move on to the next solutions.
Tip 3: Run Powershell
Try to perform Powershell to fix Windows 10 Taskbar not working issue. Here are the steps that you have to follow to do so:
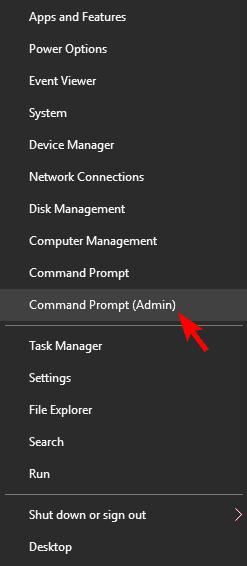
Step 1: Press Windows + X keys on your keyboard, and then choose the Command Prompt (Admin) from the list that appears.
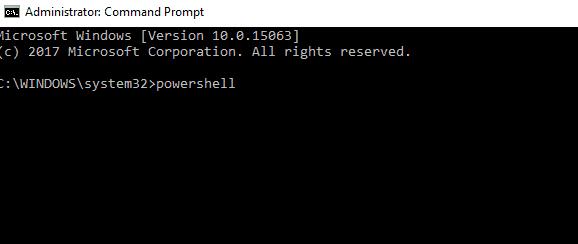
Step 2: In the Command Prompt window, input the following command and hit the Enter key from the Keyboard.
Powershell
Also Read: How to Delete Backup Files in Windows 10 – Quickly and Easily
Step 3: After this, copy or paste the following command in the Windows Powershell window and hit the Enter key.
Get-AppXPackage -AllUsers | Foreach {Add-AppxPackage -DisableDevelopmentMode -Register “$($_.InstallLocation)AppXManifest.xml”}

Step 4: Next, close the Powershell window and navigate to the following path:
C:/Users/your_username/AppData/Local/
Step 5: Find and remove TileDataFolder.

Now, check whether the Windows 10 Taskbar not working has resolved or not. If in case, after trying this method still the issue remains the same then switch on to the next solutions.
Tip 4: Perform Windows Update
Another important hack you can consider to fix this issue is – performing Windows Update. Older versions of Windows may cause numerous issues, one such is Taskbar not working on Windows 10. So, make sure to update the Windows version frequently. Here is how to perform Windows Update:
Step 1: To view the Windows Settings press Windows + I keys on your Keyboard.
Step 2: Next, choose the Update & Security option and click on it.
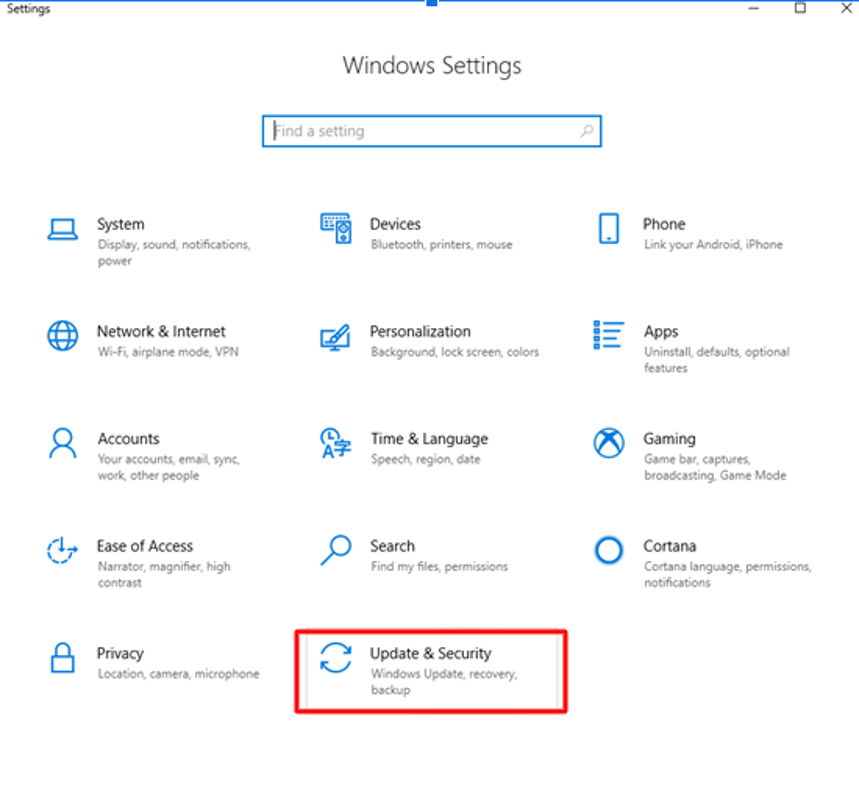
Step 3: After this, make sure to select Windows Update from the left pane of the window, then, click on the Check For Updates from the right pane.

That’s exactly what you need to perform in order to update the Windows version. In this way, Windows checks for the latest updates, if any update is found then Windows will download and install it automatically.
Also Read: Windows 10 Disk Management: Get Complete Help in Disk Management
Tip 5: Run Windows Troubleshooter
You can use Windows in-built troubleshooter for detecting and resolving several technical glitches. It is the utility program that comes by default in Windows to find and fix the issues. All you need to do is just follow the steps provided below to run the Windows troubleshooter for fixing Windows 10 Taskbar not working issue:
Step 1: Open Windows Settings quickly by hitting the Windows + I keys together from the keyboard.
Step 2: Next, click on the Update & Security option.

Step 3: Now, choose Troubleshoot from the left pane of the Window, and then click on Run the Troubleshooter.

Thus, Windows will help you in finding and fixing the numerous Windows-related issues. After troubleshooting the errors, the issues with Taskbar should be fixed.
Also Read: How to Report Someone on Facebook (Profiles, Pages, Comments, and More)
Taskbar not Working in Windows 10 – FIXED
The taskbar is one of the most crucial components in a Windows PC, and it’s not functioning well is a big nuisance to the users. Therefore, we have tried to educate you on how to fix Windows 10 Taskbar not working in this write-up.
Hope, you must have liked this troubleshooting guide and found much helpful to deal with the issue. If the guide was really beneficial for you, then, please tell us which troubleshooting tip or hack worked for you, in the box below.
Also, share your suggestions too through the comments below. Lastly, for receiving more troubleshooting articles do subscribe to our Newsletter. And, don’t forget to follow us on Instagram, Facebook, Pinterest, and Twitter for getting quicker responses.

