How to Clear The Delivery Optimization Cache in Windows

You can effortlessly wipe off the delivery optimization cache to give the PC storage the much-needed space for improved performance by following this guide.
You may have bumped into delivery optimization files when decluttering the C drive. These files are those files that Windows update downloads and cache your PC sent to other computers on the same network to speed up their update process, decrease the bandwidth consumption, and improve security. However, these files hog up the hard drive space, prompting many users to clear the delivery optimization cache in Windows.
Are you also one of those users who wants to remove these files but needs more clarification on how to delete them? If yes, you can continue reading this article to learn the most suitable methods to delete Windows 10 delivery optimization cache files. Let us not waste precious time and get started with them right away.
Methods to Clear the Delivery Optimization Cache in Windows
Here is how to clear the cache files of delivery optimization in Windows effortlessly.
Method 1: Remove delivery optimization files manually
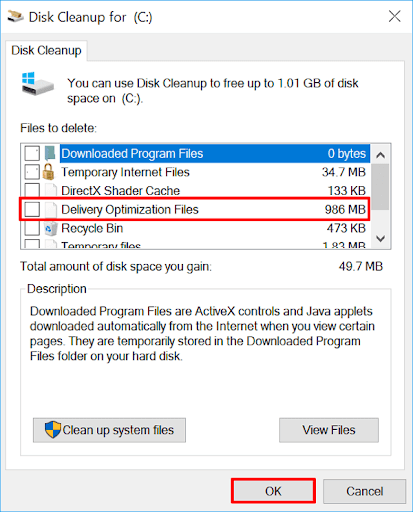
Windows computers boast a built-in Disk Cleanup utility to clean files, such as delivery optimization cache to free up disk space. Hence, here is the step-by-step process to delete these files from your computer using the Disk Cleanup tool.
- To begin the process of cache deletion, click the Start button on the taskbar, input Disk Cleanup in the on-screen search text box and press Enter.
- Secondly, choose Disk Cleanup from the search results to open it.
- You can now checkmark the box next to the Delivery Optimization Files to select them for deletion. You can remove the checkmark from the other files to exclude them from the cleanup process.
- Next, click OK to navigate to the next step.

- Lastly, reboot your PC to complete the cache cleaning process.
Method 2: Delete Windows 10 delivery optimization files automatically using Win Riser
As you may have noticed, manual cache file deletion is a slow and complex process. Hence, we have got you covered if you are looking for a quick and easy way to clear the delivery optimization cache in Windows.
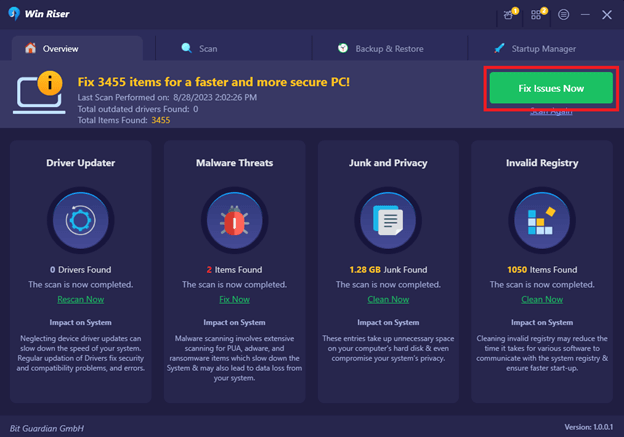
You can perform this task automatically and hassle-free using one of the best PC cleaners and optimizers, such as Win Riser. The Win Riser software offers one-click cache files and other junk cleaning along with a lot of other useful features. A few of these features include driver updates, deep scans to help you get the most accurate system status details, registry issues fixing, malware identification and removal, and much more. Hence, you can follow the below simple directions to use this software.
- Firstly, download the Win Riser software setup from the link below.
- Secondly, double-click the file that gets downloaded and install the software.
- Next, allow the software a couple of seconds to perform a comprehensive scan to detect junk and other issues.
- Click Fix Issues Now to resolve all the detected problems instantly.

- Lastly, restart your PC to save the changes you have made.
So, that was how to clear the delivery optimization cache in Windows. In addition to deleting these files, you can disable this feature if you do not need it to prevent cache creation. We share how to do it in the following section of this article as a bonus for our readers.
Also read: How to Clear Cache and Cookies on Browser (Windows PC)
Disabling Windows 10 Delivery Optimization
If you do not want the Delivery Optimization feature, you can follow these steps to disable it.
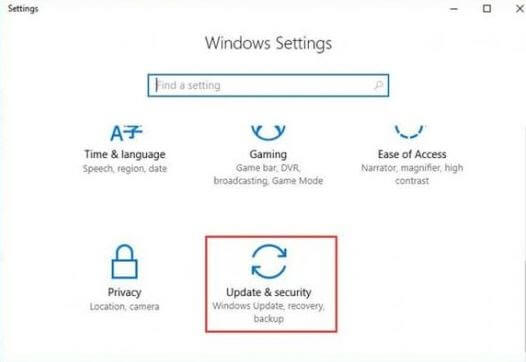
- Firstly, access your PC’s settings using the Win+I hotkey.
- Secondly, select Update & Security from the available Settings panel.

- Next, select Delivery Optimization from the menu on the left.
- You can now toggle off the Allow downloads from other PCs button to turn off the delivery optimization in Windows 10.
- Lastly, restart your PC to complete the above process.
Wrapping Up
This article explained how to clear the delivery optimization cache in Windows 10 and the steps to disable this feature. We hope this guide proved to be helpful. However, if you have tips to improve it or have any questions, please feel free to drop us a comment. We will be more than happy to hear from you.


