How to do Noise Reduction on Photoshop (Complete Guide)

If you want to execute noise reduction in Photoshop, this guide will help you do the same easily.
Adobe Photoshop is one of the best and most commonly used editing tools of all time. The app is quite popular amongst professionals and enthusiasts because of the plethora of features offered to all. The editing properties of the software are so strong and effective that users get attracted to it like a moth to a flame.
The platform is quite great for noise reduction. You can easily remove all kinds of noises from the image using Adobe Photoshop and get a crystal-clear output that meets your expectations perfectly. There are multiple ways that you can use to remove noise from any image. This is why either the user gets confused about which one of these to use.
With the help of this guide, we will bring forward all these different techniques for noise reduction in Photoshop. Different techniques work for different devices and requirements. Hence, go through the methods first and then reduce the noise as required. However, be advised that you should proceed cautiously for an accurate and easy resolution. Now that the intro is laid out well, let’s have a look at the procedure right below.
Techniques for Noise Reduction in Photoshop: Tested Ways
In the coming sections, we will have a look at the safest and the best ways to reduce image noise using the Adobe Photoshop app. Go through the solutions and deploy all of the necessary ones for a high-quality and clear image.
Method 1: Reduce the Color Noise in an Image
Firstly, we are going to explain how to remove the color noise from any image using the Photoshop app. This will allow you to rectify the color of the image according to your preferences. The procedure to execute color noise reduction in Photoshop is quite simple and provided below:
- Run the Photoshop app and then open the image you want to edit.
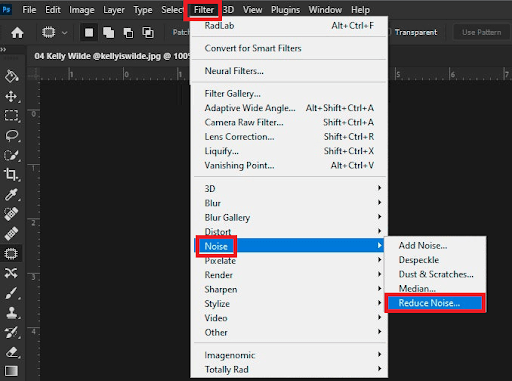
- From the menu of the app, click on Filter, take the cursor to Noise, and select Reduce Noise.

- In the window that appears, you can use the image editing sliders to modify the image as required. You can introduce the required changes with ease.
- When the image is noise-free, save the picture or share it if necessary.
You can introduce the required changes to the image with the help of the sliders. Just drag the sliders and watch the changes happening in the preview pane. If you want to reduce luminance noise, then follow the next procedure.
Also Read: How to Fix Red-Eye in Photoshop in Just 5 Minutes
Method 2: Reduce the Luminance Noise in an Image
The method to execute the luminance noise reduction in Photoshop is a bit lengthy and advanced. This is because, with the help of this method, you can remove noise in Photoshop that the color method may fail to. Being said that, follow the below steps closely and remove noise with ease:
Procedure to Reduce the Luminance Noise:
- Run the Photoshop app and then open the image you want to edit.
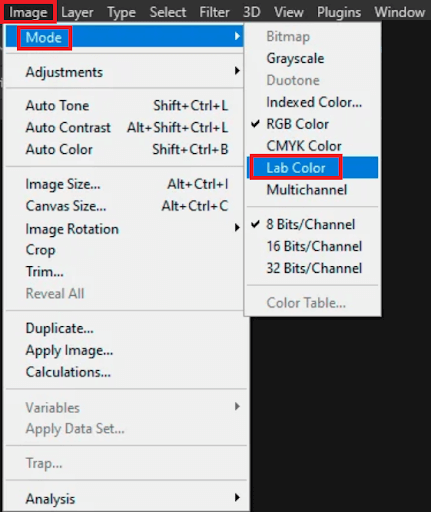
- From the menu of the app, click on Image, take the cursor to Mode, and select Lab Color.

- In the next window, you will see different Channel palettes named Lightness and RGB. Drag the current background to the Create New Layer button present at the bottom of the window.
- Click on Lightness as described earlier and drag the background again to the Create New Layer button.
- Now what you need to do is click on the Filter option present on the menu and select Filter Gallery.
- Select Stylize from the next pane and open the Glowing Effects. Use this filter to make the required adjustments to the image and proceed further.
- Once you are done with the changes to the image, open the Image menu, and select Invert under the Adjustments sub-category.
- While pressing the Ctrl button on the keyboard, select all the white sections established after using the Filter Gallery.
- Nextly, click on the Filter menu, and open Smart Blur under the Blur sub-category.
- Within the Smart Blur filters, select the Quality to be High, and use the Radius filters to blur the image as necessary.
- Now look for the Layers displayed at the bottom of the screen and use the Opacity setting to determine the opacity for all the layers. Keeping on changing and adjusting the opacity till you get the perfect results.
- Once you are done with the above adjustments, select the layers, and click on the Flatten Image button.
- Lastly, use RGB settings to give the final touches to your image.
So, this is how you can apply the luminance noise reductions. We suggest that you play with all the filters as much as you can to get the desired and effective results.
Also Read: Scratch Disks are full? How to Clear Scratch Disk and Photoshop Cache
Frequently Asked Questions: Noise Reduction in Photoshop
You may have some questions related to the methods discussed above related to how to remove noise in Photoshop. Addressing the same, we are answering some of the most commonly asked questions below for your ease of understanding:
Q 1. Does Photoshop have noise reduction?
Yes, Photoshop has noise reduction techniques that allow you to improve the quality of the image and make it more clear and clutter-free.
Q 2. How do I remove noise from the background in Photoshop?
There are two common methods that you can use to remove noise from the background in Photoshop. One allows you to remove the color noise while the other deals with luminance noise. For the same, you need to open an image in Photoshop, navigate to Filter>Noise>Reduce Noise and use the sliders within to make the changes.
Detailed procedures for both methods are explained in the previous sections of this guide.
Q 3. What is the best noise reduction setting in Photoshop?
The best noise reduction setting in Photoshop is available under the name of Reduce Noise when you navigate through Filter>Noise>Reduce Noise.
Q 4. How do I reduce grain and noise in Photoshop?
To reduce the grain and noise in Photoshop, you can take the help of the Filter>Noise>Reduce Noise settings or the luminance noise settings. The distilled procedure for the same methods is available in the previous sections of this guide.
Also Read: Best Free Photoshop Plugins for Photographers
Noise Reduction in Photoshop: Execute Smoothly
So, this was how even a beginner can easily reduce the digital noise from an image using the Adobe Photoshop app. We hope that we were able to help you with the procedures aptly and as required. The procedure to reduce the luminance noise may be complicated but is the best when it comes to increasing the image clarity.
If you have any questions related to the guide, we are here to help you. Explain your queries in the comments below and we will offer accurate solutions to the same. Our expert team will look into the matter and get back to you in no time. If you liked this guide on how to execute noise reduction in Photoshop, do let us know in the comments as well.
Follow us on different social media platforms like Facebook, Instagram, Twitter, or Pinterest for more. Stay up to date with our new and interesting blogs by subscribing to our newsletter. Just provide your email address in the box below.


