How to Fix Input Not Supported Acer Monitor (Top 5 Ways)

This article introduces you to the quickest and easiest solutions to the Acer monitor input error on Windows 10 and 11.
Acer monitors are celebrated across the world for their crisp display and the best performance. They are known to make your gaming and binge-watching experience better. However, recently many users reported an annoying “input not supported” on Acer monitor problem, resulting in all their work coming to a halt.
If you also happen to be one of those unlucky users, you can put all worries to rest. This article guides you through the tried and true solutions to the Acer monitor problem. However, it is crucial to understand the causes of this issue before trying to fix it for better troubleshooting. Hence, let us discuss the same in the subsequent section of this article.
Acer Monitor Input Not Supported-Causes
The following factors may be responsible for the problem you are experiencing with your Acer monitor on Windows 10/11.
- Issues with your monitor connection
- Incorrect screen resolution
- Outdated display or graphic driver
- The display cable is damaged
- Hardware problems with the monitor
After listing the possible causes, let us learn how to solve the problem.
Input Not Supported on Acer Monitor-Quick and Easy Fixes
You can apply the following solutions to get rid of the Windows 10/Windows 11 input not supported Acer monitor error.
Fix 1: Check your monitor connection
Monitor connection issues are among the most common reasons input is not supported on your Acer monitor. Hence, you should check the monitor cable and ensure it is functioning correctly before trying any complex solutions. You can check the cables by connecting to another monitor (if you have a second monitor). Also, remember to check the connection ports to ensure it works properly.
Also Read: How to Fix No Signal on Acer Monitor (Top 7 Fixes)
Fix 2: Use safe mode to change the resolution
You may not be able to use your computer normally (the screen goes black) as a result of the Acer monitor input not supported error. In such a situation, changing the screen resolution and refresh rate through the safe mode can solve the problem. Hence, here are the steps to do it.
- Firstly, hold the power button for at least ten seconds.
- Secondly, hit the power button again to turn on the computer.
- Hold the power button for at least 10 seconds when the manufacturer’s logo appears/Windows begins to start.
- You can now press the power button again to turn on your computer.
- Hold down the power button for ten seconds to turn off the computer.
- Again press the power button to turn on your computer.
- Wait until you enter the recovery environment.
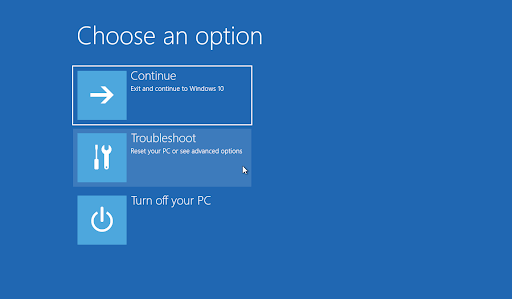
- Use the arrow keys to select Troubleshoot from the on-screen options.
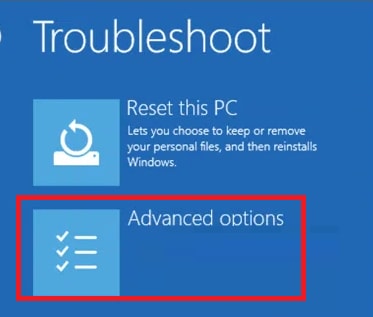
- Select the Advanced options.
- Navigate to the Startup Settings.
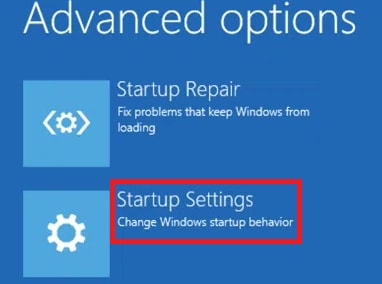
- Choose the 5th option from the on-screen list or press the F5 key to enter the safe mode with networking.
- After entering the safe mode, right-click the empty desktop space and choose Display settings from the available options.
- Scroll down to the Scale and layout segment and select the recommended resolution for the display. Windows 11 users will get this option as Display resolution.
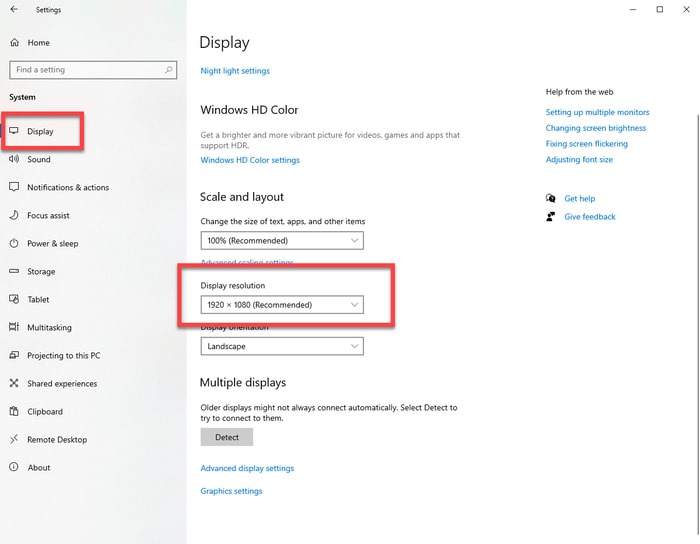
- Click on the Keep changes button to confirm the change.
- You can now select the Advanced display settings.
- Select Display adapter properties for Display from the monitor showing the input not supported issue.
- Navigate to the Monitor tab.
- Select the recommended/default rate from the screen refresh rate drop-down menu.
- Lastly, restart your computer after saving the changes.
Fix 3: Perform hardware and devices troubleshooting
The hardware and devices troubleshooter can find and solve the problems with your monitor. Hence, here is how to use it to fix the Windows 10/Windows 11 Acer monitor input not supported error.
- Firstly, search and open Command Prompt on your computer.
- After opening the Command Prompt, input msdt.exe -id DeviceDiagnostic in the command line and press Enter.
- Wait until the troubleshooting is completed.
- Lastly, reboot your PC after completing the above process.
Also Read: Best CPU Temperature Monitor Tools For Windows
Fix 4: Update your graphic and display driver (Recommended)
Outdated drivers break the communication between the connected peripherals, such as your monitor and the system, causing multiple problems, including the one you are experiencing. Updating drivers is among the sure-shot solutions to almost all problems. Hence, you can update the drivers on your computer.
There are many ways to update drivers. However, the easiest and safest of all options is to update drivers automatically via Win Riser. Win Riser is a renowned driver updater and PC optimization software with features such as driver backup and restoration, junk removal, malware detection, and much more. You can download and install this wonderful software from the following link.
After installing the software, let it scan your computer for two to three seconds, review the results of the scan, and select Fix Issues Now to fix all issues, including Acer monitor VGA to HDMI input not supported, with one click.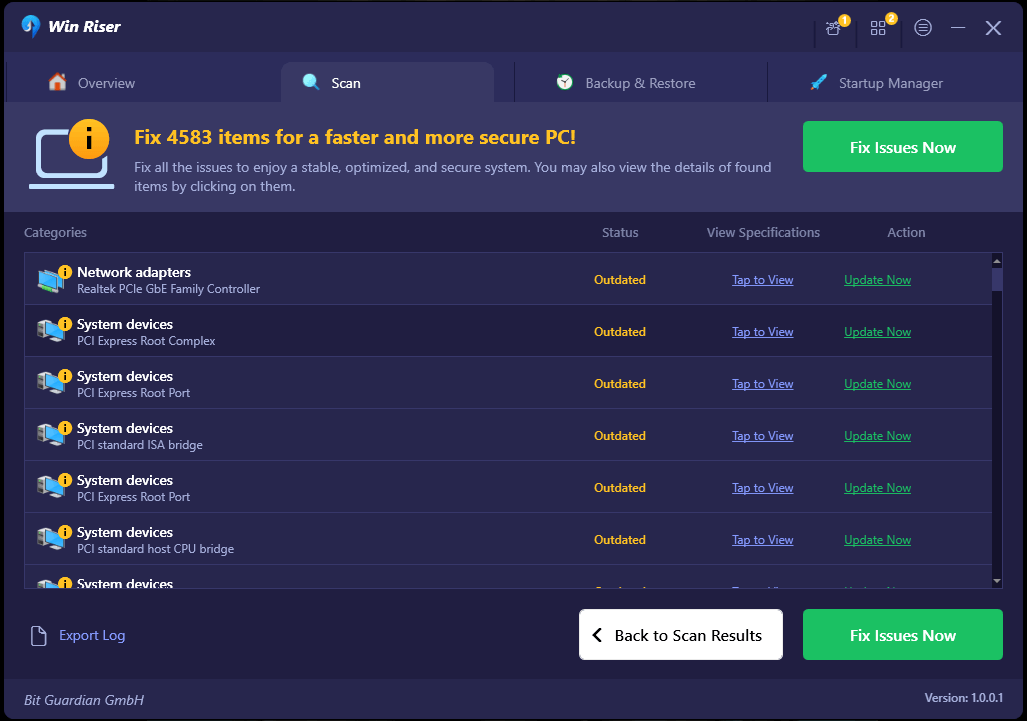
Fix 5: Switch to Windowed mode (if you experience the issue while gaming)
Your game settings may be higher than what your computer can support, leading to the error you are trying to fix. Hence, you can use the Alt+Enter to access your game in the Windowed mode and drag the ends to lower the resolution.
Also Read: Best Free Monitor Calibration Software
Acer Monitor Input Not Supported Error Fixed
This article discussed various approaches to fix the monitor input not supported Acer monitor BIOS error. You can begin by following the first approach and continue moving forward until the monitor starts functioning correctly. However, you can directly update drivers using Win Riser if you wish to save time and effort. If you have questions or suggestions about this guide, do not hesitate to drop them in the comments section below.


