How to Fix Microsoft Teams Camera Not Working
Read the complete guide to find the most reliable solutions to Fix the Microsoft Teams camera not working issue on your device.
Getting on a call with your coworkers using a virtual medium has evolved to become the new standard. The number of organizations using video calls for meetings with Microsoft Teams continues to rise. Unfortunately, even Microsoft is susceptible to some of the common problems that users come across while using the app. What should you do then if your camera stops working while you’re using Microsoft Teams on Windows 10? If you are also frustrated with the same question you are on the right page.
Don’t give up and follow the methods mentioned in the following guide to address the Team’s camera not working. There is a significant possibility that this is the result of a software mistake, such as a bug or an out-of-date driver.
In this piece, we’ll cover all you need to know to fix your Microsoft Teams camera not working and get it functioning with the various operating systems.
General Fixes for Microsoft Teams Camera Not Working:
Give these straightforward methods a shot. Try one of these simple remedies to fix the MS Teams camera not working issue. These steps must be applied before uninstalling the program or upgrading to Windows 10.
- Restart either your laptop or your computer.
- You will need to restart Microsoft Teams.
- If you are using a camera that connects by USB, you need to unplug and then reconnect it.
- Connect your camera to the computer using a different connection if you suspect that one of the USB ports on your device is not working properly.
- Close any other applications, such as Zoom or Skype, that require access to the camera. In most cases, these applications might already be running in the background, which means that your camera might already be in use.
Methods to Solve Microsoft Teams camera not working:
If the above-mentioned general fixes didn’t help apply the detailed steps for each of the following solutions to resolve Teams camera not working issue.
1. Fix Microsoft Teams Camera Not Working by Turning off Other Apps:
If the camera is not detected by Microsoft Teams, unplugging and then reconnecting it can be the solution to the problem. You should also exit any other applications (like Zoom or Skype) that are utilizing the peripheral device before restarting the computer.
Follow these additional steps for advanced troubleshooting if you are still having issues after trying the previous ones.
You can test to see if the application is compatible with the built-in camera on a computer that has more than one camera by first disconnecting the USB camera. If everything you’ve tried works, then making use of the platform’s native hardware can be the quickest answer to your problem.
In the event that you really need to use a USB camera, you can utilize Device Manager to turn off the built-in camera. You should be aware, however, that if you disable the peripheral device, you won’t be able to utilize it with any other applications.
Follow these instructions in order to turn off the built-in webcam on your Windows 10 computer to fix camera not working on Teams issue:
Step 1: Open the Start menu on your device.
Step 2: Simply conduct a search for “Device Manager,” and then select the first relevant result to launch the application.
Step 3: Develop further the Imaging devices and Cameras branch, as well as the Sound, Video, and Game Controllers.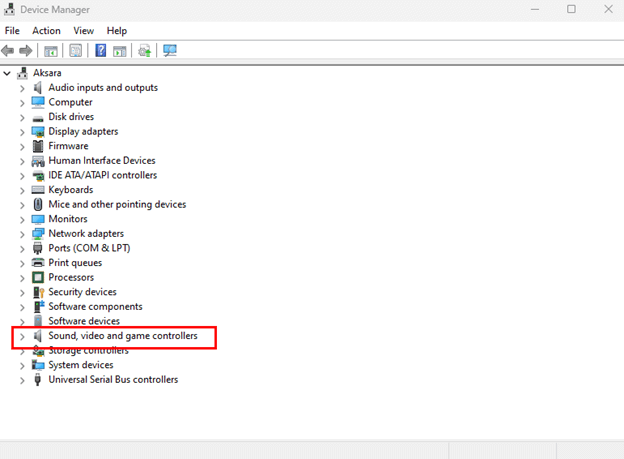
Step 4: Select the “Disable device” option from the context menu that appears after you right-click the camera.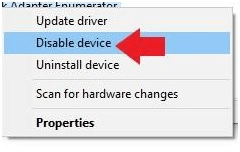
Step 5: Open the Teams app once you have finished the procedures to ensure that you may keep conducting video conversations.
You can re-enable the hardware at any time by following these steps again, with the exception of step 4, in which you must make sure to pick the Enable device option.
In the event that there is a hardware-related issue and you are in need of a replacement, we suggest latest Camera that has advanced features such as ability to record video in 4K resolution.
In case the Camera on teams not working issue remains, move to the next section of the guide.
Also Read: How To Fix WiFi Not Working in Windows 10/8/7
2. Fix Microsoft Teams Camera Not Working by Updating the App:
It is possible that you may need to manually update the Microsoft Teams app in order to fix a faulty Camera not working on Teams. The outdated app might be preventing the app from making use of the camera. Although updates for Microsoft Teams are automatically downloaded and installed, you can manually perform these updates too.
Follow these steps to keep your version of Microsoft Teams up to date:
Step 1: Launch the Microsoft Teams app.
Step 2: To access the main menu, select the button that looks like three dots and is located in the top-right corner.
Step 3: Simply select the option to Check for updates.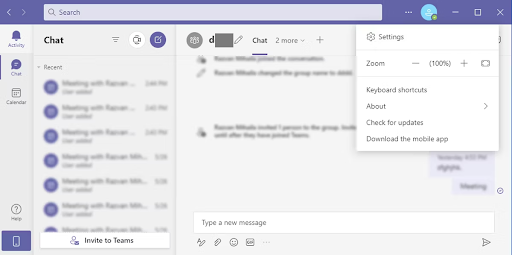
Now if the Team’s camera not working issue persists, try the following methods.
Also Read: How to Fix Logitech Wireless Mouse Not Working
3. Fix Microsoft Teams Camera Not working by Force Shutting App:
Confirm that the webcam is operational by going to the “Devices” page inside the settings for Teams after you have finished the instructions. You can verify that everything is functioning properly by making a test call by clicking the button that says “Make a test call.”
To force shut the Teams app in order to fix Camera on Teams not working
Step 1: Open Task Manager on your Windows device.
Step 2: Locate the Teams app and right-click on it.
Step 3: Here Force Shut the app.
Now launch the app again to check if Team’s camera not working issue is fixed. However, if the problem remains, move to the next method.
Also Read: How to Fix Discord Mic Not Working in Windows 10, 11
4. Update Camera Driver to Fix Microsoft Teams Camera Not Working
If the app and the camera continue to be incompatible with one another, the problem may lie in the driver. In this particular instance, updating the driver, reinstalling the driver, or rolling back to an earlier version of the driver might help resolve the issue.
Update Camera Driver:
In order to offer smooth communication between hardware and the OS it is recommended to install driver updates regularly. If you have the skills and experience you can download drivers from the official website of the manufacturer or from the driver directory i.e. Device Manager.
However, an easy and recommended method to not only update the camera but all other system drivers is via an automatic driver updater tool. Bit Driver Updater is one of the most reliable options to download system drivers. It enables a one-click download along with scheduling these updates. Moreover, all your device data is backed up and can be restored.
Also with the Pro version of the tool, you get 24*7 support and up to 60-day money-back guarantee. So to update the camera driver via Bit Driver Updater to resolve the Microsoft Teams camera not working issue.
Steps to Update Camera Driver Automatically:
Step 1: Download the Bit Driver updater below. Double-click and apply the instruction to install it on your device.
Step 2: Run the tool and wait till the outdated driver search begins automatically. If not, click on the Scan Now option.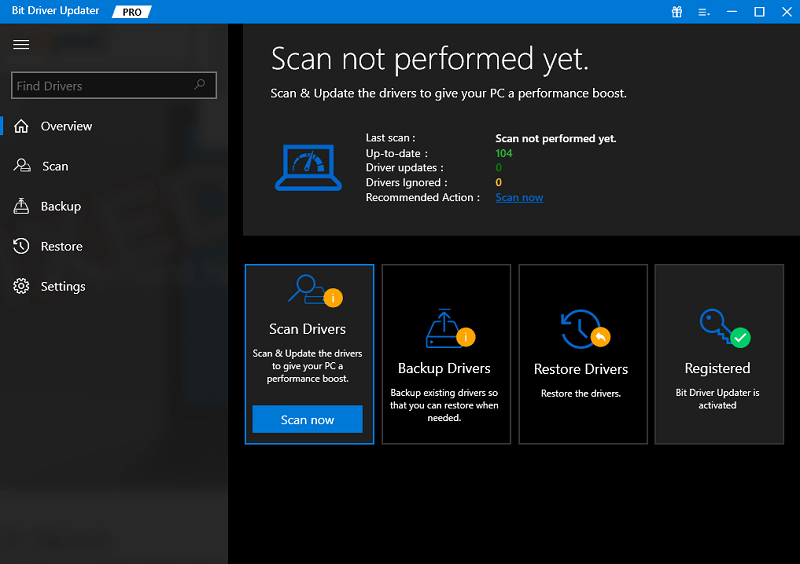
Step 3: Click on the Update Now button next to the Camera Driver. Else, if you have the Pro version of the software head to the end of the list and click on Update All button.
Step 4: Install the updated drivers and restart your PC to apply the updates.
Once the updated drivers are applied, Relaunch the Teams app. Now check if the Camera not working on Teams issue is fixed. In case, the problem persists, apply the next solution.
Also Read: How to Fix Epic Games Launcher Not Working (Guide)
5. Fix Microsoft Teams Camera Not Working via Settings Adjustments within Teams
There is no further configuration required for Microsoft Teams to recognize the camera. On the other hand, if you are unable to initiate a video conference, it is possible that you are having difficulties with the camera’s settings. Therefore, some adjustments must be made to resolve MS Team’s camera not working.
Follow these steps in order to configure the settings for your camera on Microsoft Teams:
Step 1: Launch the Microsoft Teams app on your device.
Step 2: To access the main menu, select the button that looks like three dots and is located in the top-right corner.
Step 3: Choose the Settings option from the menu.
Step 4: Simply select the Devices tab.
Step 5: Choose the appropriate camera from the list that appears in the “Camera” section by using the pull-down menu.
Step 6: Check the camera’s functionality by using the preview, and confirm that it is working.
When you have finished the instructions, you should then make a test call to see if the Camera not working on Teams issue is fixed.
Also Read: How to Fix Photos App Not Working in Windows 10, 11
Microsoft Teams Camera Not Working Issue: FIXED
Hopefully, with the help of the above guide you were able to easily fix the Microsoft Teams camera not working issue. Make sure you follow the format of solutions to avoid extra time and effort. If you have any questions or feedback for us leave them in the comments section. For more tech troubleshooting guides and updates for Windows and Mac subscribe to our blog. Follow us on Facebook, Instagram, Twitter, or Pinterest to never miss any tech news.


