How to Fix System Interrupts High CPU Usage [FIXED]
![How to Fix System Interrupts High CPU Usage [FIXED] How to Fix System Interrupts High CPU Usage [FIXED]](https://wpcontent.techpout.com/techpout/wp-content/uploads/2023/02/08174906/How-to-Fix-System-Interrupts-High-CPU-Usage-FIXED.jpg)
System interrupts CPU usage is high if it equals or exceeds 10%. This high CPU consumption can cause a lot of issues on your computer. Hence, you can fix it at the earliest using the solutions given in this article.
System interrupts is an official component of the Windows OS to manage communication between the system and your computer hardware. You can see it as a Task Manager process. It shows the CPU usage of every hardware interrupt. However, some users have complained about system interrupts’ high CPU usage.
If you also encounter Windows 10 system interrupts 100 percent CPU usage or high CPU usage, you are reading the correct article. Through this article, we walk you through the best possible solutions to this problem.
However, before attempting to troubleshoot the issue, let us understand what triggers this problem.
Why System Interrupts High CPU Usage Occurs
As stated earlier, system interrupts is a Windows OS component that alerts the CPU of any priority task that needs the CPU’s attention. When alerted, the CPU pauses the task at hand to tackle the high-priority task.
However, the system interrupts becomes a problem when it consumes 10% or more of the CPU. This system interrupts high CPU consumption on Windows 10 and 11 happens when there is some hardware error that may lead to fatal system crashes if left unattended.
Many factors may contribute to the hardware error causing a high, i.e.,10% or more (sometimes 100%) CPU usage on Windows 10 and Windows 11. The following are the key ones of them.
- External hardware interrupting the CPU
- Out-of-date hardware drivers
- Problems with internal devices, like network adapters, internal modems, internal sound devices, and any add-on cards
- Hardware failure
- Outdated BIOS
Above, we discussed the possible causes of the system interrupts CPU usage problem. Now, let us fix it.
Also Read: [Fixed] Desktop Window Manager High GPU in Windows 10, 11
Fixes for System Interrupts High CPU Usage on Windows 11/Windows 10
You can apply the below solutions to fix the 10% or more CPU usage of system interrupts on Windows.
Fix 1: Perform basic troubleshooting
Before trying more complex and technical workarounds, you can try these basic fixes to the system interrupts’ high CPU usage.
- Restart your computer
- Scan your device for malware or virus infections that may be causing hardware problems
- Disable or unplug external hardware devices like USBs
Fix 2: Try disabling USB root hubs
USB hardware is one of the most common culprits behind high CPU usage of system interrupts on Windows 10 and Windows 11. Therefore, disabling the USB root hub can fix the issue. The following are the steps to disable it.
- Firstly, enter the quick access menu using the Windows+X keyboard shortcut.
- Now, select Device Manager from the options on your screen.

- Locate and click on Universal Serial Bus Controllers to expand them.
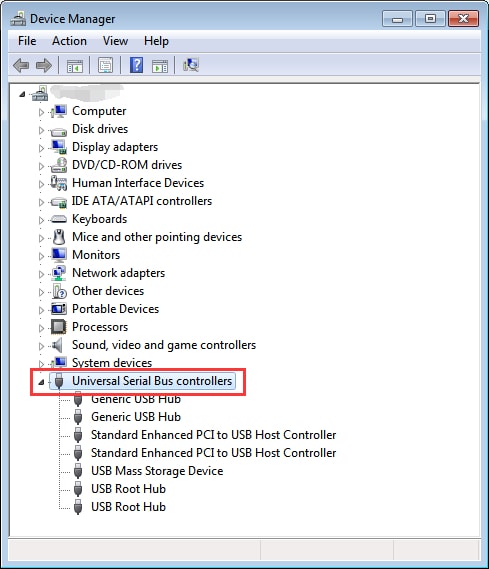
- Find and right-click each USB Root Hub and Disable Device one by one, except those for your keyboard and mouse.
Note: It is crucial to ensure you do not disable the USB Root Hub for your keyboard and mouse. Hence, you can right-click the USB Root Hub, go to Properties, click on the Power tab, and view the Attached devices.
- After disabling the USB Root Hubs (except the ones for the keyboard and mouse), check whether or not the system interrupts CPU usage has come down. Try the next solution if the CPU usage is still on the higher side.
Fix 3: Update hardware drivers (Recommended)
Outdated hardware drivers are the most popular culprits behind Windows 11 and Windows 10 system interrupts high CPU usage. Hence, updating the device drivers is among the sure-shot ways to fix the issue.
You can update all out-of-date drivers automatically with a single click through a professional program like Bit Driver Updater.
The Bit Driver Update software updates all drivers securely and automatically with just a click. Moreover, it boasts many other benefits, such as scan scheduling, driver backup and restoration, acceleration of the driver download speed, and much more.
You can click the following link to get this incredible program on your computer.
After installing the software (installing it takes only a few seconds), a list containing all outdated drivers appears on the screen. You can choose to Update All these listed drivers automatically with a single click on the button to do it. 
There is also an Update Now option to download and install specific driver updates. However, experts suggest updating all drivers for better computer performance.
Also Read: Best CPU Temperature Monitor Tools For Windows
Fix 4: Disable internal devices
If updating drivers did not bring down the Windows 10 system interrupts’ CPU usage from 100% to the normal level, the problem may be internal device-related. Hence, disabling internal devices like network adapters, sound devices/sound cards, internal modems, and add-on expansion cards can solve this problem.
You can disable all problematic internal devices using the Device Manager. As an example, below is how to disable network adapters.
- Launch the Device Manager tool.

- Find and click on Network adapters to expand them.
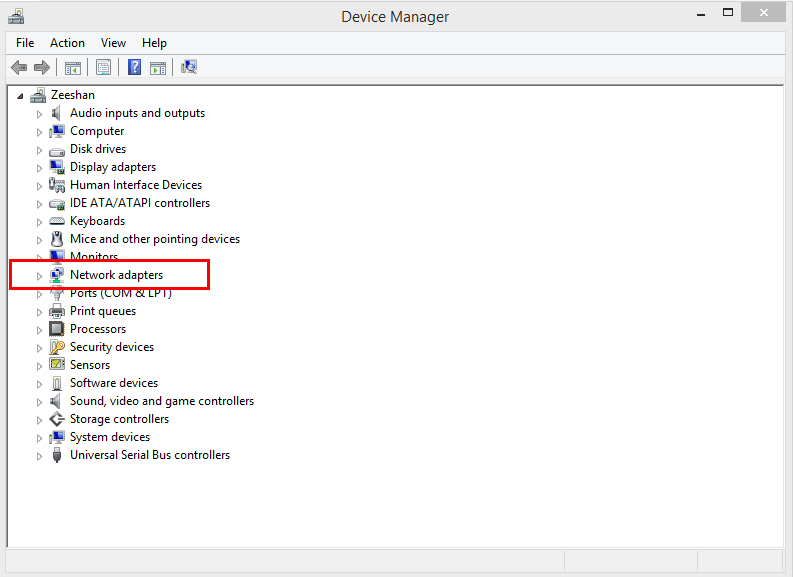
- Right-click your network adapter and open its Properties.
- Click on the Advanced tab.
- Go to the Property section.
- Now, choose the Wake on Magic Packet and Wake on pattern match properties.
- Set the value of selected properties to Disabled.
- Lastly, click on the OK button to save the changes you made in the previous steps.
Fix 5: Check your computer for failing hardware
Hardware failures may also be responsible for system interrupts high CPU usage on Windows 11 and Windows 10. Therefore, below is how to check and fix these issues.
- Firstly, click on the File Explorer icon on your taskbar to open it.
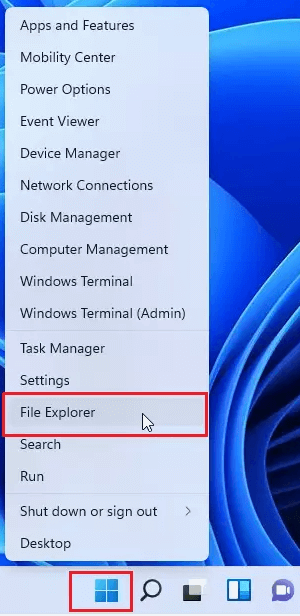
- Right-click the disk to check it for errors and choose Properties.
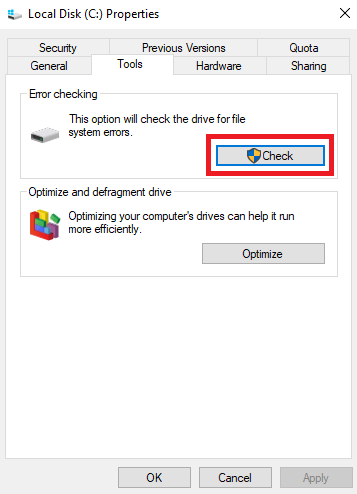
- Navigate to the Tools tab and click on the Check button.
- Wait until Windows scans the drive and repairs it.
- Now, check whether or not the system interrupts CPU usage has returned to normal. Try the next fix if it is still high.
Fix 6: Update BIOS
Updating BIOS is somewhat risky. Hence, you should try it as a last resort if all the above fixes failed to fix the Windows 10/Windows 11 system interrupts high CPU usage. You can follow these steps to check your BIOS version and then update it.
- Firstly, apply the Windows+R keyboard shortcut to launch the Run utility.
- Input cmd in the on-screen box and press the Enter key to open Command Prompt.
- Now, input the following commands one after the other and press Enter after each command.
systeminfo | findstr /I /c:bios
wmic bios get manufacturer, smbiosbiosversion
Also Read: CPU & GPU Bottleneck: What is it and How to Fix it
System Interrupts High CPU Usage Fixed
This article shared multiple fixes for 10% to 100% (high) CPU usage of system interrupts on Windows 10 and Windows 11. You can apply these solutions sequentially or directly update drivers using Bit Driver Updater to fix this problem in the best possible way.
If you have any questions, concerns, or suggestions about this article, you can drop them in the comments section. We will be more than happy to hear from you and address your queries.
To troubleshoot other tech issues, get software recommendations, and stay updated with the latest technology, remain connected to TechPout.


