How to Fix Windows Cannot Connect to Printer
If your Windows printer cannot find and connect to the printer, do not worry, as this article has some sure-shot solutions to this annoying problem on Windows 11, 10, and 7.
Printing is among the most commonly performed actions on a computer. You may need to print reports, assignments, and various other crucial documents. However, it becomes highly frustrating when Windows cannot connect to a printer.
Are you also struggling with a similar problem? If yes, you have found the right article for you. Through this write-up, we guide you through the best possible solutions to the printer problems on Windows 7/10/11.
However, it is crucial to learn what may be the reasons your computer cannot find the printer before attempting to solve the problem. If you understand the possible triggers of the issue, fixing it becomes easy as pie. Hence, the next section discusses the same.
Why Windows Cannot Connect to the Printer
Here are the possible reasons your Windows 7/Windows 10/Windows 11 computer cannot find and connect to the printer.
- Outdated printer drivers
- Improperly installed printer
- The print spooler service not working
- Incompatible printer driver
- Registry issues
- Interference from your antivirus software
Above are the top factors because of which your Windows computer cannot connect to the printer. Let us now look at how to fix the issue.
Fixes for the Windows Cannot Connect to the Printer Problem (100% Working)
You can apply the following solutions to solve the Windows computer not finding the printer and connecting to it problem.
Fix 1: Try restarting the printer
Sometimes simple solutions like performing a printer restart can fix complex problems such as the computer cannot find the printer. Hence, you can try starting your printer again before trying any other fixes. Here is how to do it.
- Firstly, press the Power button to turn off the printer.
- After the printer display disappears, remove your printer’s power cable.
- Reconnect the power cable after waiting for 20 seconds.
- You can now test print and check whether or not the issue is fixed. If it persists, the following fixes can help you get rid of it.
Also Read: Printer Driver Is Unavailable On Windows 10, 11 [Fixed]
Fix 2: Reinstall the printer
A printer cannot function correctly if it is not properly installed. Hence, you can follow these steps to uninstall and reinstall your printer to fix the issues in the printer’s installation and solve the problem that Windows cannot connect to the printer.
- Firstly, click the Windows icon and choose Settings from the available options.
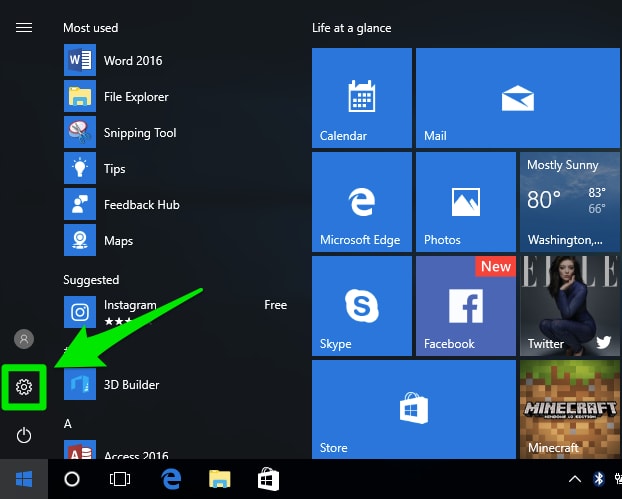
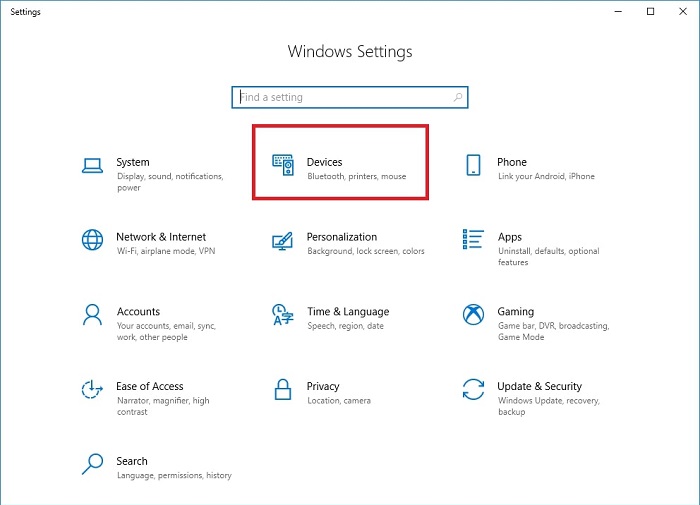
- Select Devices from the options you have on your screen.
- Select Printers & Scanners from the left section of the on-screen window.
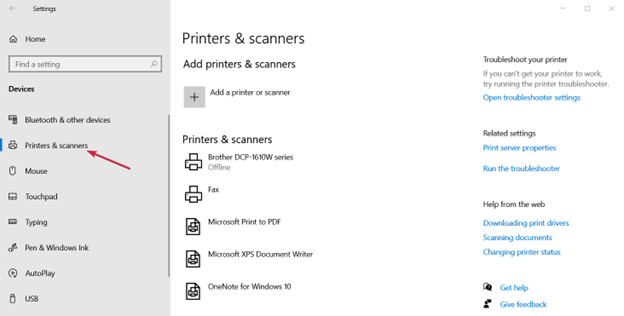
- Click on the option to Add a printer or scanner.
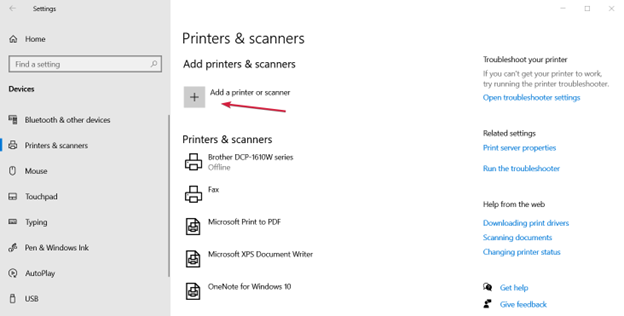
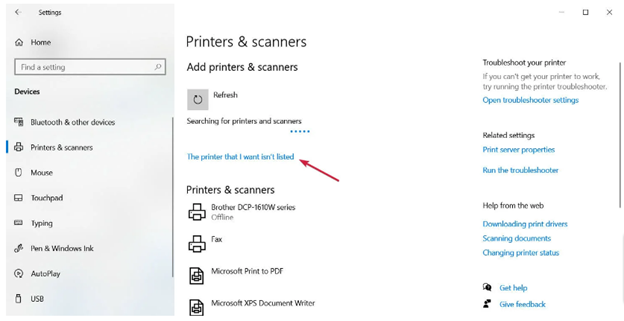
- Select your printer if the system detects it. If the system has not detected your printer, choose The printer I want isn’t listed.
- Now, select the appropriate option for your specific situation. In our case, we wish to add a local printer.
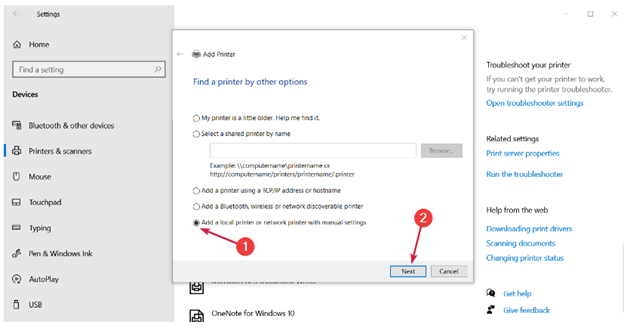
- Click Next to continue.
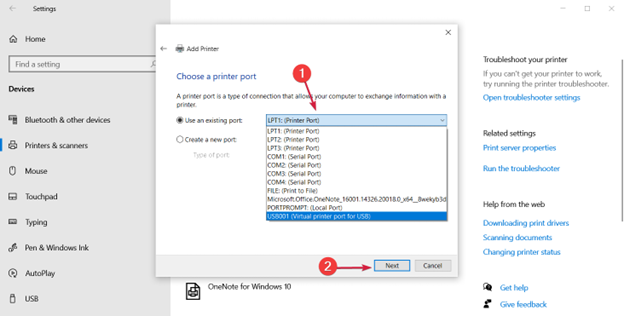
- Select the port for your printer from the dropdown menu and click Next.
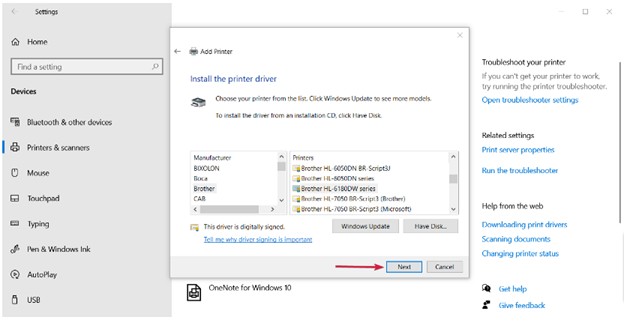
- Choose your printer manufacturer and model from the on-screen list. If it is not available, select Windows Update to add more printers and manufacturers. If you have the disk that you got with your printer, choose the Have Disk option.
- Click Next after selecting the printer.
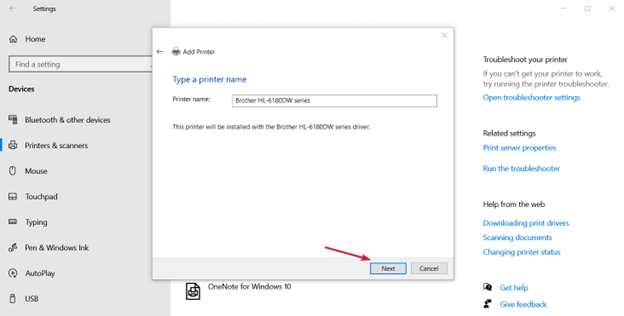
- Select your printer name and click Next.
- After the system installs the printer, choose whether or not you wish to share it.
- Click Next to proceed to the next step.
- Lastly, Print a test page to ensure the printer works and click Finish. To connect your local printer, plug in the USB cable of your printer to your computer’s USB port and turn on the printer.
Fix 3: Update the printer driver (Recommended)
Outdated drivers can cause multiple problems, as the communication between your computer and printer breaks without a compatible and up-to-date driver. The driver converts your commands into the language your computer understands, i.e., binary codes.
Moreover, outdated drivers are among the most common reasons you experience issues like Windows 7/Windows 10/Windows 11 cannot connect to the printer and system crashes. Hence, updating the drivers can certainly solve a lot of problems on your computer.
You can update drivers hassle-freely using a dedicated driver update tool like Win Riser. The Win Riser software updates all drivers automatically and offers many other features.
Some of the most fascinating features of Win Riser include driver backup and restoration, scan scheduling, in-depth scans, driver ignore option for the drivers you don’t want to update, malware detection, and removal of junk.
You can download the Win Riser software and install it from the link below.
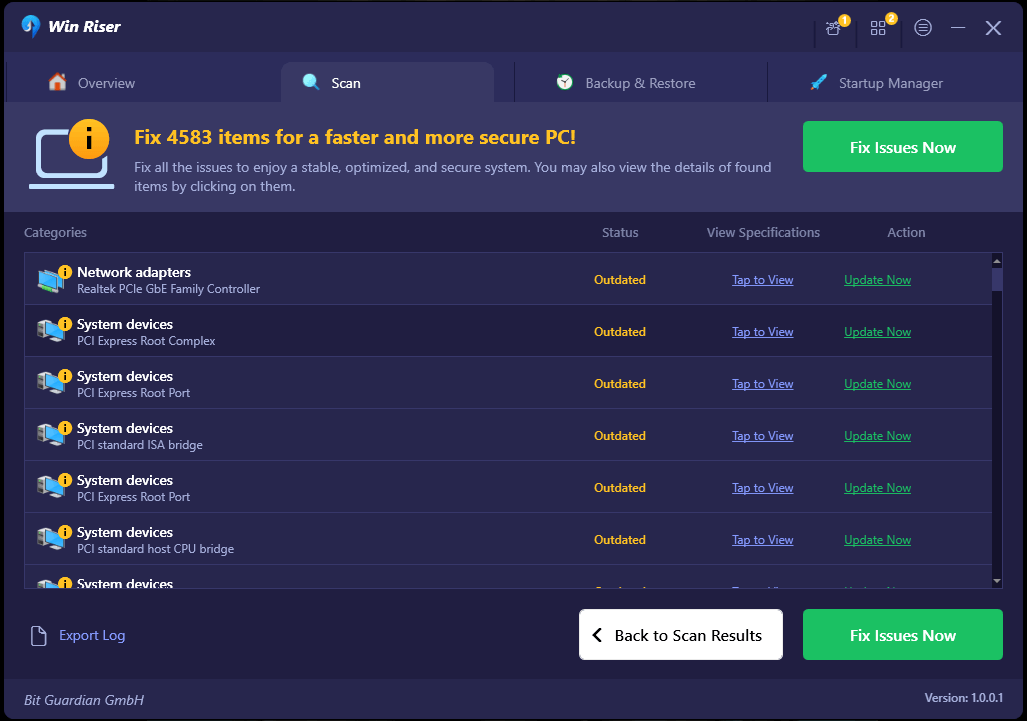
After installing the software, all you have to do is run the program and scan your computer, review the suggested driver updates, and select the Fix Issues Now option to drive all problems away instantly.
Also Read: How to Fix Windows 11 Printer Sharing Not Working
Fix 4: Restart the print spooler service
The print spooler service is responsible for storing your print jobs temporarily in the computer’s memory until your printer can print them. If this service is not working correctly, you may find your computer cannot connect to the printer. Hence, here is how to stop and restart the print spooler service to fix the issue.
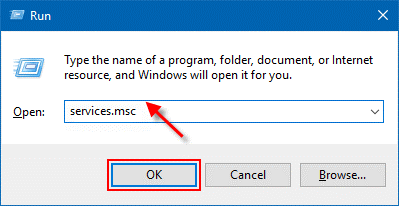
- Firstly, use the Windows+R shortcut to launch the Run utility.
- Now, input services.msc in the on-screen box and hit Enter on your keyboard.
- Locate and double-click the Print spooler to view its properties.
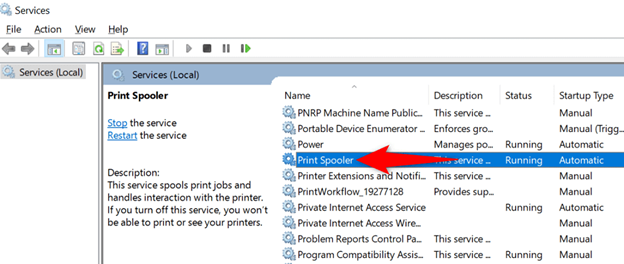
- Choose Stop to put a temporary halt to the print spooler service.
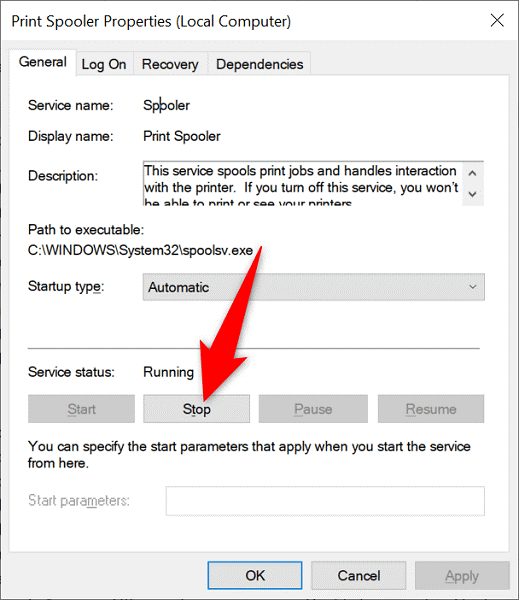
- Lastly, after waiting for about 10 seconds, click Start to restart the service.
Fix 5: Remove the non-compatible printer drivers
Incompatible printer drivers are also a reason your computer cannot find the printer. Moreover, such drivers may prevent the print spooler service from adding your printer. Hence, you can follow the below steps to remove these drivers to make your printer function smoothly.
- Firstly, access the Run program using the Windows+R shortcut.
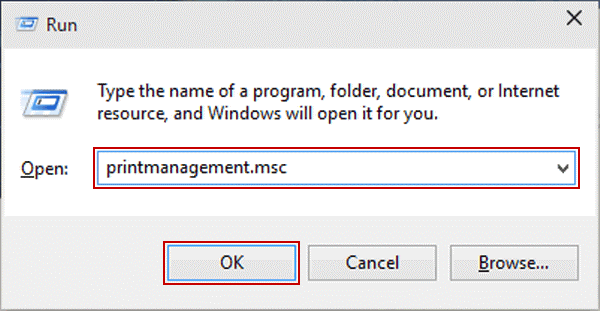
- Input printmanagement.msc in the box on your screen and click OK.
- From the left pane of the print management window, select Custom Filters to view them.
- Select All Drivers from the available Custom Filters.
- Now, right-click the incompatible printer driver and select Delete from the on-screen menu.
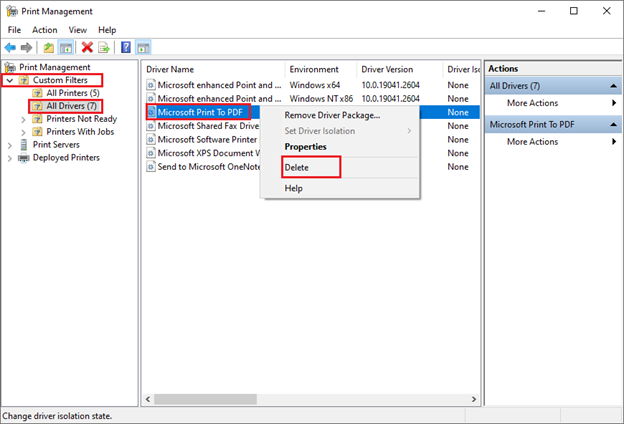
- Repeat the above steps to uninstall all the incompatible printer drivers.
- Lastly, restart your computer and add the printer and drivers again.
Also Read: How to Restore Printer Connection on Windows 10, 8, 7
Fix 6: Disable your antivirus software and Firewall temporarily
Your antivirus software and Firewall may interfere with the functionality of your computer, resulting in problems like Windows 11 cannot connect to the printer. Hence, you can disable the Firewall and antivirus temporarily to get rid of the issue. You can follow the user manual of your antivirus to learn how to do it. Here are the steps to turn off the Windows Firewall so that you can make your printer work properly.
- Firstly, click on the Windows logo and input Control Panel in the search box.
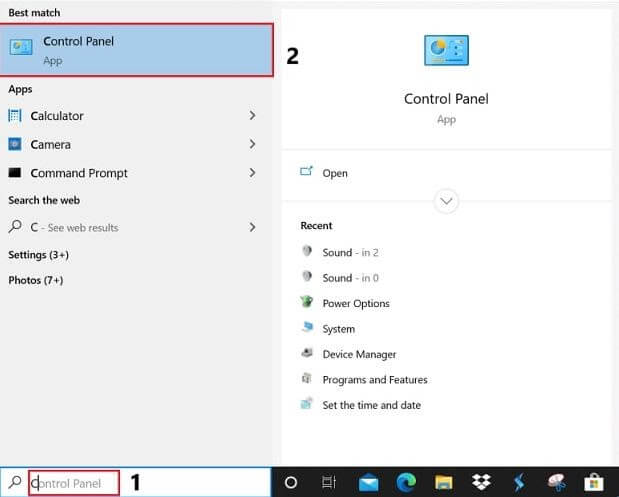
- Select the Control Panel from the results to open it.
- After the Control Panel opens, choose System and Security from the on-screen options.
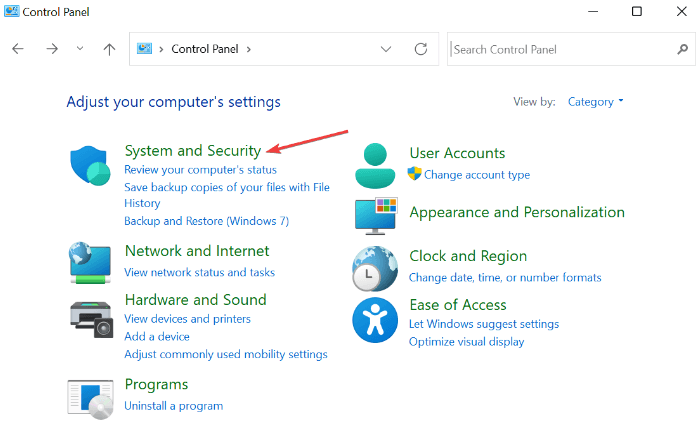
- Select Windows Defender Firewall.
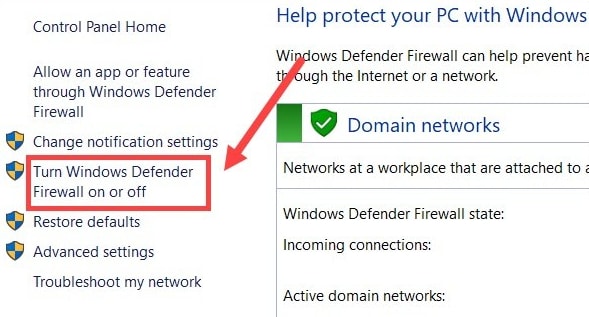
- Choose the option to Turn Windows Defender Firewall on or off from the left panel.
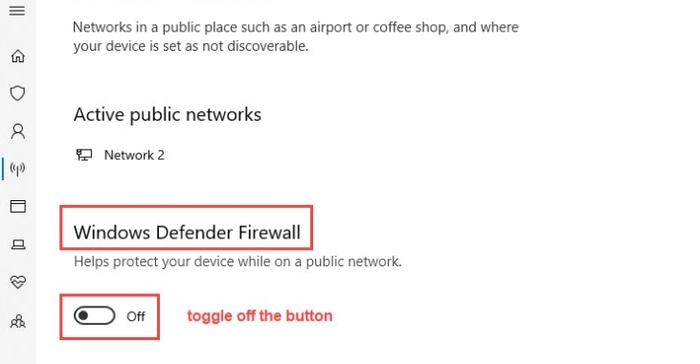
- You can now choose the Turn off Windows Defender Firewall (not recommended) option for both private and public network settings.
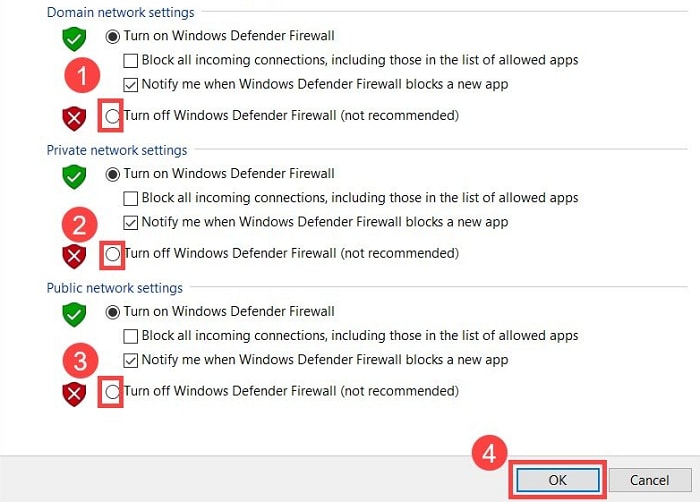
- Lastly, click OK to disable the firewall.
Fix 7: Change the registry settings
Changing a few registry values has solved the Windows cannot connect to printer problem for many users. Hence, you can also try this fix by following the below steps.
- Firstly, follow the steps given in fix no. 4 to stop the print spooler service.
- Now, use the shortcut command Windows+R to access the Run utility.
- Input regedit in the on-screen box and click OK.
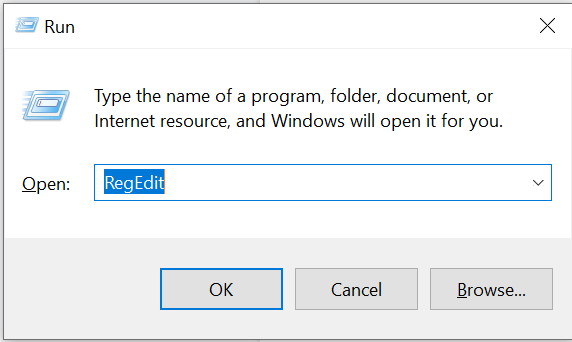
- Navigate to the HKEY_LOCAL_MACHINE\SOFTWARE\Microsoft\Windows NT\CurrentVersion\Print\Providers\Client Side Rendering Print Provider registry key.
- Right-click Client Side Rendering Print Provider and choose Delete from the on-screen options.
- Lastly, you can restart the print spooler service and reboot your PC to save the changed registry setting.
Fix 8: Use the Windows troubleshooting utility
Windows computers come with an in-built troubleshooting mechanism to fix minor bugs that may have caused issues like the computer cannot find the printer. Hence, you can perform these steps to run the printer troubleshooter.
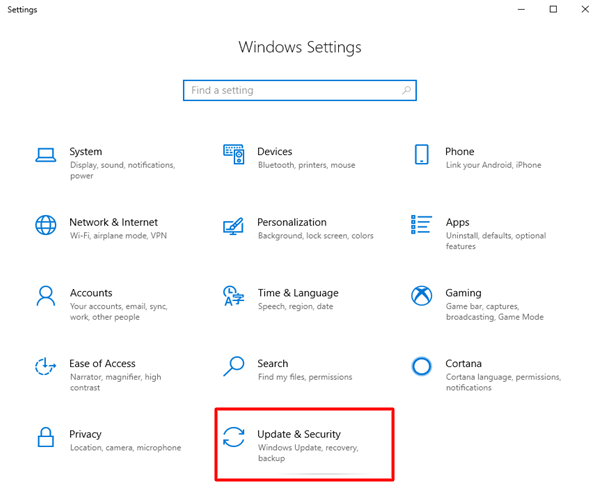
- Firstly, use the Windows+I keyboard shortcut to open the Settings panel.
- Choose Update & Security from the on-screen settings.
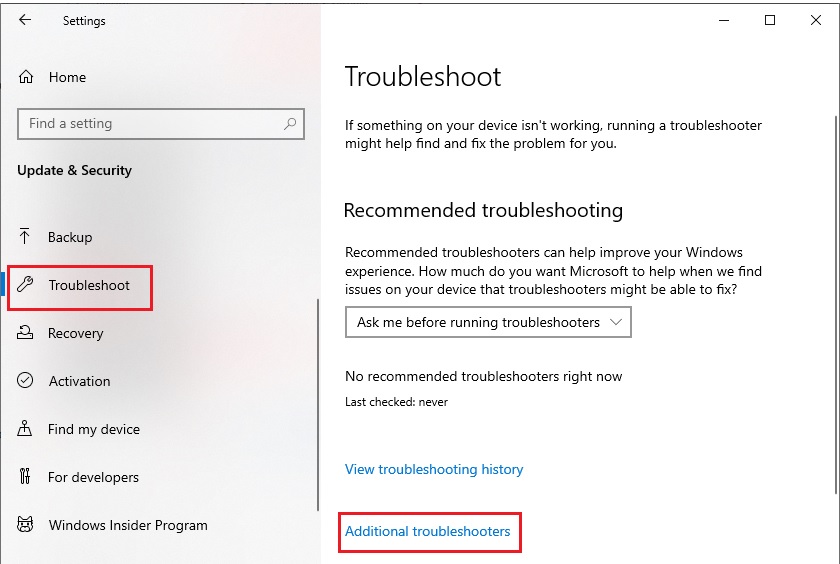
- Select Troubleshoot from the left panel of the Update & Security window.
- Click Additional Troubleshooters to view them.
- Choose Printer and click the Run the troubleshooter button.
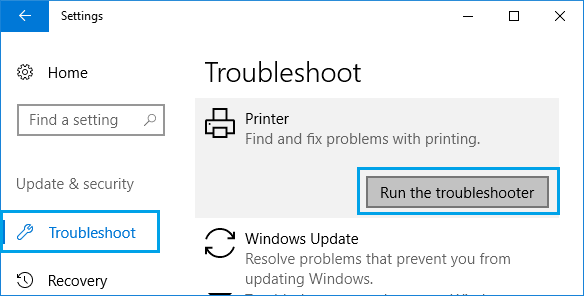
- Wait until the troubleshooter finds and fixes the printer issues.
- Lastly, restart your computer to complete the troubleshooting process.
Also Read: How To Fix Printer Printing Blank Pages On Windows 10? Easy Solutions!
Fix 9: Make the printer your default printer
If you have multiple printers installed on your computer, making the problematic printer your default printing device can solve the problem. Hence, here is how you can make the printer the default device.
- Firstly, open the Settings panel using the Windows+I shortcut.
- Now, choose Devices from the available settings.
- Choose Printers & Scanners from the left panel of the Devices window.
- Now, disable the option to “Let Windows manage my default printer.”
- Choose your printing machine from the on-screen list and select Manage.
- Lastly, select the Set as default option to set the chosen printer as your default printer.
Fix 10: Perform Windows update
Updating Windows fixes minor bugs that may have led to the computer cannot find and connect to the printer problem. Hence, here is how to update Windows to fix the issue.
- Firstly, open the Settings panel using the Windows+I shortcut command.
- Now, choose Update & Security from the options on your screen.

- Select Windows Update from the left panel.
- Choose to Check for updates.
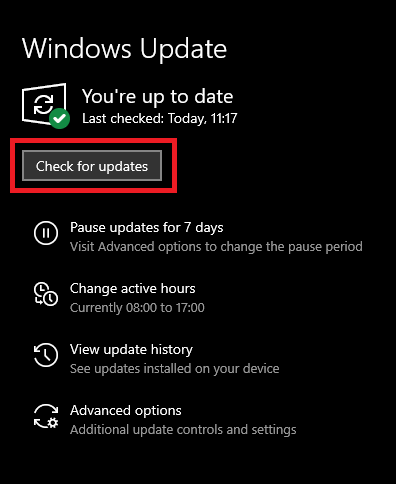
- Get the available OS updates downloaded and installed.
- Lastly, restart your computer after installing the available Windows updates.
Also Read: How to Fix “Printer Not Responding” Error on Windows PC
Windows Cannot Connect to Printer Fixed
This article helped you fix the problem that your computer cannot find the printer. You can follow the fixes shared in the above guide to solve the problem. However, if you need a quick solution and cannot try all the solutions, we suggest updating drivers through Win Riser, as it solves almost all problems instantly.
If you have any confusion or suggestions about this article, kindly leave us a comment. We will be back soon with another troubleshooting guide. Until then, you can go through our other articles to learn how to fix various computer problems.


