Besides providing a safe and secure environment for your crucial data Mac devices are known for their interface. Running applications and programs is possible without a hitch. But lately, only some users have reported issues with applications not responding. If you are also here to fix the issue, this is the right place.
If you are running an app on your Mac and it stops responding, you can force close these applications on Mac. The guide below explains various shortcuts to force quit app on Mac and restart it. However, in normal cases use the shortcut keys Command Q on your keyboard or press the Quit option from the application menu. If this method doesn’t work and the app stops responding, use any one of the following methods.
Simple Alternatives to Force Quit Applications on Mac
No need to apply all the methods, read the steps for each and apply the suitable steps to force quit app on Mac.
Method 1: Use Apple Menu to Force Quit App Mac
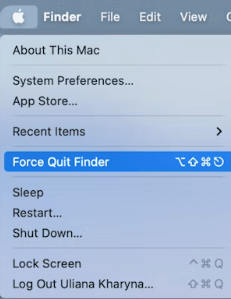
Apply the following steps to force quit the application on Mac using the Apple menu
Step 1: Locate the Apple icon on the left top corner of the application window.
Step 2: Click on the Force Quit option.
Step 3: Select the App which is not responding on your Mac.
Step 4: Press the button to force Quit.
Also Read: How to Mute Tabs in Chrome on Mac and Windows PC
Method 2: Use Dock to Force Close App Mac
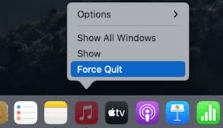
In case the Apple menu method didn’t work as the app window fails to respond, here’s how to force quit applications on Mac via Dock
Step 1: To display the dock menu move the mouse to the app you wish to force close and right-click on it. Click and hold the icon for the app.
Step 2: Hold the Option key (Alt). This will change the Quit menu to Force Quit.
Step 3: Select the Force Quit option.
Method 3: Use Keyboard Shortcut to Force Close App on Mac
Another alternative to force quit applications on Mac is by using keyboard shortcuts. If any of your Apps running on Mac is unresponsive here is how to force close app Mac.
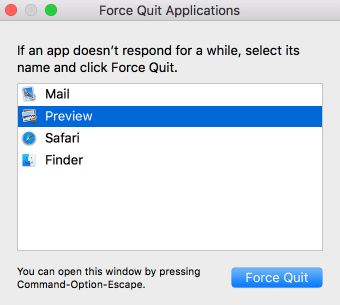
Step 1: Press Command, Option, and Esc keys together on your keyboard and hold.
Step 2: Select the application you wish to quit from the dialogue box that appears on your desktop screen.
Step 3: Click on force Quit option.
This method to force quit an app on Mac is very effective when you are unable to access the mouse or the trackpad is lagging.
Also Read: How to Find iPhone Backup Location on Mac and Windows PC
Method 4: Use Terminal to Force Quit App on Mac
If Command line methods to execute a command or perform a task is your preference this method to force close app Mac can be your pick. Here are the simple steps to apply to force quit applications on Mac through Mac Terminal.
Step 1: Launch Terminal on your Mac.
Step 2: Enter the command mentioned below
killall [application name]
For example, if the Skype application is not responding on your Mac type: killall Skype in the Terminal
Step 3: Click the Enter key on your keyboard. This will instantly force shut the application on your device.
Note: If the name of the application you want to shut consists of more than one word enter the name using quotation marks.
Step 4: The command will force close app Mac on the system level. This means the data will not save automatically.
Pro Tip:
If a particular application hangs frequently on your Mac here are the simple things to be checked:
- Make sure the app is updated and the latest version released by the manufacturer is installed on your Mac.
- Check if the cache on your app is cleared. If not, make it a habit to clear its cache at regular intervals if the app is used on a frequent basis.
If the issue persists, uninstall the application or program. Reinstall the program from the official source and this will fix the frequent freezing of app problems on your Mac.
Also Read: How to Fix WindowServer High CPU Usage on Mac [FIXED]
Force Quit Applications on Mac: DONE
We hope you have now learned how to force quit applications on Mac. Choose any one of the above-listed methods to force close App Mac which is not responding. If you need any more help feel free to ask us in the comments box below. Also, for more Mac and Windows tips or guides subscribe to our blog.
To never miss any updates follow us on Facebook, Twitter, Instagram, and Pinterest.


