Are you encountering DNS_PROBE_FINISHED_NXDOMAIN error? Don’t worry you can get rid of this problem, easily & quickly. Read more!
The error usually appears due to a problem with your DNS or misconfiguration. DNS is an abbreviation for Domain Name System. It helps direct traffic on the internet by linking domain names with authentic web servers.
When a user copies and pastes a URL in their browser, DNS gets to function to connect the entered URL to the actual server’s IP address. But, sometimes, DNS fails to recognize the IP address or domain name, in that case, you might get an error message reading DNS_PROBE_FINISHED_NXDOMAIN in Windows 10, 11, or older versions. (Here NXDOMAIN part stands for Non-Existent Domain). The error is very confusing, but it’s also fairly easy to resolve. Continue reading for more information.
Listed below are some potential solutions that you can consider to resolve the DNS_PROBE_FINISHED_NXDOMAIN issue on Windows PC. Without further ado, let’s begin:
Whenever you run into a DNS_PROBE_FINISHED_NXDOMAIN error, you should try restarting the DNS client service as a very basic hack in order to resolve the problem. Follow the steps provided below:
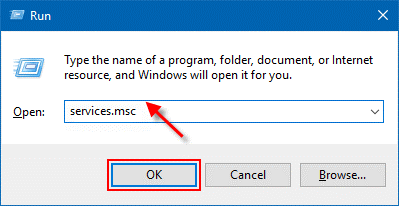
Step 1: To get started, you need to hit Windows and R keyboard keys together. This action will open the Run Dialog box on your screen.
Step 2: Here, in the text field of the Run box, you need to enter services.msc and press Enter.

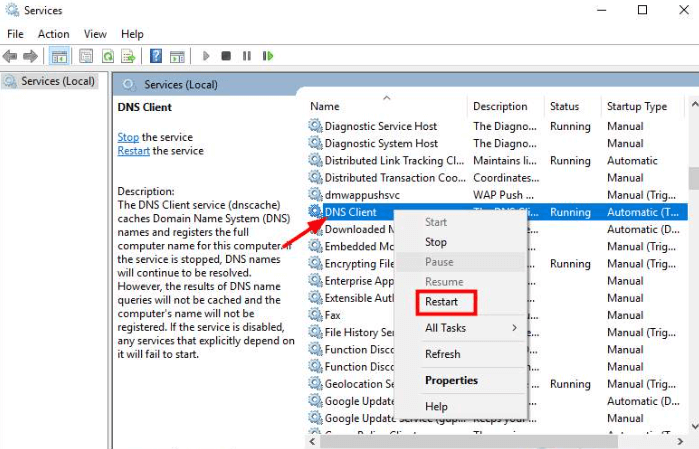
Step 3: This will take you to the Services window, wherein you need to find a DNS Client. Once you got the item, click right on it and select Restart from the options on your screen.

Once done, close the web browser and try to visit the webpage again to test whether the DNS_PROBE_FINISHED_NXDOMAIN issue is resolved or persisting.
Also Read: SOLVED whea_uncorrectable_error Windows 10
The error can occur by DNS itself, specifically, if you are utilizing the Internet Service Provider’s default DNS or the router’s DNS. A low-quality router may cause DNS issues. To resolve DNS_PROBE_FINISHED_NXDOMAIN, you can alter your current DNS to the public DNS of Google (8.8.8.8 & 8.8.4.4).
Step 1: Firstly, invoke the Run terminal using a keyboard shortcut (Windows and R).
Step 2: Then, input control in the box and press Enter.
Step 3: Now, you will see the Control Panel items window, here set View by: Small icons.
Step 4: Then, locate and click on Network and Sharing Center from the available options.
Step 5: Click on Ethernet.
Step 6: On the next prompt, click on the Details button.
Step 7: Now, you’ll see IPv4 DNS Server.
After checking your current DNS, if you want to change it to Google’s public DNS in order to fix DNS_PROBE_FINISHED_NXDOMAIN, then follow the steps below:
Step 1: Launch Control Panel on your system by using the above steps.
Step 2: Go to View By and change it to Small icons.
Step 3: Find and select Network and Sharing Center.
Step 4: From the subsequent window, click on Change Adapter Settings from the left pane.
Step 5: Next, click right on the network that you are currently using, after that choose Properties from the list.
Step 6: Navigate to the Internet Protocol Version 4 (TCP/IPv4) and select it.
Step 7: To proceed, click on Properties.
Step 8: Now, select Use the following DNS server addresses, and set Preferred DNS server as 8.8.8.8 and Alternate DNS server as 8.8.4.4.
Step 9: Lastly, click on OK to apply changes.
Also Read: 0x0 0x0 Error Code in Windows PC Fixed
Are you using any VPN? If yes, then there are chances you can get the DNS_PROBE_FINISHED_NXDOMAIN error, only if the DNS of the VPN is having the issues. If that is the case, then you can try to disable the VPN service for a temporary period and check to see if the issue is fixed.
When the VPN is put out of action, then the Ethernet’s DNS will be utilized. If there are no issues with the DNS of ethernet, your problem will be diagnosed.
Antivirus programs are designed to protect your PC from threats & viruses. But, sometimes, the firewall or antivirus software may block DNS. So, if you are using an antivirus program or the firewall, then we suggest you disable them temporarily just to fix the error message saying DNS_PROBE_FINISHED_NXDOMAIN.
A Point to Remember: Be careful about the sites you visit when the firewall or antivirus is disabled, as some threats or viruses can damage your PC easily without any sort of protection.
After implementing this solution, enabling the firewall or VPN again is recommended.
Has nothing worked for you? None of the above-shared hacks helped you fix the DNS_PROBE_FINISHED_NXDOMAIN Chrome error. Don’t worry, this last resort will definitely help you resolve the issue. Below
how to flush the cache and renew the IP address.
Step 1: Invoke the Run terminal by pressing Windows and R keyboard keys at the same time.
Step 2: Write cmd in the text field of the Run Dialog box and hit CTRL + SHIFT + ENTER together.
Step 3: This action will open Command Prompt as an Administrator. In the Command (Admin) window, type the following commands and press Enter after each.
ipconfig /release (In order to release the IP address)
ipconfig /flushdns (In order to clear the DNS cache)
ipconfig /renew (To renew the IP address)
Step 4: After that, input netsh int ip set dns and hit Enter from your keyboard. This will reset your IP settings.
Step 5: Next, type netsh winsock reset & press Enter from your keyboard. This command will reset Winsock Catalog.
Once done, reboot your system to apply changes and test the issue. This will surely help you get rid of this issue.
Also Read: How to Fix Bad_Pool_Caller Error on Windows 10 {SOLVED}
The above suggested were some of the workable solutions that you can consider in order to fix the DNS_PROBE_FINISHED-NXDOMAIN error on Windows 11, 10, 8, and 7 PC. We hope you find these troubleshooting tips very helpful.
Do you have any questions or further suggestions? If yes, then don’t hesitate to share them with us through the comments box below. Additionally, if you want to read more about the technical issues & PC errors, then do subscribe to our Newsletter. You can also follow us on our Social Media handles: Facebook, Twitter, Instagram, and Pinterest.
If you also want to place some bets on games this IPL season, here are…
If you wish to download and update the RNDIS device driver for Windows 10/11 or…
In the event that you are interested in executing the Bose Headset drivers download and…
If you are also facing the Guided Access not working issue on your iOS (iPhone)…
If you are looking for the best privacy screen protector to use the smartphone freely…
If you are looking for the perfect alternative to Apple Pay, refer to the Apple…