How to Take Screenshot on Chromebook
Snapping screenshots on Chromebook does not demand an extra bucket of hardwork just because it is different from what we process on smartphones and Windows or MacBook. It is pretty simple and you can easily capture the screenshot on Chromebook, whether it is covering the entire screen or just a small part or glance of the area. In this section, you will learn how to take screenshots on Chromebook.
How to Capture Full Screenshot on a Chromebook
Let us start with the method to take a full screenshot on Chromebook. To take a screenshot of entire screen of your Chromebook covering everything –
- Press Ctrl + Switch Window, simultaneously. You will find the Switch Window button on the topmost row resembling a rectangle with two lines.
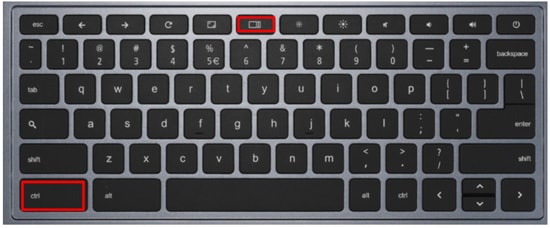
- Once you are done pressing both the keys, you will be able to see the thumbnail of your screenshot appearing in the bottom-right corner.
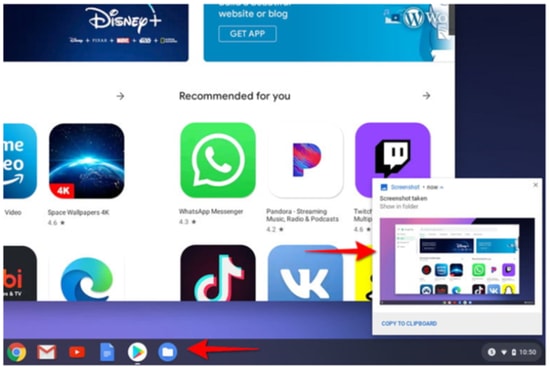
- Click on that thumbnail and you will be directed to the downloads folder where all of the screenshots that you take are stored by default. You can access screenshots there offline.
- The screenshot which you have taken will be tagged with the date and the time it was shot.
How to Capture a Specific Portion of Screen
If you wish to capture only a specific part of screen on your Chromebook, here is what you have to do:
- Press and hold Ctrl + Shift keys simultaneously with the Switch Window button.
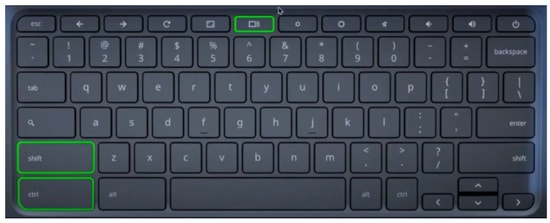
- You will notice the screen dim and the cursor will turn into a crosshair. You have to use that crosshair and begin holding down on the touchpad or mouse from the corner of your desired capture area.
- Use your mouse and your finger to drag the cursor across the screen to select the capture area that you wish to take a screenshot of and lift your finger to capture the screen.
- Just like full screenshot, this capture will be stored in downloads folder by default and will be labelled the date and time by Chromebook OS.
Read Also: How to Take a Screenshot on HP Laptop
Apps to Take Screenshot on Chromebook
If you find the built-in screenshot commands of Chrome OS insipid, you can find screenshot apps for Chromebook to capture the screen that are available on Chrome’s Web Store.
Here are the screenshot extensions for Chromebook:
1. Fireshot
With Fireshot you can capture the entire page and then edit and save them to multiple formats including PDF, GIF, JPEG and PNG. Besides, it lets you print, upload and send the screenshot to OneNote and email.
2. LightShot
Lightshot is an amazing screenshot app for Chromebook and pretty easy to use. You just have to drag and drop the selection of screenshots from your desired area of screen. You can then edit and send it to the Cloud.
3. Awesome Screenshot
As the name suggests, Awesome Screenshot allows you to capture screenshots as well as the videos. It is a powerful screenshot app for Chromebook and lets you share the screen capture and screen recording.
How to Copy Screenshot in Chromebook
Since the screenshots cannot be saved to the clipboard automatically, all you have to do to copy them is click the Copy to Clipboard button which appears with a thumbnail when you take a screenshot. Then press Ctrl + V to paste it.
Read Also: Best Screen Recorder For Windows 10
How to Edit the Screenshot on Chromebook
Since you have discovered the ways to take screenshots on Chromebook entirely and partially, you may as well want to learn how to edit them. To do that you first have to know that Chrome OS features a built-in image editor with help of which you can edit the screen capture however you want.
- Select Images/Downloads by clicking on Files folder icon on the shelf.
- Double-click on the screenshot which you wish to edit and it will open in the image viewer.
- Go to the Pen icon in the top-right corner to start editing.
- You will find options for cropping, rotation, and brightness in a toolbar at the bottom.
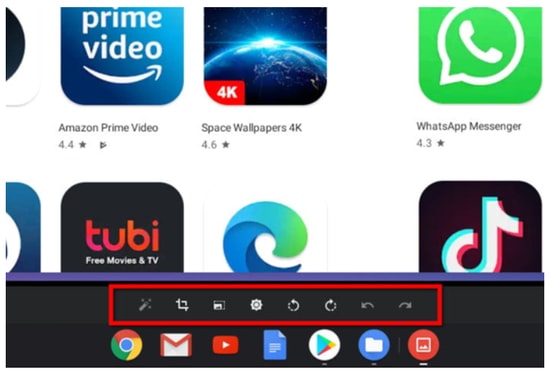
- Once you have finished editing, click on the Pen icon to approve your edits or simply click Exit.
- You can copy the edited image manually if you wish to keep the original one since you will not be able to save the copies of images in this editor.
How to Save Screenshots to Google Drive
To save the screenshots on Google Drive, you must upload them on Cloud. Here is how to save the screenshot on Google Drive:
Step 1: Open the Files folder and select Images/Downloads from there.
Step 2: Select the screenshots you wish to upload to the Drive.
Step 3: Once you have selected the screenshots, click on the Share button.
Step 4: Now select the Save to Drive option from the menu.
Summary
Taking screenshots is an easy and a real quick task. However, in Chromebook, you have got multiple ways to take screenshots including extensions. Hopefully, these simple ways will not only help you capture the screenshot but also chisel it with edits. And for the rest, let us know if you found this article helpful.
