How to Turn Off Sticky Keys on Windows 11,10
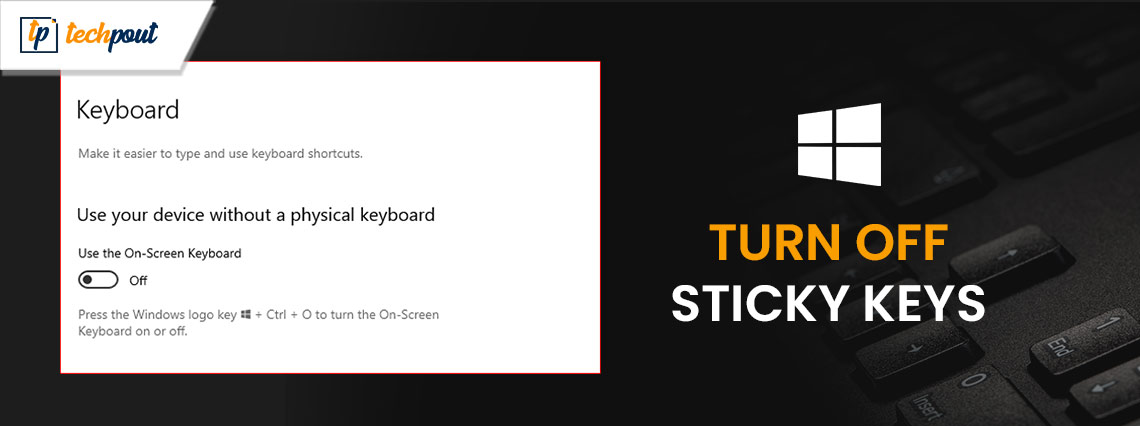
The sticky keys charactestic on Windows enable users to simplify their work by using keyboard shortcuts. However, not many users are aware of how to enable or disable sticky keys. If you are also here in search of How to turn off sticky keys Windows 11/10 this guide is for you. Before we begin with the solutions for How to remove sticky keys we must understand what sticky keys are.
What Exactly Are Sticky Keys?
Sticky Keys is an accessibility feature built into Windows that simplifies the process of using keyboard shortcuts. When you use a keyboard shortcut, you are required to press both of the keys at the same time or all of the keys simultaneously, by default.
To open a file in an application, for instance, you would often press the Windows key as well as the letter O simultaneously. However, if you have Sticky Keys enabled, you can press the Windows key, let go of it, and then press the O key. No need to keep holding down the Windows key until you press the O key. To turn on or switch off the Sticky keys open Sticky Keys settings.
Sticky Keys is a useful program to have if you have trouble pushing many keys at the same time. By using this function, you may effectively make your keys sticky. This will cause them to remain in their current position until the next key is pressed.
How to Turn Off Sticky Keys Windows 11/10?
The following methods can be applied to answer the question of how to remove sticky keys on your Windows device. No need to apply them all. Just go through the steps and pick the most suitable option depending on your skills.
Method 1: Activate or Deactivate the Sticky Keys
Sticky Keys can be activated on your own computer by using the keyboard’s shortcuts. Therefore the following steps can be followed for how to turn off sticky keys shortcut
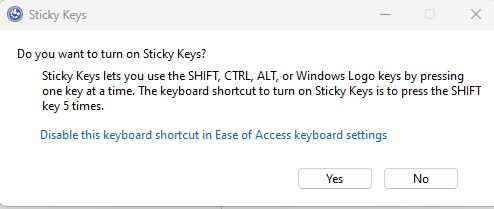
Step 1: To do this, simply keep pressing Shift key five times continuously. You are going to receive a prompt asking you to turn on Sticky Keys. To activate them, click the Yes button.
Step 2: In order to draw your attention to the situation, Sticky Keys will light up and make a high-pitched sound. In addition to this, the Sticky Keys symbol will show up on your taskbar.
Step 3: To disable them, repeat the process of pressing the Shift key five times continuously. When you turn off Sticky Keys, you will hear a sound to let you know it’s done.
The popup that asks, “Do you want to turn on Sticky Keys?” also includes a link that allows you to disable this shortcut. So, if you want to disable it, you can click on that link.
If you were unable to resolve the query of how to turn off sticky keys through this, move on to the next method.
Also read: How to Fix Keyboard Spacebar Not Working in Windows 10, 11
Method 2: Utilizing the Menu Quick Settings
Sticky Keys is one of the many useful functions that can be accessed more quickly with the shortcuts provided by Quick Settings. This can be easily found on your Windows device. Utilizing this menu, you have the ability to toggle the Sticky Keys functionality on and off.
Apply the following steps to get an idea of how to unlock sticky keys on Windows 11 or 10 devices:
Step 1: Simply launch Quick Settings by hitting the Windows key and the letter A. You may also access this menu by clicking the battery icon or the Wi-Fi icon that is located in the system tray of your computer.
Step 2: When the menu appears, make your selection under “Accessibility.”
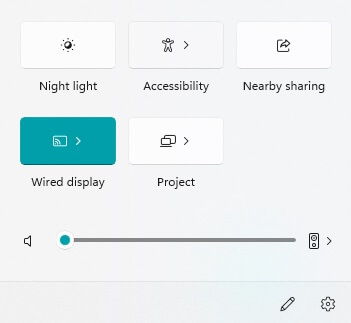
Step 3: Turning off the “Sticky Keys” option can be found in the “Accessibility” menu.
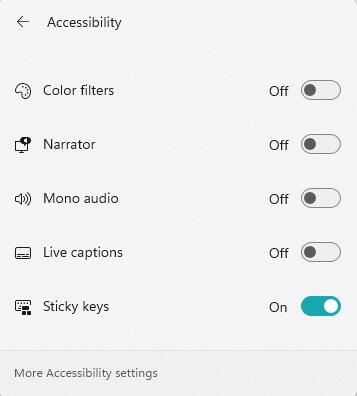
If the above method didn’t work on your Windows device, try the next solution for the How to Turn off sticky keys Windows 11/10 issue.
Method 3: Editing the Registry Using Registry Editor
If for any reason you couldn’t turn off Sticky Keys using any of the techniques described above, you can use this method with Registry Editor that will automatically turn off the feature. We only advocate utilizing this method if you have already attempted the procedures we listed above, but they were unsuccessful.
The following instructions can be applied to resolve the concern of how to turn off sticky keys on Windows devices.
Step 1: To make advantage of this choice, press the Windows key and the letter R simultaneously to bring up the Run dialog box. Alternatively, You may also launch this box by going to the “Start” menu, typing “Run” into the search bar.
Step 2: In the “Run” box, type regedit, then click on Enter key on your keyboard to proceed.
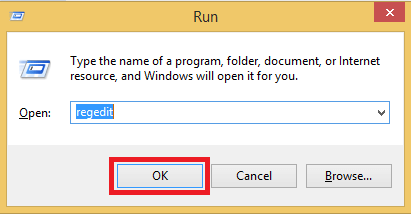
Step 3: Then, when prompted by “User Account Control,” click “Yes” from the menu. The Registry Editor will open when you do this.
Step 4: Select the address bar at the top of the Registry Editor window, type the following information, and then press the type Enter.
Computer\HKEY_CURRENT_USER\Control Panel\Accessibility\StickyKeys
Step 5: To change the flag, double-click the “Flags” entry in the right pane.
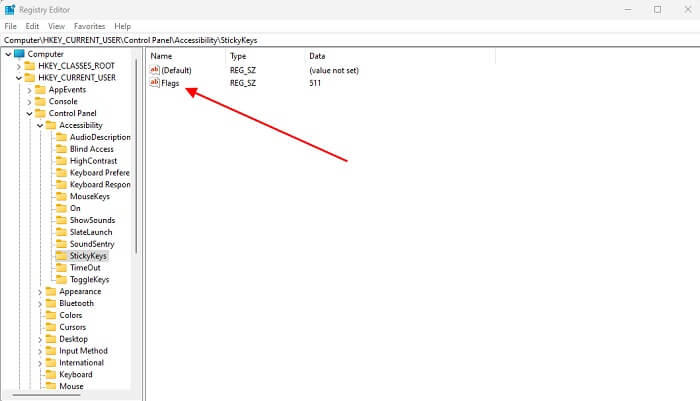
Step 6: To edit the string, head to “Edit String” box, further select “Value Data” field, and type “506” there. The next step is to select “OK.”
Step 7: Put an end to your work in Registry Editor, then restart your Windows PC.
The Sticky Keys option on your computer has been turned off. However, if you come across any issues below we have listed steps for the question of how to turn off sticky keys shortcut.
Also read: How to Update and Reinstall Keyboard Drivers
Method 4: Use Control Panel
Sticky Keys can be toggled on and off using the Control Panel.
Step 1: You may access the Control Panel by doing a search for it in the Windows search bar.
Step 2: Here choose the option Ease of Access.
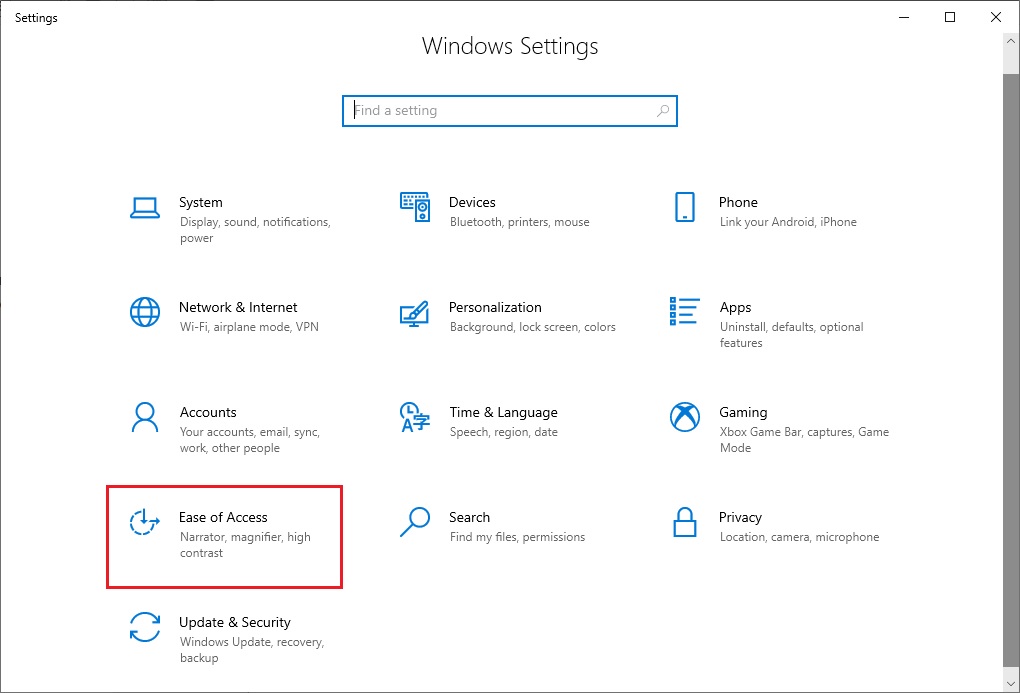
Step 3: Now, select the checkbox located next to Turn on Sticky Keys to activate them. You can also turn off Sticky Keys by unchecking the option.
Under the option to Turn on Sticky Keys, you will also see a link to Set up Sticky Keys, which you may click on. Simply clicking on it will access the page where you may configure your preferences.
How To Turn Off Sticky Keys: DONE
We hope that the above methods helped you in resolving the issue of How to turn off sticky keys Windows 11/10. If you come across any issues or have any suggestions for us feel free to connect with us in the section below.
If the guide helped you in addressing the concern don’t forget to subscribe to get regular tech updates and troubleshooting guides delivered directly to your email. To never miss out on any tech news, tips, and tricks follow us on Facebook, Pinterest, Instagram, and Twitter.
