How to Fix Kernel Data Inpage Error in Windows 10,11

Kernel Data Inpage is a Blue Screen of Death error you can fix effortlessly with the quick and easy solutions in this article.
Blue Screen Death (BSOD) errors are often frightening as they may render your computer dysfunctional. However, not all BSOD errors are unsolvable, with Kernel Data Inpage error being one of the easily solvable errors of this kind.
Yes, you read it right. Though scary, KERNEL_DATA_INPAGE is an effortlessly solved issue. You only need to know the best solutions to this problem. In this article, we are going to share these fixes for the 0x0000007A, 0xC000009C,0xC000009D, 0xC000016A, and 0xC0000185 errors.
However, it is on point to discuss what may have caused this issue before trying to fix it for better troubleshooting. Hence, the next section of this write-up sheds light on the same.
Causes of Kernel Data Inpage Error
The following factors may have contributed to the Blue Screen of Death Kernel error you are experiencing.
- There may be hard disk issues, such as a bad sector
- RAM (Random Access Memory) may be faulty
- Your device may have incompatible or outdated drivers
- Various applications, programs, or processes may be conflicting with the device’s functionality
- The cable connection between your computer and various hardware components is loose
- Malware infections have led to corrupted system files
After learning what may have led to the problem you are trying to solve, let us walk you through the needed solutions.
Fixes for Windows 10/Windows 11 KERNEL_DATA_INPAGE Error
You can apply the following solutions to resolve your computer’s Kernel Data BSOD error.
Fix 1: Run the CHKDSK command to repair the hard disk
Bad sectors or blocks and other hard disk issues are some of the major factors responsible for the Blue Screen of Death errors like the one you are struggling with. Hence, checking and repairing the disk via the CHKDSK command can help fix the issue. It is easy to execute this command using Command Prompt. Here is how to do it.
- The first step is to open Command Prompt. You can do this by entering Command Prompt in Windows search, right-clicking the first result, and choosing Run as administrator from the available options.

- After opening the elevated Command Prompt, input chkdsk /f /r /x (please remember to replace x with the letter of your hard disk) in the command line and press Enter.
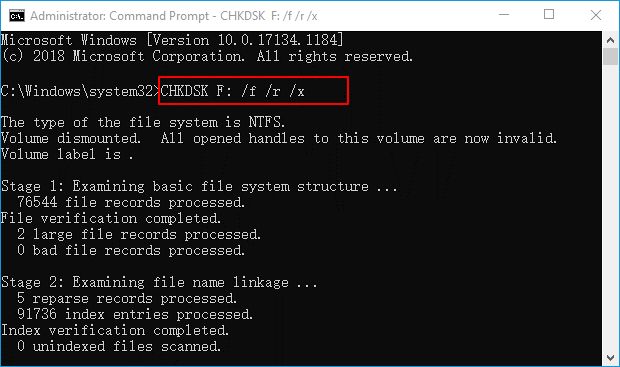
- Next, wait until the scan is complete.
- After the scan completes, press your keyboard’s Y key if you are asked to perform further repairs.
- Lastly, leave the Command Prompt and reboot your computer to complete the process.
Also Read: [FIXED] UNEXPECTED KERNEL MODE TRAP Error in Windows 10, 11(BSOD)
Fix 2: Perform Windows Memory Diagnostic
RAM problems, such as faulty, damaged, or corrupted RAM are another reason you may experience a KERNEL_DATA_INPAGE error. Windows Memory Diagnostics is a built-in Windows tool for solving such problems. Hence, you can take the following steps to use it.
- Firstly, use Windows Search to find and launch the Windows Memory Diagnostic tool.
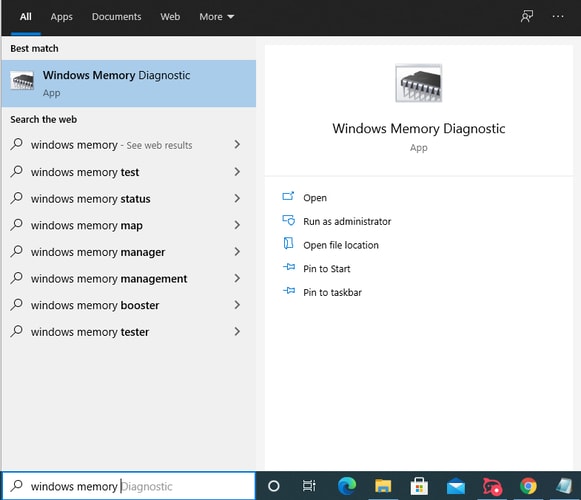
- Secondly, choose Restart now and check for problems (recommended) from the options on your screen.

- Lastly, allow the RAM checking process to complete and solve the detected problems.
Fix 3: Check your computer for malware infection
Malware infection may have corrupted the system files, leading to the problem you are trying to solve. Hence, you can follow the below steps to check your device for malware infection to fix the issue.
- Firstly, you are required to access your computer’s settings. You can use the Win+I shortcut command to do so.
- In the second step, choose Update & Security from the available settings.
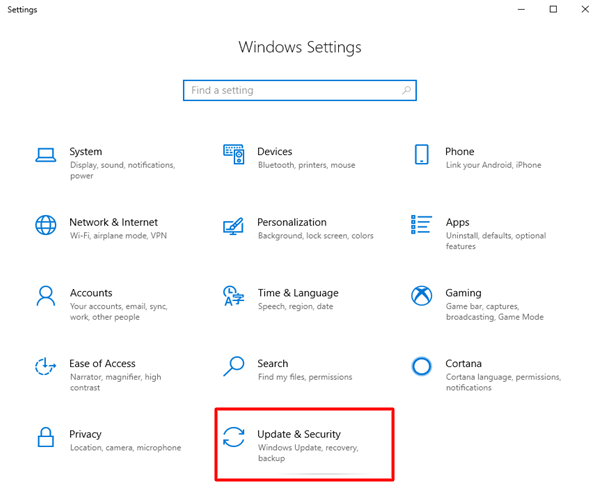
- Next, select Windows Security from the options available in the Update & Security menu.
- The Windows Security window will appear on your screen. You can now choose Virus & threat protection from the protection areas.
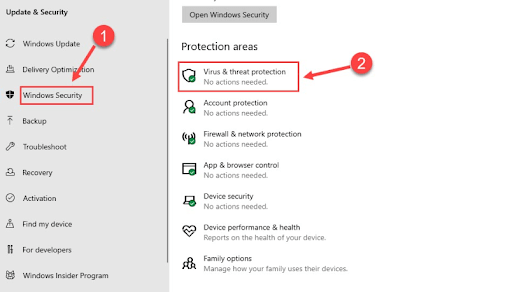
- Next, perform a Microsoft Defender Antivirus scan.
- Lastly, execute the required actions and restart your computer.
Note: If manual malware elimination is inconvenient for you, you can use one of the best antimalware/antivirus programs to perform the task conveniently and automatically.
Also Read: How to Fix Critical Process Died BSOD Error in Windows 10 {SOLVED}
Fix 4: Update your device drivers
Your computer system needs an interface, called a driver, to communicate with an attached peripheral. If the driver is outdated, this communication between the system and hardware breaks, which may lead to annoying problems, such as the Windows 11/Windows 10 KERNEL_DATA_INPAGE. Updating the drivers can fix this and many other issues. Hence, one of the most recommended solutions is to update the drivers.
You can update device drivers safely and automatically via the best driver update software, such as Win Riser. This software updates all problematic drivers with a single click, eliminates malware, removes junk, cleans invalid registries, rolls back drivers to their earlier version if any update-related issues occur, and offers many other incredible features. You can click the following link to download this incredible software to your computer.
After downloading and installing the software, you can follow these simple directions to update drivers and fix other issues with Win Riser.
- Firstly, let Win Riser perform a comprehensive system scan for a couple of seconds.
- Secondly, review the scan results and click Fix Issues Now to update drivers and solve problems automatically.

- Lastly, restart the computer to complete the process.
Fix 5: Clean boot your computer
Third-party software conflicts may have caused the error you are struggling to fix. Performing a clean boot can solve this problem. Hence, here is how to perform it.
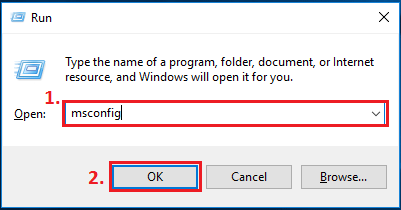
- Firstly, input msconfig in Windows search and select System Configuration from the on-screen results.
- Secondly, choose Services from the System Configuration window.
- You can now Hide all Microsoft Services.
- In this step, select all the on-screen services and Disable All of them.
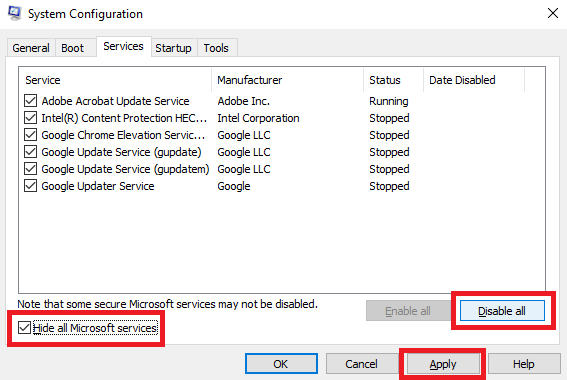
- Click OK and use the CTRL+ALT+DELETE shortcut to open the Task Manager.
- After opening the Task Manager, navigate to the Startup tab.
- Next, select all startup programs one after the other and Disable them.
- Lastly, click OK and reboot your PC to complete the process.
Also Read: MACHINE CHECK EXCEPTION BSOD in Windows 10 [SOLVED]
Fix 6: Check the cable connections
There is a possibility that IDE/SATA cables are loose or faulty. If this happens, you may encounter difficulties, including the one you are currently experiencing. Hence, you can ensure that the IDE/SATA cable is appropriately connected on all ends. You can also remove all external devices like USB, printer, etc., to fix the issue.
Fix 7: Perform an SFC scan
Running the System File Checker (SFC) utility through the Command Prompt can repair the corrupted files that may have caused the problem. Thus, here is how to do so.
- Firstly, use the Win+S shortcut command to access the Search utility.
- Secondly, input cmd in the on-screen search box, right-click on the first result, and choose Run as administrator from the context menu.

- Next, input sfc /scannow in the command line and press Enter.
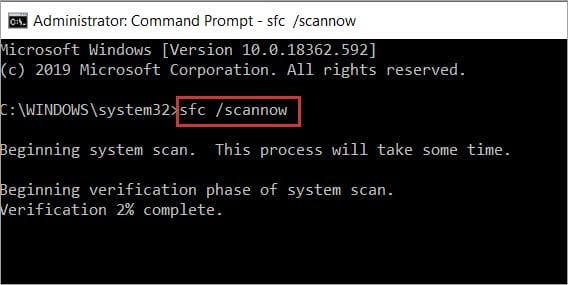
- Lastly, restart your computer after completing the system file checking and repair.
Also Read: How to Fix System Service Exception BSOD error on Windows 10
KERNEL_DATA_INPAGE Error Fixed
We believe one of the above solutions fixed the Blue Screen of Death error you were struggling to solve. However, if any confusion or questions remain unresolved, please leave a comment without any hesitation. We will be delighted to address all your queries. Also, do not forget to share this article with those who may find it helpful.


