Lexmark Printer Drivers Download & Update for Windows 11, 10, 8, 7
The post focuses on the simple methods to download and update Lexmark printer drivers for Windows 11, 10, 8, 7. Read on for more information.
Lexmark is an American-based company that is popular for manufacturing imaging products and laser printers. Irrespective of being one of the best manufacturers, many users who have acquired Lexmark printers recently complained about the unresponsive or bad performance of the printer. Don’t worry, if you are also experiencing issues with your Lexmark printer. Because the good news is that the issue can be solved easily & quickly just by updating the printer drivers.
Therefore, we have prepared this guide highlighting the best ways to download Lexmark printer drivers for Windows 10, 11 (64 bit/32 bit).
Methods to Download, Install and Update Lexmark Printer Drivers for Windows PC
No matter which Lexmark printer model you are using, there are always some methods available for you to update the related drivers. In this section, we put together 3 different ways to perform Lexmark printer drivers download on Windows 11, 10, 8, 7 PC. You can choose the one that suits you best.
Method 1: Manually Install Lexmark Printer Driver from Manufacturer’s Website
Like others, Lexmark also provides regular driver support for their devices. So, if you are familiar with the technical specifications or the model that you are using. Then, you can use this method to download and install Lexmark printer drivers for Windows 7, 8, or higher versions. However, this may take some more time than usual. But, still, if you want to try this, follow the steps outlined below:
- Visit the official website of Lexmark.
- Scroll down until you see the Driver & Downloads option. Then, click on it to proceed.

- In the search box, enter the model name or a serial number of your Lexmark product and hit the Enter key from your keyboard.
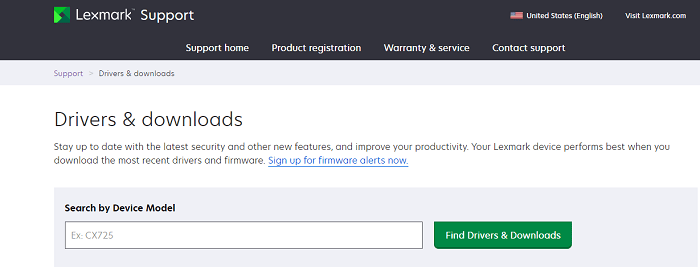
- Next, choose the compatible version of Windows OS and Language type. Later, click on the Submit option.
- Now, find the relevant driver file for your Lexmark printer and click on the Download button.
Once done, then click double on the downloaded driver file and comply with the installation wizard to install the required drivers for Lexmark printers.
Also Read: Printer Driver Is Unavailable On Windows 10 [Fixed]
Method 2: Run Windows Update to Download Lexmark Printer Drivers
The user can also try to download and install the latest version of Lexmark printer drivers by Windows Update. To use this method, all you need to do is just follow the steps below:
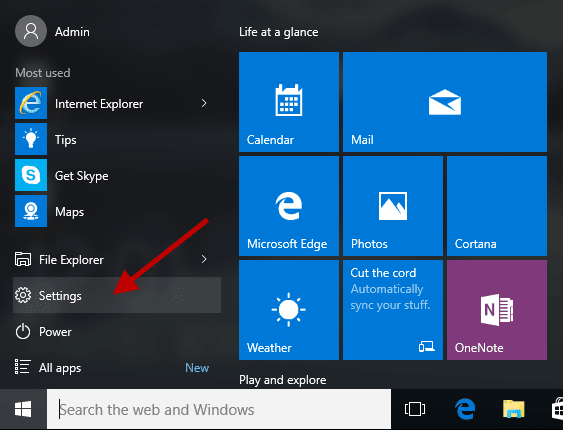
- Go to the Start, then hover over the gear (Settings) icon and click on it.
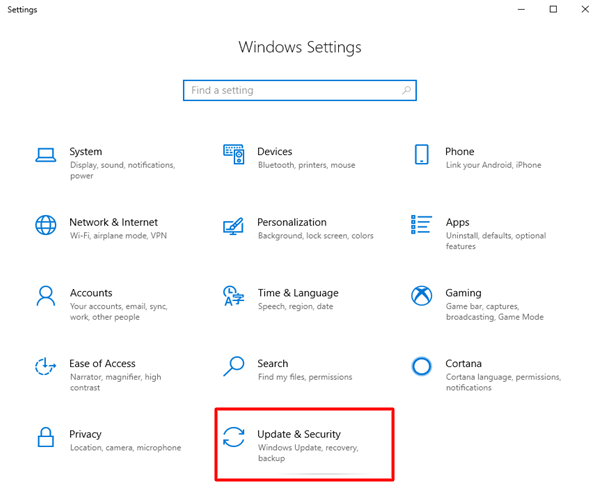
- In the Windows Settings, find and click on the Update & Security option.
- Make sure Windows Update is selected from the left menu pane in the next window. If not, then choose to proceed.
- Next, click on the Check For Updates.
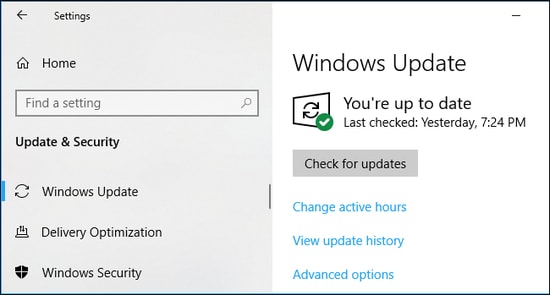
Now, let the Windows Update process take effect, and install the latest Lexmark driver updates on your PC. Once everything is done, then reboot your computer.
Method 3: Use Bit Driver Updater to Automatically Update Lexmark Printer Driver (Recommended)
Sometimes, Windows lags finding the compatible or most up-to-date drivers. And, installing the drivers manually from the official website of the manufacturer can be error-prone or daunting. Hence, we recommend you use any reliable third-party driver updater program to automatically and hassle-free update the PC drivers.
Anyways, there are plenty of driver updater tools available in the market, and it’s very hard to find the ideal one. Isn’t it? Nothing to worry about, you can give Bit Driver Updater a try. It is one of the most accessed driver updater utility tools and is popular for efficient functioning.
Bit Driver Updater automatically finds the system and then searches for the most suitable drivers for it. Not only that, but the utility also has the potential to maximize the overall performance of the PC. Furthermore, with the pro version of Bit Driver Updater, one can easily update all outdated PC drivers with two easy clicks of the mouse. Otherwise, you can continue with the free version, however, it takes a longer time than usual because the free version is partly manual. That means you need to update drivers one by one.
Here are the steps that you need to follow in order to update Lexmark printer drivers using Bit Driver Updater:
- Download Bit Driver Updater from the button below.

- Double click the downloaded file and follow the installation wizard to complete the process.
- After installation, run the driver updater solution on your computer system and click on the Scan button from the left panel.
- Next, you need to wait for the scanning to be finished.
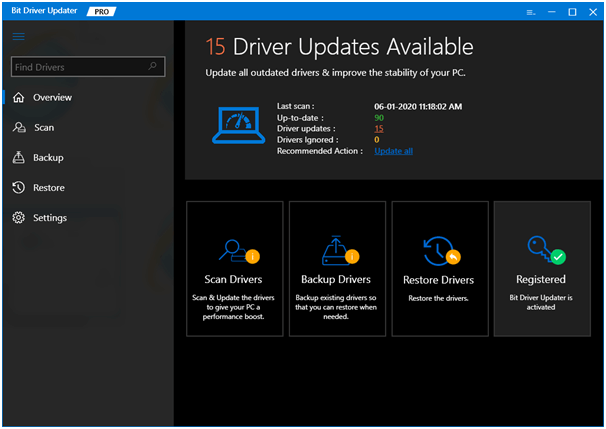
- Once done, then go through the scan results, and find the problematic Lexmark printer driver. Then, click on the Update Now button shown next to the printer driver.
- As said, if you are using the pro version, then you can also click on the Update All button. This will help you install the latest version of all system drivers.
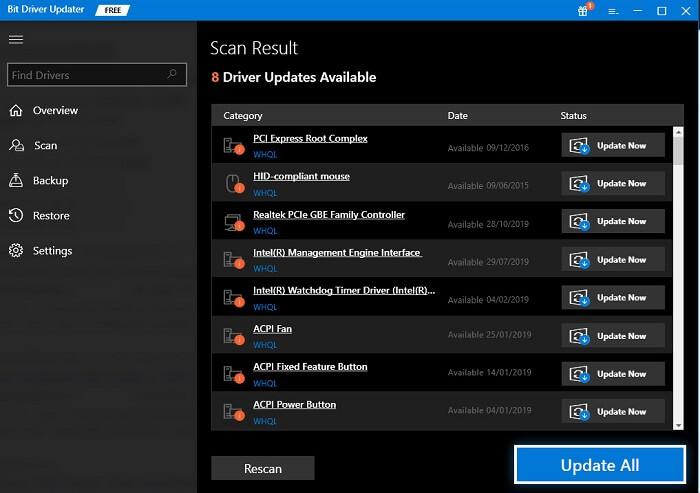
That’s all! See how simple it is to perform driver update via Bit Driver Updater. Undoubtedly, this is the best and non-cumbersome approach to deal with driver errors or problems.
Also Read: Best Free Driver Updater for Windows
Frequently Asked Questions (FAQs)
Here we are going to answer the most commonly asked questions regarding Lexmark printer driver free download for Windows 10, 11, or older versions.
How Do I Scan From a Lexmark Printer to My Computer?
For scanning a document from your Lexmark printer to your PC, you need to first make sure that your system and printer both are firmly connected to the same network. Thereafter, follow the steps below:
- Invoke the printer’s folder, then choose your preferred printer.
- Launch the properties of the printer and then change the settings as required.
- Next, go to the Control Panel and then choose the right scan setting.
A Point to Remember: If your printer device isn’t mentioned in the list, then first add your printer.
How Do I Install Lexmark Printer Software?
Head to Lexmark’s official website and then choose your printer model and operating system. Then, run the software installer and go with the onscreen instructions to complete the Lexmark printer software installation process on your Windows PC. Apart from this, you can also install the software with the help of an installation CD that came with your printer at the time of purchase.
How Do I Update My Lexmark Printer Driver?
To update the Lexmark printer drivers on Windows PC you can either use Windows default tool Device Manager or visit the official website of Lexmark. Apart from that, you can also use any reliable third-party driver updater program like Bit Driver Updater to automatically and hassle-free complete the task of updating the Lexmark printer drivers.
Download, Install and Update Lexmark Printer Driver on Windows: Performed
In sum, through this driver-guide, users can detect, download, and install the correct Lexmark printer driver for Windows 11, 10, 8, 7 (32-bit and 64-bit). We hope you find this installation guide helpful. Please let us know in the comments below if you have any questions or further suggestions regarding the same.
For more tech-related articles or information, do subscribe to our Newsletter and also follow us on our Social Media accounts: Facebook, Twitter, Instagram, and Pinterest.


