Read to know about the easiest ways to fix Oculus Controller not working issue.
Are you having a problem accessing your Oculus controller with Quest 2 or Rift? If yes, then you are not alone. There are numerous users out there facing tracking issues or erratic blackouts with the Oculus controller. The issue could arise due to obsolete device drivers, inaccurate USB power settings, faulty or broken USB cables/ports, and more.
Whatever the cause is, the issue is solvable too. We have prepared this guide to help you troubleshoot and fix Oculus controller not working properly. But, before getting started, reconnecting the controller, removing or replacing the batteries in your respective controller is recommended. Then, test if the controller is working properly. If the Oculus controller still remains unresponsive then keep reading for more information.
In this section, we are going to put together the 5 simplest but effective tactics to fix Oculus controller not working on PC. However, you do not need to give all of them a try, just work your way down until you get an ideal solution for you. Now, without further ado, let’s get started:
When your Oculus controller becomes unresponsive and fails to coordinate with its prime service, then you may encounter can’t reach Oculus runtime service error, which eventually hinders the functioning of your controller. If that is the case, then you will need to reboot the Oculus Runtime service. If you don’t know how to do that, then follow the steps below:
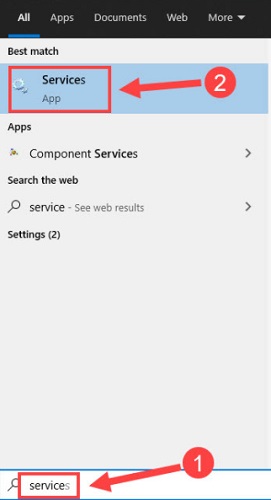
Step 1: In the search box of the Windows, write Service and choose Services.


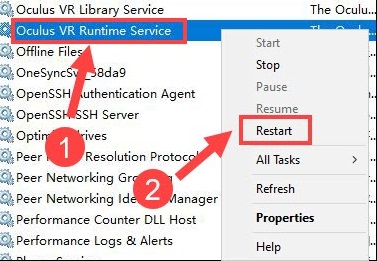
Step 2: This will take you to the Services window, wherein you need to navigate to the Oculus VR Runtime Service and make a right on it.
Step 3: Lastly, click on Restart as shown in the image below.


Once done, reboot your computer as well as the Oculus application to check if the controller works fine. If it does not work as expected, then you need to try another fix.
Also Read: How to Download WD SES Device USB Device Driver for Windows 10
Another way to fix the Oculus controller not working is to disable the USB Selective Suspend feature. It is a Windows feature that puts specific USB ports in the suspend condition just in order to save your PC from utilizing unnecessary energy or power. It’s likely to interfere with your Oculus VR rig and prevent it from working correctly. So, it would be a nice move to turn off the USB power saving. To do so, follow the steps outlined below:
Step 1: Go to the Windows search box and write a power plane in it.
Step 2: Then, choose Edit power plan.
Step 3: After that, click on Change advanced power settings.
Step 4: Next, double-click on USB settings to expand the same category.
Step 5: Locate the USB selective suspend setting and click double on it.
Step 6: Now, you need to choose Disabled as an option from the drop-down menu list next to Setting.
Step 7: Lastly, click on OK.
After performing the above steps, check to see if the issue is fixed. If the Oculus controller is not turning or responding, then move on to the next solution.
When it comes to PC performance and hardware devices, drivers matter a lot. In order to ensure that your VR rig works smoothly with the Oculus Quest 2, Rift, or Rift S, you should install the latest drivers on your PC frequently.
You can either search for the correct drivers manually or automatically.
To install drivers manually, you need to visit the official support page of Oculus and then download the correct driver installer according to your Windows operating system. But it is worth noting that this requires a lot of time and complete computer knowledge.
So, if you don’t have the required time or computer skills to install drivers manually, then you can do it automatically with Bit Driver Updater.
It is one of the most trusted and safest driver updater utilities that automate the entire process of finding and installing the correct version of drivers on your computer. You can automatically update your outdated device drivers either with its free version or pro version. However, the pro version just takes two clicks of the mouse, also, lets the users perform bulk driver downloads at once. Whereas, the free version updates drivers one by one as it is partly manual.
Below are the steps on how to update device drivers through Bit Driver Updater:
Step 1: Get the setup file of Bit Driver Updater from the download button provided below.
Step 2: Run the installer and follow the installation wizard to complete the process.
Step 3: Launch the Bit Driver Updater and click the Scan button to detect problematic drivers.
Step 4: After that, check the scan results and click on Update Now alongside the driver you wish to update.
Step 5: And, if you wish to update multiple drivers at a time, then click on Update All.
Once the latest driver updates are installed, restart your PC and try to test your Oculus VR headset and controller. If still your Oculus controller not showing up, then proceed with other solutions.
Also Read: How to Fix Critical Structure Corruption Error in Windows 10
The Oculus controller not working issue is likely to happen if you have too many programs and applications running in the background and they are clashing with your Oculus application. To check if that is the actual cause, simply closing all the unnecessary background applications or processors is suggested. Here is how to do that:
Step 1: Click right on any empty space on your taskbar and choose Task Manager from the available options.
Step 2: Now, find and right-click on the programs or apps that you are not using currently.
Step 3: Lastly, click on End Task to complete the process.
After shutting down the unnecessary applications, try to access your Oculus controller just to check whether the controller is functioning properly or still not responding. Try the last resort, if the problem persists.
Nothing has helped from above? Don’t worry, this resort might work for you. As per some reports, the wrong installation of the Oculus application can lead to improper functioning of the VR rigs. Luckily, it is not that tougher to fix this problem. You can easily repair the Oculus app by following the simple steps provided below:
Step 1: To get started, you need to first visit the official Oculus Setup page.
Step 2: Then, make a click on Download Software to proceed further.
Step 3: If a prompt appears asking for your confirmation, then click on Yes.
Step 4: Wait to complete the download. After that, run the downloaded file and click on Repair.
This may take a couple of minutes to complete the repair process. Once it’s done, reboot your computer, later on, launch the Oculus application again to test the issue. Hopefully, your Oculus controller goes back to its original state and works as expected.
Also Read: How to Fix INET_E_RESOURCE_NOT_FOUND in Windows 10
Thus, by trying the above-explained ways you can easily resolve the issues with your Oculus controller and make it work again. Hopefully, this troubleshooting guide on how to fix Oculus controller not working is helpful.
Please drop your queries and further suggestions in the comments box below. Also, if you want to read more troubleshooting tips then do subscribe to our Newsletter. Additionally, get regular tech updates through Facebook, Twitter, Instagram, and Pinterest.
If you also want to place some bets on games this IPL season, here are…
If you wish to download and update the RNDIS device driver for Windows 10/11 or…
In the event that you are interested in executing the Bose Headset drivers download and…
If you are also facing the Guided Access not working issue on your iOS (iPhone)…
If you are looking for the best privacy screen protector to use the smartphone freely…
If you are looking for the perfect alternative to Apple Pay, refer to the Apple…